What Is Word Document Generation Service?
The Word Document Generation Service, a service that utilizes Word templates, efficiently populates data into templates to generate the PDF and Word documents that customers require.
Where to Use Word Document Generation Service?
In the insurance industry, document generation is necessary, particularly for proposals and claim steps where documents need to be sent to customers. In the past, the company used Crystal Reports and Jasper Reports to create templates. However, these design tools were complex and the development was challenging, often requiring 10 man-days to complete the entire development and testing process for each template.
The Word version of the printing service uses Word to design templates, significantly reducing the time required for template creation.
- Advantages: Easy to learn and use.
- Disadvantages: Excel format is not yet supported, making it inconvenient to create reports, and the function remains undeveloped for the time being since there is no team that has explicitly raised this demand.
How to Use Word Document Generation Service?
Quick Start
- Design and upload templates
- To download the sample template, visit the provided address: Word Document Generation - Syntax
- Click the card’s setting to upload your template. For more information on template maintenance, see Template Management
- Generate PDF
- Call the API to generate PDF.
    curl --location --request POST 'https://portal-gw.insuremo.com/eBao/1.0/print/template' \
    --header 'Authorization: Bearer -jIWXA************XdBu37mw' \
    --header 'Content-Type: application/json' \
    --data-raw '{
    "templateName": "Certificate of Currency",
    "version": 0,
    "outputFormat": "docx",
    "mapping": {
        "ProductName": "Personal Accident",
        "ProductCode": "PAD",
        "PolicyNumber": "PAD00002901",
        "FirstName": "Jack",
        "LastName": "Smith",
        "Commission": 61.2,
        "DiscountPercent": 30,
        "DuePremium": 408,
        "EffectiveDate": "2021-06-05",
        "ExpiryDate": "2022-06-05",
        "PolicyCoverageList": [
            {
                "ProductElementCode": "C00008",
                "CoverName": "Accidental Death",
                "SumInsured": "1000000"
            },
            {
                "ProductElementCode": "C00008",
                "CoverName": "Accidental Death",
                "SumInsured": "1000000"
            },
            {
                "ProductElementCode": "C00011",
                "CoverName": "Medical Benefits",
                "SumInsured": "150000",
                "PolicyBenefitList": [
                    {
                        "ProductElementCode": "B00044",
                        "BenefitName": "Medical Benefits Limit",
                        "BenefitDescription": "Pay up to 45% of Sum Insured towards medical expenses or specified limit, whichever is lower incurred as an In-patient for accidental injury",
                        "Limit": "50,000 per incident, maximum of four per year"
                    },
                    {
                        "ProductElementCode": "B00045",
                        "BenefitName": "Surgical Dental Benefits Limit",
                        "BenefitDescription": "Pay up to 10% of Sum Insured towards surgical dental expenses or specified limit, whichever is lower.",
                        "Limit": "5,000 per incident, maximum of 2 per year"
                    },
                    {
                        "ProductElementCode": "B00045",
                        "BenefitName": "Routine Dental Benefits Limit",
                        "BenefitDescription": "Pay up to 5% of Sum Insured towards routine dental expenses or specified limit, whichever is lower.",
                        "Limit": "1,000 per incident, maximum of 4 per year"
                    }
                ]
            },
            {
                "ProductElementCode": "C00012",
                "CoverName": "Lifestyle Benefits",
                "SumInsured": "20000",
                "PolicyBenefitList": [
                    {
                        "ProductElementCode": "B00050",
                        "BenefitName": "Gym Benefit",
                        "BenefitDescription": "Free gym access in our Lifestyle Network, payment towards your gym membership or visits to other locations.",
                        "Limit": "Up to $500 per year for ad-hoc visits or other gym membership."
                    },
                    {
                        "ProductElementCode": "B00053",
                        "BenefitName": "Fitness Device Benefit",
                        "BenefitDescription": "Discount on a fitness devices, such as Watch or Fitness Tracker, At-home fitness equipment, fitness clothing. See PDS for more details.",
                        "Limit": "25% discount, or equivalent reimbursement on non discounted items, unlimited items."
                    },
                    {
                        "ProductElementCode": "B00045",
                        "BenefitName": "Routine Doctor Visit",
                        "BenefitDescription": "Free doctor visits in our Lifestyle Network, or payment towards non-network doctor visits for routine checkups.",
                        "Limit": "Reimbursement of out-of-network doctor visits (excludes treatment costs) up to $100 per visit."
                    }
                ]
            }
        ]
    },
    "instructions": [
        {
            "instructionType": "Condition",
            "variableName": "HasCoversWithBenefits",
            "expression": "var hasBenefit = false; for (cov : data.PolicyCoverageList) { if (not empty(cov['\''PolicyBenefitList'\'']) and cov['\''PolicyBenefitList'\''].size() > 1) { hasBenefit = true } } return hasBenefit",
            "expressionResultType": "bool"
        },
        {
            "instructionType": "Transform",
            "variableName": "CoversWithBenefits",
            "expression": "var benefits = [...]; for (cov : data.PolicyCoverageList) { if (not empty(cov['\''PolicyBenefitList'\'']) and cov['\''PolicyBenefitList'\''].size() > 1) { benefits.add(cov)} } return benefits",
            "expressionResultType": "list",
            "transformResultPath": "CoversWithBenefits"
        }
    ]
}'
Word Document Generation - Introduction
Generating insurance documentation has always been a complex and costly process. The insurance policy data need to be merged with pre-developed templates to produce the final document.
Common types of insurance documents include:
-
Quote letters
-
Policy documents (describing what is covered and what is not)
-
Policy wordings and product disclosure documentation
-
Communication emails
The requirements for insurance documentation are complex:
-
Multiple branding styles
-
Many regulatory-driven formatting requirements
-
Complex merging of policy data – including tables, financial, and insurance-related information
-
Ability to generate PDFs or Word documents
-
Securing provided PDF with a password
How Can the Word Document Generation Service Help?
-
It empowers product designers to quickly design insurance documentation in Word format, which we refer to as Document Templates.
-
The document designer can embed placeholders in the template to indicate where policy data can be inserted.
-
Subsequently, the Word Document Generation service utilizes this template, merges it with JSON-formatted policy data, and generates a final document version for any specific policy.
-
Advantages:
- Quick and easy to design templates in Word
- Easy to merge policy data in
Word Document Generation - Syntax
This section discusses the syntax used to create the template.
Please see the examples: Word Docgen Sample.zip
To generate a document, we need at least two things: the first is the document template, and the second is the template data used to create the final document. Optionally, we also provide printing instructions, which are additional commands and data that can help the template and data generate the document.
In summary, we have:
-
Document template - A Microsoft Word document with template markup.
-
JSON data - Data used to generate the document from the template. The data is mapped into the template using the path to the data item in the JSON structure, hence we call this the mapping data.
-
Print instructions - For more advanced and programmatic features, print instructions can perform extra operations on the template and mapping data while generating the document.
Now that you understand the main components required for document generation, we will discuss the syntax of how to create a template. The syntax includes several types of constructs that can be mixed to form powerful document building templates. Here is an overview:
-
Field replacement - This is the simplest type of syntax that allows you to replace markers with data from the mapping input. It’s the most commonly used type of syntax for inserting data such as names, addresses, cover details, sum insured, and other information contained in the data mapping.
-
Repeating fragments - You can repeat fragments within a document by surrounding them in the repeating fragment syntax. This allows you to generate repeating data, like lists.
-
Conditional fragments - These fragments allow you to include or exclude parts of a document or text based on a logic script or expression. The logic is stored in the print instruction.
Now that you know the types of constructs you can use to build your document template, we will discuss the details of each type of syntax.
Field Replacement Markers
The most basic syntax involves replacing a marker in the template with data from a field in the mapping. The syntax is as follows:
DataPath|variableName
You must enclose the marker in the double angle brackets like so, MARKER. Inside the marker, the first part is the Path or Name that maps into the supplied JSON data. It is followed by a separation character ”|” and then a variable name, which you can call whatever you like.
Let’s look at an example using some sample JSON data:
{
  "FirstName": "Jane",
  "LastName": "Smith",
  "Address": {
    "AddressLine1": "223 Charlotte Ave",
    "AddressLine2": "Sydney, NSW, 2000",
  }
}
Some variables we could use in our document might include:
<<FirstName|name>>
<<LastName|surname>>
<<Address.AddressLine1|address1>>
<<Address.AddressLine2|address2>>
As you can see, the first part of the marker maps to the JSON data given above. The dot ”.” can be employed to traverse the hierarchy of the data.
Repeating Data Fragments
When accessing lists of data from the mapping, you may wonder how to handle repeating output. Lists and repeating elements are common in documents, and they can be formatted as bullet points, numbered lists, tables, or just some repeating fragment of text (such as a title and document content). Accessing and marking up the repeating data is done using a Repeating Fragment, and the syntax is as follows:
<<Fragment_DataPath|variableName>>
<<EndFragment>>
Between the start of the fragment (<<Fragment_XXX>>) and the end of the fragment (<<EndFragment>>), you can place any document formatting, including Field markers or other syntax (such as Conditions). Field markers support repeating elements by using the square bracket notation ”[ ]” at the end of the list.
Let’s look at an example, extending our previous JSON data.
{
  "FirstName": "Jane",
  "LastName": "Smith",
  "Address": {
    "AddressLine1": "223 Charlotte Ave",
    "AddressLine2": "Sydney, NSW, 2000",
  },
  "PolicyCoverList": [
     {
        "CoverName": "Building Property Cover",
        "SumInsured": 100000
     },
     {
        "CoverName": "Contents Cover",
        "SumInsured": 60000
     }
  ]
}
To simplify the list of insurance cover taken, we have only included the name of the insurance cover and the sum insured amount. To present this information in our document, we can use the following markup: <<Fragment_PolicyCoverList[]|item>>.
You have selected <<PolicyCoverList[].CoverName|cover>> to cover for an amount of $<<PolicyCoverList[].SumInsured|amount>>
<<EndFragment>> When the document is generated, the output will appear as follows:
You have selected Building Property Cover to cover for an amount of $100000.
You have selected Contents Cover to cover for an amount of $60000.
Conditional Printing Fragments
There are scenarios where you might only want to print a fragment of the document under certain conditions. For example, if the Sum Insured exceeds $1 million, or if a particular coverage has been taken. This is considered a more advanced topic as it involves processing some logic, yet hopefully most conditions only require some basic logic. We now explain the syntax of this fragment:
<<Condition_ConditionName|variableName>>
<<EndCondition>>
The ConditionName is unique and specific to each condition expression, but it can be reused throughout the document. The condition expressions are defined in a JSON document referred to as Print Instructions. The print instructions assist in the generation of the document by providing enhanced processing data and logic.
Let’s look at an example:
{
  "FirstName": "Jane",
  "LastName": "Smith",
  "Address": {
    "AddressLine1": "223 Charlotte Ave",
    "AddressLine2": "Sydney, NSW, 2000",
  },
  "PlanType": "Individual",
  "PolicyCoverList": [
     {
        "CoverName": "Building Property Cover",
        "SumInsured": 100000
     },
     {
        "CoverName": "Contents Cover",
        "SumInsured": 60000
     }
  ]
}
We have added a new field called PlanType to the data, and we will use this to create some conditions in the document and output a different document fragment based on the selected plan type.
<<Condition_HasFamilyPlanType|family>>
You have selected the Family plan, and this plan entitles all listed beneficiaries with the full benefits of your policy.
<<EndCondition>>
<<Condition_HasIndividualPlanType|individual>>
You have selected the Individual plan, and this coverage is tied to you and follows you wherever you go.
<<EndCondition>>
The ConditionName component is specified in the Print Instructions JSON data as follows. Ensure that the instructionType is set to “Condition” and the variableName matches the corresponding condition name. For the expression, we are checking if the PlanType is either “Family” or “Individual”.
[
  {
    "instructionType": "Condition",
    "variableName": "HasFamilyPlanType",
    "expression": "data.PlanType == \"Family\"",
    "expressionResultType": "bool"
  },
  {
    "instructionType": "Condition",
    "variableName": "HasIndividualPlanType",
    "expression": "data.PlanType == \"Individual\"",
    "expressionResultType": "bool"
  }
]
The expression itself uses a language called JEXL. This language bears a resemblance to numerous other expression languages, so if you have used expressions in the past, this might be familiar to you.
You can find the detailed syntax for JEXL at this link: JEXL Syntax
Additionally, there are some unique variables within the expression context that can be employed in constructing your expressions. For example, to access any of the mapping data, you must prefix the expression path with “data”.
| Variable Name | Description |
|---|---|
| Data | This variable holds the JSON data passed in by the “mapping” variable. |
| Item | The current item of a list in a repeating fragment. |
Referencing Repeating Objects in Conditions
In version 1.09 of the service and later.
For conditions where you require a reference to the current object, you need to include the path to the repeating list or the property you want. This slight difference in syntax from basic conditions enables tracking of the repeating object. You can find examples in the Word Docgen Samples zip file (at the top of this document) under the folder “Conditions in Repeating tables”. For this template, it would be:
<<Condition_Insureds[].Number|IsOdd>>
Make sure that the variableName is at the end, following the ”|” symbol. In the instruction, you can make reference to the new “value” property, which will store the value of the path Insureds[].Number
  {
    "instructionType": "Condition",
    "variableName": "IsOdd",
    "expression": "value % 2 != 0",
    "expressionResultType": "bool"
  }
Or if you just want the current object, you could mark the condition like this:
<<Condition_Insureds[]|IsOdd>>
The instruction expression has been updated to “value.Number” as it will be the object stored in “value”, not the “Number” property.
  {
    "instructionType": "Condition",
    "variableName": "IsOdd",
    "expression": "value.Number % 2 != 0",
    "expressionResultType": "bool"
  }
There is also an “index” property of the current object, you could update your expression as follows:
  {
    "instructionType": "Condition",
    "variableName": "IsOdd",
    "expression": "data.Insureds[index].Number % 2 != 0",
    "expressionResultType": "bool"
}It is advisable to have the Condition_ and EndCondition in their own row/cell as that row will be removed once the document is generated.
Rich Inserts
Another scenario calls for inserting rich data into the document. For example, a generated QR Code or other generated images. We will now explain the syntax of this fragment:
<<Instruction_InstructionVariableName>> <<EndInstruction>>
The InstructionVariableName is crucial, as it must be a unique identifier within the set of instructions, yet you can reuse this fragment throughout the document. The rich instructions are included in a JSON document called Print Instructions (the same as Conditional Instructions). These print instructions assist in the document generation by providing enhanced processing data and logic.
Let’s look at an example, and you can add the following fragment to your template:
<<Instruction_InsertPolicyQRCode>> <<EndInstruction>>
In the above rich instruction fragment, “InsertPolicyQRCode” is the unique variable name in the instructions. Optionally, you can specify the imageWidth or imageHeight in pixels (e.g., “250”) or as a percentage (e.g., “80%”). Additionally, you need to provide the base64-encoded image data in the base64Data property. For instance, a corresponding instruction would be something like this:
[
  {
    "instructionType": "RichImage",
    "variableName": "InsertPolicyQRCode",
    "expression": "true",
    "imageWidth": "80%",
    "imageHeight": "80%",
    "base64Data":  "iVBORw0KGgoAAAANSUhEUgAAAAgAAAAIAQMAAAD+wSzIAAAABlBMVEX///+/v7+jQ3Y5AAAADklEQVQI12P4AIX8EAgALgAD/aNpbtEAAAAASUVORK5CYII"
  }
]
This would covert the base64Data to an image and insert it in place of the fragment. The following table describes the properties you can pass with the RichImage instruction.
| Property | Required / Optional | Value / notes |
|---|---|---|
| instructionType | Required | RichImage – value should be RichImage |
| variableName | Required | Should match the name after Instruction_InstructionVariableName |
| Expression | Optional | Expression to evaluate if image will be printed |
| imageWidth | Optional | Width of image in pixels (e.g., 100, 249.87) or percent written like “78%“. Default image size will be used if not specified (100%) |
| imageHeight | Optional | Same as imageWidth for the height. Default image size will be used if not specified (100%) |
| base64Data | Required | Image to be printed encoded in base64 format. Do not include any data prefix like “data:image/png;base64,” |
Please visit the Demos & Examples pages to download the examples zip file, or you can get it here: Word Docgen Sample.zip
This zip file includes the Certificate of Currency folder for this example.
Transformation Instructions
In version 1.0.32 of the service and later.
In some cases, you may wish to transform a value in the mapping model rather than provide pre-transformed data to the word service. Some example may include formatting a premium amount, inserting the current system date or transforming a code value such as “F” to “Female”. You can use JEXL syntax with the transformation instruction to create new variables in the model.
In the following example we set the instructionType to “Transform” these instructions are executed before the template is processed. The transformationResultPath is the property the value will be stored against in the model, so you could output the transformed result using the variable syntax <<DuePremiumFmt|duePremiumFormatted>>
  {
    "instructionType": "Transform",
    "variableName": "DuePremiumFmt",
    "expression": "util.formatNumber(\"$ %,.2f\", data.DuePremium)",
    "expressionResultType": "String",
    "transformResultPath": "DuePremiumFmt"
  }
The util class has a number of methods you can call that make it easier to quickly format and transform data.
| Util Method | Description | Example |
|---|---|---|
util.systemDateFormat(1) | Generate the current system date in various formats: 0 – Full (shown below) 1 – Long (shown below) 2 – Medium 3 – Short | { “instructionType”: “Transform”, “variableName”: “SystemDateLong”, “expression”: ” ${ util.systemDateFormat(1) }“,“expressionResultType”: “String”, “transformResultPath”: “SystemDateLong” } |
util.systemDateTimeFormat(3, 3) | Generate the current system date & time in various formats: 0 – Full (shown below) 1 – Long (shown below) 2 – Medium 3 – Short The above values work for the date style & time style | { “instructionType”: “Transform”, “variableName”: “SystemDateTimeShort”, “expression”: ” ${ util.systemDateTimeFormat(3,3) }“,“expressionResultType”: “String”, “transformResultPath”: “SystemDateTimeShort” } |
| util.convertDate(data.ExpiryDate, “yyyy-MM-dd’T’HH:mm:ss”, “dd/MM/yyyy”) | Uses SimpleDateFormat syntax here: Simple Date Format Syntax | { “instructionType”: “Transform”, “variableName”: “ExpiryDateUSA”, “expression”: “util.convertDate(data.ExpiryDate, “yyyy-MM-dd’T’HH:mm:ss”, “dd/MM/yyyy”)“, “expressionResultType”: “String”, “transformResultPath”: “ExpiryDateUSA” } |
| util.formatNumber(”$ %.2f”, data.DuePremium) | The number formatting as formatNumber uses the String.format() method, see the reference here: Number Format Syntax | { “instructionType”: “Transform”, “variableName”: “DuePremiumFmt”, “expression”: “util.formatNumber(”$ %,.2f”, data.DuePremium)“, “expressionResultType”: “String”, “transformResultPath”: “DuePremiumFmt” } |
Special Document Setting Instructions
At times there are special document properties and attributes that you may want to control beyond the document output, for example PDF security settings. “Setting” instructions allow you to update and control various document settings.
Text Watermark
You may wish to generate the document with a watermark, for example for test documents. This setting allows you to configure the watermark feature in word documents.
"instructions": [
  {
    "instructionType": "Setting",
    "variableName": "TextWatermark",
    "settings": {
      "fontFamily": "Arial",
      "fontSize": 105,
      "rgbColor": "80, 60, 82",
      "layout": "diagonal",
      "semiTransparent": true,
      "text": "UAT Testing"
    }
  }
]| Setting | Description |
|---|---|
| fontFamily | Font to output the text watermark |
| fontSize | Font size of the text watermark |
| rgbColor | Red, green, blue colour values for the text watermark |
| semiTransparent | True or False to have the image semi-transparent out |
| text | The text value you want to output to the watermark |
Image Watermark
You can also add an image watermark using the following setting instruction.
Provide either a base64 encoded image string, or a URL to a the image file.
{
  "instructionType": "Setting",
  "variableName": "ImageWatermark",
  "settings": {
    "imageBase64": "",
    "imageURL": "https://insuremo.com/wp-content/uploads/2023/03/newinsuremologo.png",
    "imageScale": "1.5",
    "washout": false
  }
}| Setting | Description |
|---|---|
| imageBase64 | Provide the image as a base64 string |
| imageURL | Provide the image as a URL to an image file |
| imageScale | Optional setting to scale the image |
| washout | True or False to have the image washed out (semi-transparent) |
PDF Security
When supplying a password via the password attribute it will encrypt the PDF and require a password to open. This setting allows you to set which features are allowed in password protected documents.
"instructions": [
    {
        "instructionType": "Setting",
        "variableName": "PdfPermissions",
        "settings": {
            "fillIn": false,
            "highResolutionPrinting": false,
            "modifyContents": false,
            "documentOpenPassword": false,
            "contentCopy": false,
            "modifyAnnotations": false,
            "contentCopyForAccessibility": false,
            "documentAssembly": false,
            "printing": false
        }
    }
]
PDF Compliance
You can change the PDF compliance version by adding the following Setting instruction.
"instructions": [
  {
    "instructionType": "Setting",
    "variableName": "PdfCompliance",
    "settings": {
      "pdfCompliance": "PDF_A_1_A"
    }
  }
]
You can set the “pdfCompliance” value to one of the following:
| Value | Description |
|---|---|
| PDF_17 | Set the “Compliance” property to “PdfCompliance.Pdf17” to comply with the “1.7” standard. |
| PDF_20 | Set the “Compliance” property to “PdfCompliance.Pdf20” to comply with the “PDF 2.0” (ISO 32000-2) standard. |
| PDF_A_1_A | Set the “Compliance” property to “PdfCompliance.PdfA1a” to comply with the “PDF/A-1a” standard, which complies with “PDF/A-1b” as well as preserving the document structure of the original document. |
| PDF_A_1_B | Set the “Compliance” property to “PdfCompliance.PdfA1b” to comply with the “PDF/A-1b” standard, which aims to preserve the visual appearance of the document as Aspose.Words convert it to PDF. |
| PDF_A_2_A | The output file will comply with the PDF/A-2a (ISO 19005-2) standard. |
| PDF_A_2_U | The output file will comply with the PDF/A-2u (ISO 19005-2) standard. |
| PDF_A_4 | Set the “Compliance” property to “PdfCompliance.PdfA4” to comply with the “PDF/A-4” (ISO 19004:2020) standard, which preserving document static visual appearance over time. |
| PDF_UA_1 | Set the “Compliance” property to “PdfCompliance.PdfUa1” to comply with the “PDF/UA-1” (ISO 14289-1) standard, which aims to define represent electronic documents in PDF that allow the file to be accessible. |
PDF Duplex
Some PDFs require the PDF to generate with a final blank page for printing a physical document double-sided. This setting will ensure the PDF is compatible for duplex printing.
{
  "instructionType": "Setting",
  "variableName": "Duplex",
  "settings": {
    "enabled": true,
    "clearHeaderFooter": true
  }
}| Setting | Description |
|---|---|
| enabled | True or False value to enable or disable duplex printing |
| clearHeaderFooter | True or False value if you also want any headers or footers removed on the final page. |
Word Document Generation - API Details
This section discusses the endpoints of the Word Document Generation service. The service offers two categories of APIs: template design endpoints and runtime endpoints. The template design endpoints are ideal for creating and testing document templates, while the runtime endpoints are more suitable for using the templates to generate documents in production (e.g., for your app or service).
See the Examples page for example files.
Generate Model
| Description | |
|---|---|
| METHOD | POST |
| Endpoint | /print/model |
| Type | Multipart form request |
| Field Names | template - set to the template document file (.docx) |
Example Javascript method (using Angular HTTPClient):
  getTemplateModel(file: File) {
    const formData = new FormData()
    formData.append('template', file)

    this.http.post(`https://portal-gw.insuremo.com/eBao/1.0/print/model`, formData, {
      headers: {
        Authorization: `Bearer ${environment.insuremo.token}`
      }
    }).subscribe(modelData => {
      console.log(modelData)
    })
    }
This API will generate the expected JSON model data that should be used for mapping. This endpoint enables you to determine what data each document generation endpoint requires. For example, the output of “Policyholder Benefits.docx” from the examples zip:
{
    "FirstName": "",
    "LastName": "",
    "ProductName": "",
    "PolicyCoverageList": {
        "CoverName": "",
        "SumInsured": ""
    },
    "CoversWithBenefits": {
        "CoverName": "",
        "PolicyBenefitList": {
            "BenefitName": "",
            "Limit": ""
        }
    }
}
Print Template as Word File
| Description | |
|---|---|
| METHOD | POST |
| Endpoint | /print/word |
| Type | Multipart form request |
| Field Names | name - the output name of the document;template - set to the template document file (.docx);password - (optional) when provided the pdf will require this password to read;mapping - the JSON file (string) of the data mapping;instructions - the JSON file (string) of the print instructions (optional) |
This endpoint will generate a Word file based on the provided inputs.
Print template as PDF file
| Description | |
|---|---|
| METHOD | POST |
| Endpoint | /print/pdf |
| Type | Multipart form request |
| Field Names | name - the output name of the document;template - set to the template document file (.docx);password - (optional) when provided the pdf will require this password to read;mapping - the JSON file (string) of the data mapping;instructions - the JSON file (string) of the print instructions (optional) |
This endpoint will generate a PDF file based on the provided inputs.
Debug the template
| Description | |
|---|---|
| METHOD | POST |
| Endpoint | /print/debug |
| Type | Multipart form request |
| Field Names | name - the output name of the document;template - set to the template document file (.docx);mapping - the JSON file (string) of the data mapping;instructions - the JSON file (string) of the print instructions (optional) |
This endpoint does not output a document, it will output a JSON response providing a list of errors and warnings processing the template. This is useful to debug a template and check for possible font issues.
Print from Stored Template (Zip)
| Description | |
|---|---|
| METHOD | POST |
| Endpoint | /print/template |
| Type | JSON body |
| Fields | templateName - the name of the template stored in insureMO;version - version number of the template;outputName - the output name of the document (optional, otherwise templateName will be used);outputFormat - either “pdf” or “docx”;password - (optional) when provided the pdf will require this password to read;useCache - (optional, default true) control if the template is cached or fetched from the template servicemapping - the JSON mapping data;instructions - the JSON print instructions |
Example Body:
{
  "templateName": "template-example",
  "version": 0,
  "outputName": "Policy Certificate"
  "outputFormat": "docx",
  "useCache": true,
  "mapping": {},
  "instructions": {}
}
Word Document Generation - Template Management
The Word Document Generation service is a simple and user-friendly document generation service that allows users to configure Microsoft Word documents as templates. These templates support variable parameter replacements, repeating fragments, and conditional fragments using a simple notation. The templates can be uploaded and managed on insureMO portal and can be used to generate policy-specific documents with a simple API call.
This section discusses the template management aspect of the portal:
-
How to create a new template
-
How to upload the template into insureMO
-
How to make a simple API call to print the template with the /print/template API
How to Create a Template
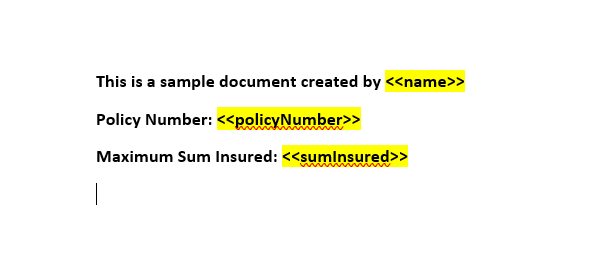
A template can be created in a new blank Word document as shown above. The notation used follows the pattern where the variable name is enclosed in double angled brackets. For more information on the syntax, please see our Syntax section: Word Document Generation - Syntax
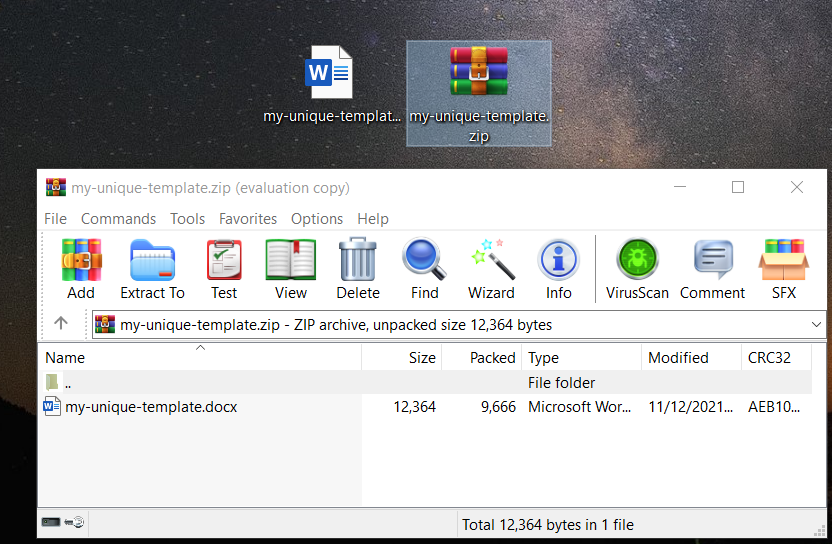
Save the file and give it an appropriate name. It is important to ensure that the name is descriptive and uniquely identifies this template. Once the file is saved, you need to put it inside a zip file before importing it into insureMO. You should have a zip file with a single Word document inside:
How to Upload the Template
To upload the template, navigate to insureMO portal, go to Non-Insurance Services, and then locate the Document Generation Service.
Click Settings to access the page where you can manage all your templates. Create a new template with a unique name, which will be used as the identifier passed to the rich-docgen-service to find and print an instance of this document. Provide a ‘Catalog’ name to save the template, this is a simple grouping that allows you to group similar documents together, such as by project code, product code and region. Finally, provide a version number. Normally this starts from 0, and each time you make changes, increment the version. When making an API call to print this document, you need to input the version number.
How to Print the Template
Once your template is saved, you can make an API call using Postman (or in your code) to print an instance of this document. As our example document is simple, our JSON payload is also quite straightforward. Ideally, you should create variable names in the template that match the JSON policy payload for your product, ensuring a simple one-to-one mapping. This allows you to pass your payload directly to our service. Here is what our Postman request looks like:
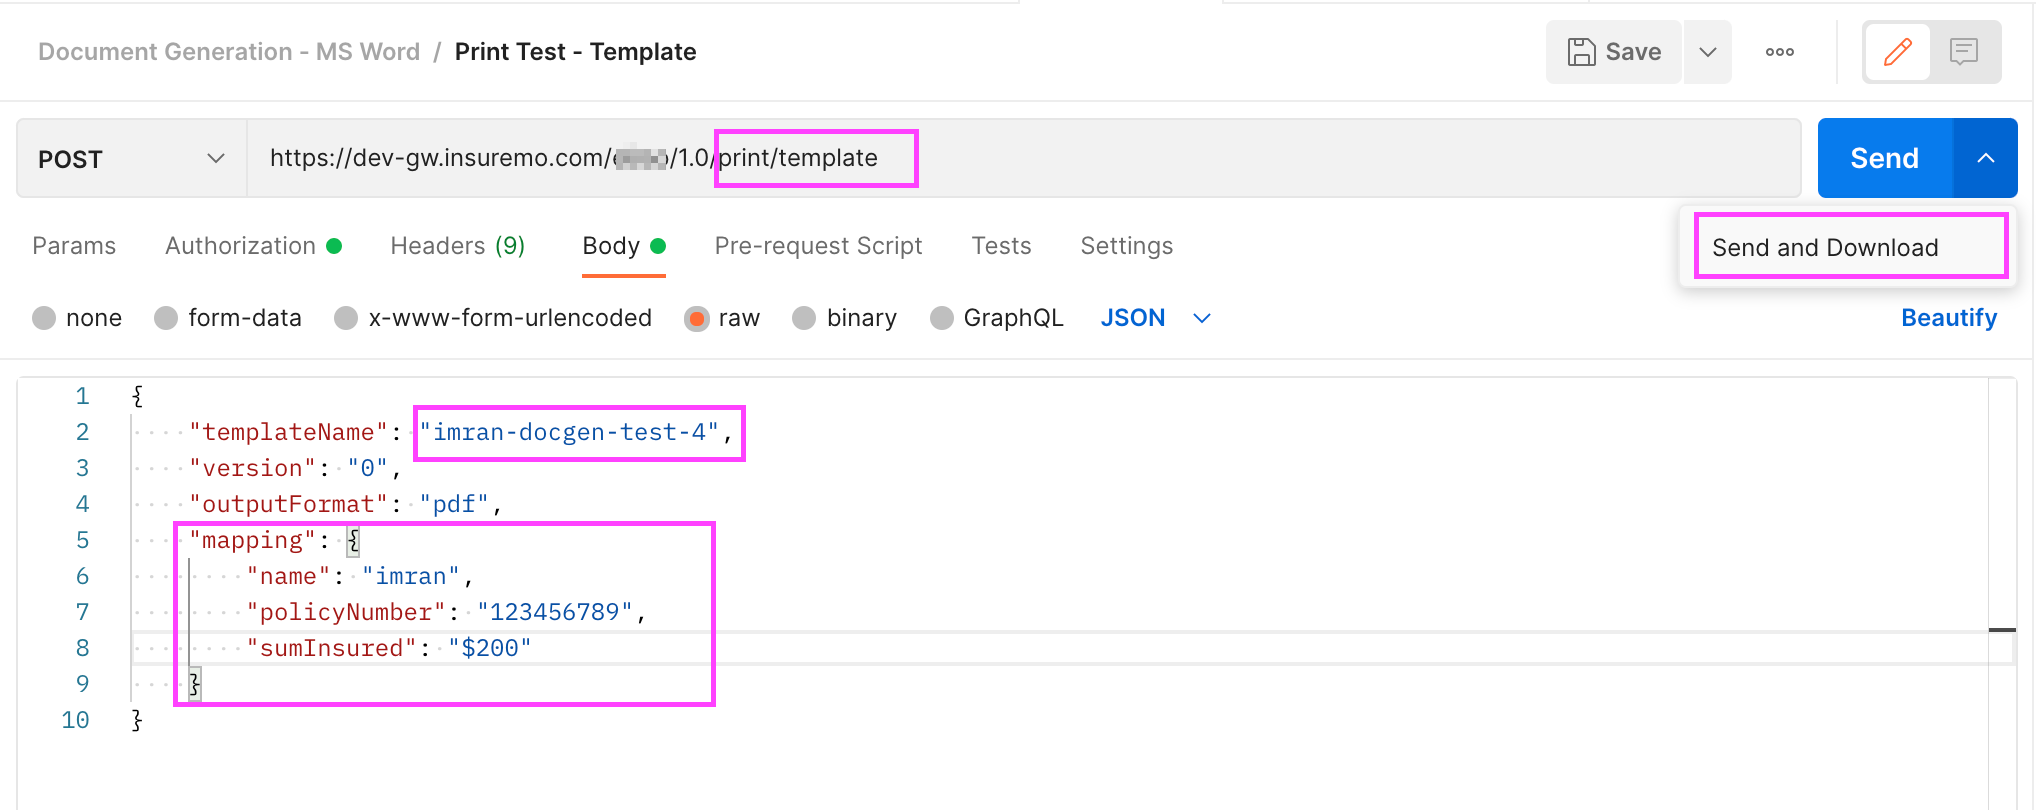
This will return a document with all the formatting and structure you configured in the template, replacing the placeholders with the corresponding values:
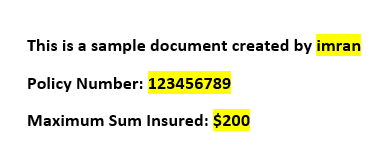
This is a simple example to get you going. There are many other features supported by the template. For more information on the syntax, please see our Syntax section: Word Document Generation - Syntax
Word Document Generation - Demos and Examples
In this section we present video demonstrations and training videos on how to use the document generation service. Please check back often as new videos will be added to this page.
Example Files
Please download the following zip file to access some examples that include marker replacements, repeating fragments, and conditions.
The file contains a number of sample templates, JSON data, and print instructions for you to explore and even use as a foundation for your own templates.
Word Document Generation - Tips and Troubleshooting
Although the Word Document Generation service provides a more approachable way to design templates for dynamic document generation, problems may still arise during the design and development of various documents.
Output Issues
Problem: The document template looks correct, but the generated document fonts are different.
Solution: The reason is that the fonts are not available on the server. You can embed the fonts, which will store them into the document. This will increase the document size, but produce the intended final result. Please see this Microsoft support article on the Benefits of Embedding Custom Fonts for more information.
Alternatively, if the embed custom fonts solution is not working, you can request to have the font added to the server.
Problem: Remaining << >> markers are in the final document.
Solution: Check that the marker does not contain spaces. For example, the <<EndCondition>> would print correctly, while having a space inside the marker like this: << EndCondition>> would result in the extra << >> characters.