Introduction
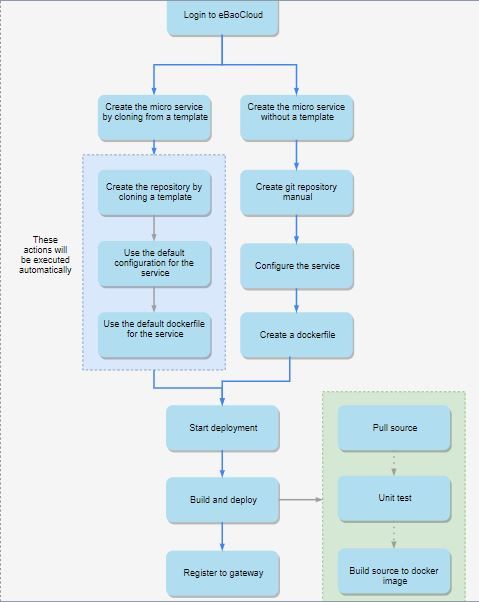
This document will help you to understand the functional behavior of the system on how to create and manage Service factory / DevOps and deploy them through a container docker file.
DevOps module has a set of different services which are used to manage microservices. It allows users to create a new microservice from a template for different languages like Golang, NodeJS, and Java, clone the template source code to do local development before committing to git and then trigger CICD process.
The followings can be done through it:
-
Create a new microservice.
-
Develop the microservice locally and debug it locally.
-
Build, test and deploy it through CICD.
-
Configure the service.
-
Set up the auto scaling criteria.
Architecture - Flow Chart
Get Started
insureMO provides the Service factory dashboard in order to get a clear picture of different Services published, subscribed, or deployed from different vendors or consumers, thus getting to have an overview of different services, running or pending or failed. It also provides an overview of the usage of CPU, Memory, and Network against each environment selected on the first basis.
The user will get the detailed content of the steps and how to proceed with this feature by clicking Expand (refer to the screenshot below).
Links of different topics are provided and on clicking, users can navigate to each of them and take help to proceed with the operation.
Initiation
The planning and tracking of environment preparation, code stream preparation, development template setting, and other preparatory work required by the developers of a new tenant can be completed here. Related personnel can create tasks on cards, add them and view the status for planning and managing purposes.
Here, we will see how to create cards, add a task, and view status.
Create Card
Step 1: Select a tenant from the drop-down list.
Step 2: After selecting the tenant, you will see the + Add Another Card, Tenant 0-1, Result options, and tenant name.
Step 3: Write card description and click Add.
Provide card description in the card and create successful message on top of the screen.
Step 4: You can delete and add numbers of cards.
Step 5: Here, You can see the result of the card.
Add Items
Once you create a card successfully, you can add items to the cards.
Click +Add Item. You will see a blank box.
Provide the Item name and click Submit.
You will see the item added to the card. You can add, delete, or modify tasks and actions on the card.
Add Task and Action
Click the Item Name, and you will see the screen below.
The item name is your task name. You can add multiple tasks to one task. i.e Task List.
You can modify or delete the created task list or the task one by one from the list. Just click the checkbox, and the remove button will act, click Remove and the selected task will be deleted.
Action: Click on Action. Select the Apply Section —> Click Submit.
In this way, you can create a card, add an item to the card, create a task list and action.
Planning
Release Calendar
The release calendar allows different teams to collaborate online; people can subscribe to notifications to keep track of the release plans and progress.
Deployment Plan
Here, you can search for the deployment plan as per tenant, create a plan and import a plan as well.
Search the Deployment plan by selecting a tenant, and you will see Plan ID, Name, Status, and Actions.
Create Plan:
Step 1: Click Create, you will see the Create Plan window.
Step 2: Provide a plan name, Tags and click checkbox Input Image. If you want to provide an image, click Submit to save the provided information.
Step 3: You will see the created plan name top on the plan list.
Step 4: You can perform the mentioned action on the plan.
Check Deployment Status or Auto Test Status of Plan:
Step 1: View plan list and find out the plan, then click plan name.
Step 2: You will see the deployment pipeline page. In this page, all environments will be deployed to list here.
Step 3: You can trigger deployment process or auto test process by clicking Play beside Deploy or Test icon.
Step 4: Display deployment status or auto test status of each environment (the data refreshes every 2mins ). Hovering over the Deploy or Test icon, you can see trigger log.
Step 5: Click Deploy to check pods status; Click Test to check test result.
Pipeline
Here, users can view the status and process of CI/CD at any time; the platform can automatically generate the pipeline according to the CI/CD operation and allow users to modify it.
Select a tenant and date, and you will see the status and process of CI/CD.
Here, you can also create a new flow of the CI/CD process with the help of the Create Data, Add Edge, and Add Note.
DevOps
Introduction to Services on insureMO:
This page will explain everything you need to know about Services (aka Microservices) on the insureMO platform.
What is the difference between an API and a Service on insureMO?
This is a commonly asked question by new users on the platform.
APIs define an interface to communicate with a backend system. Registering an API on insureMO means that its requests can now be routed through the insureMO API gateway and it allows you to leverage the capabilities that it provides. The important point to note here is that an API does not define where or how that backend functionality sits, it merely defines the interface. So it could be running in a legacy system on-premises, it could be a web application running in the cloud, or it could be running within the insureMO platform itself as a product engine.
Services, on the other hand, allow you to write that backend functionality as code and run it on the insureMO platform. This essentially means you package your code as a Docker container and deploy it to run within the insureMO infrastructure. The insureMO Portal provides you all the tools you need to do this and manage it after its deployed.
Services vs API Factory:
So you might be thinking, services sound a lot like API Factory in that you can write some code and have it be triggered by an API call to do something specific. In theory, both allow you to define custom APIs.
However, API Factory is very limited in what you can write with it. You are restricted to writing a script in a single language (JavaScript) and even within that, you cannot import any external libraries. Instead, you can only use the libraries preloaded by insureMO. In contrast, writing your own service means you can essentially use any tech-stack you choose in any language, using any framework of your choice. The only restriction is that it needs to be packaged as a Docker container and you need to write a Docker File.
Types of Services
There are 2 main types of services that you can create on insureMO:
1. Web Applications
This is a very convenient way for you to develop any front-end applications and have them served directly from insureMO. Configuring a service as a web app allows you to configure routing (ports, paths, and domain) so that your app will be publicly accessible from the internet. We have a lot of templates for you to quickly start the UI development of your next insurance application covering all of the latest and greatest UI development frameworks (React, Angular, Vue, etc.).
2. Microservices/APIs
This allows you to write an entire backend service in any technology stack you choose and define a swagger file for the APIs it exposes. The system can automatically register those APIs for you when you deploy the service.
Web Application
How to create Web Application:
There are 6 steps to create Web Application service.
Step 1 - Basics: Provide service name, description and select one option: How would you like to start? and click Next.
(a) I’ve already got an app I want to deploy.
(b) I want to start from a Template.
Step 2 - Git Config: Provide Repository URL, Host ID, Username, Access token and click Next.
Step 3 - Dockerfile: Select existing Docker File or create a new one through Create and click Next.
Step 4 - Running Config: Here, you can provide extra parameter.
Step 5: Route Config: Here, users can see, Service Name is provided, together with environment where you can access service and click Next.
Step 6 - Summary: Here, users can see details of created web application. Now, click Create, Web Application will be created successfully.
Click Create to create web application service, you will see Web Application Created Successfully! with Check Service and Create Another buttons.
Click Check Service shown below with created service name.
Note: If you select option I want to start from a Template. Follow the same mentioned steps above.
Microservices/APIs
This allows you to write an entire backend service in any technology stack you choose, define a swagger file for the APIs it exposes and the system can automatically register those APIs for you when you deploy the service.
Step 1 - Basics: Provide service name, description and select the option How would you like to start? and click Next.
(a)I’ve already got an app I want to deploy.
(b)I want to start from a Template.
Step 2: Git Config: Provide Repository URL, Host Id, Username, Access token and click Next.
Step 3: Docker File: Select Existing Docker file or create a new one through Create and click Next.
Step 4: Running Config: Here, you can provide extra parameter.
Step 5: API Registration.
Step 6: Summary: Here, users can see details of created web application. Through clicking Create, a microservice is created successfully.
Click Create to create a microservice, you will see MicroService Created Successfully! with Check Service and Create Another buttons.
Click Check Service shown below with created service name.
Docker File
Click Docker File menu, the page listing of docker files gets populated with status and other details. Here, you can search created docker file as per standard tenant.
How to create new Docker file:
1.Click Create, the Create Docker File page will be shown.
2.After creation of docker file, you will see, file status is Pending Audit – You can approve the file and change file status.
Click Approve to change file status.You can see file status changing from pending Audit to Normal.
CI/CD
Here, you can search for services as per tenant and create a service.
When you enter this section, you will see created services information like Service Name,Repository Url, Docker File and Actions.
Search services for a specific tenant. You need to select the tenant name from the drop-down list.
You will see a list of services for that selected tenant.
Create Service
API developer / Admin uses this feature to view all the created services as per selected tenant. Click Quick Create, you will see the created service page.
Create Service page.
Provide Service Name, select Tenant from the list you want to assign service and click Submit.
After creating a service. You will see the service status as Unknown. You need to edit the created service.
Edit service to change service status from Unknown to Normal. Select the Edit option from the Action drop-down list.
Select an existing docker file or create a new one if the existing docker is not available.
Click New which is given in the docker file drop-down list.
Click New and create a new docker file. Provide docker name and contents of docker.
Here, you can see created docker file.
Provide GitRepository details and click next for further steps.
- Service Name:
- Service name. For microservice26m.
- Docker File:
- Select the Docker file for the service if users created it before.
- Users can select the Docker file shared by other services.
- When selecting New, users can create a new Docker file. We recommend using the service name as new Docker file name. For example:
abc-service.
- App Type:
- Users can select Backend or Frontend.
- Mode:
- Users can select strict or none.
- Git Repository:
- Indicate Repository Url, User Name & Access Token.
You will see Runtime which provides an extra parameter.
You will see the Extend step which provides the following details.
After performing all these mentioned steps above, service status will be changed.
DevOps allows users to perform the following actions on the created service.
- CI/CD: Select option from Action drop down.
Select Build and Deploy, and the environment, then submit the CI/CD to be triggered. During CI, the source code will be built first. If it contains unit test, it will be executed after building. If unit testing fails, the CI step will stop.
- Edit: Select the Edit option from the drop down.
Click Edit and you will see the screen below.
- Service Name:
- service name. For microservice26m
- Docker File:
- Select the Docker file for the service if users have created it before.
- Users can select the Docker file shared by other services.
- When selecting New, users can create a new Docker file. We recommend using the service name as the new Docker file name. For example:
abc-service.
- App Type:
- Users can select Backend or Frontend.
- Mode:
- User can select strict or none.
- Git Repository:
- Indicate Repository Url, User Name, and Access Token.
-
Export service: To Export service, click Export Service. Service JSON file will be stored in your system.
-
Export Dockerfile: To export service docker file. Click Export Dockerfile, service docker file will be downloaded in your system.
In the image below you can see exported docker file.
- Operation History: To see operational history of related services.
You will see operation history of services in single and multi-options.
Single option
Multi options
- Delete: To delete the created service.
Build History
Users can check the build history as per tenant here. It contains build output and build status.
Users can view and delete build history.
View: Here, users will see build history output.
Delete: Use this option, users can delete history.
Deployment History
In this section, users can see and search operation history as per tenant and environment.
Select a tenant and environment from the drop down list. You will see selected tenant service deployment history in Single and Multi forms.
Deployment History in a single form.
Deployment History in multiple forms.
Environment Info & Service List
Here, you can search the list of services for a specific tenant and environment.
When you select a tenant from the drop-down list, you will see associated environment of that tenant will give below.
Select Tenant:
You will see the list of environments. Select one of them from the list. You will see list of services with Service Name, Environment Name and Latest Version of services.
Environment Information
Here, users can create environment for all the services and its deployment related activities.
Note: Users should have admin right for environment creation and deployment related activities.
You can click Create to create the environment.
After clicking Create, you will see the screen below.
Enter all details in the overlay like name, cluster, mail list, tenant list & Url and click Submit finally to create it. You will see your created environment in environment list.
Actions perform on the created environment.
Edit: Users can edit the newly created one by clicking Edit.
Here, you can edit environment details.
Delete: Click Delete to delete the created environment.
Kubernetes
This part will describe the topics including Pod, Deployment Monitoring, AutoScale Config, Route, Environment, Template, DeamonSet, Config Map, and Jobs.
Pod
A Pod is the basic execution unit of a Kubernetes application – the smallest and simplest unit in the Kubernetes object model that you create or deploy. A Pod represents processes running on your Cluster.
A Pod encapsulates an application’s container (or, in some cases, multiple containers), storage resources, a unique network IP, and options that govern how the container(s) should run. A Pod represents a unit of deployment: a single instance of an application in Kubernetes, which might consist of either a single container or a small number of containers that are tightly coupled and that share resources.
Docker is the most common container runtime used in a Kubernetes Pod, but Pods support other container runtimes as well.
Select environment and the tenant. You will see some pod details of the container system.
You can perform the following actions:
View: Click View. You can view code related to specific container in YAML and JSON format.
Log: Click Log. You will see log data of related pod.
Restart: To restart the service, click Restart as shown below.
Deployment Monitoring
Here, users can monitor the status of services currently running in the cluster. Also users can remove the service from cluster.
The details and status can be seen by selecting the environment and particular tenant from the list.
Actions perform on Deployment Monitoring.
View: Click View.
You can view the service deployment details in YAML and JSON format.
Delete: Click Delete to delete deployment monitoring details.
Auto Scale Configuration
Click Auto Scale Config -> Here, users will select environment and tenant for auto scale configuration service creation.
Create Auto Scale Configuration. Click Create, a popup window will open.
o Select the service that you want to set up the auto scale criteria for, like here select dev-sample-nodejs.
o Then set Max Replicas, Target CPU. In the configuration above, when the Target CPU approaches 30% usage ratio, a new pod (instance) will be created automatically by the Kubernetes.
From the following menu and UI to see how many nodes / replicas are running for each micro service.
Actions perform on the created service.
View: Click View to view the service code in YAML and JSON format.
Code in YAML and JSON format.
-
Then we use Postman to do stress testing.
-
After a while, you will see the Current CPU is over the target CPU, and the Desired Replicas is 3 which means 3 replicas will be created.
-
Soon 3 replicas for dev-sample-nodejs are running.
-
After the stress testing is completed, the Current CPU will be down to 0.
-
A few minutes later, the Current Replicas and Desired Replicas will down to 1, which means there is only 1 pod (instance) running.
Route
Users can access their APIs through the gateway by default. Route means that we provide additional access path to the service.
This configuration may cause routing conflicts; we recommend contacting us for help before creating /editing it. We may disable this feature in the future.
Here, users can create, view and delete route services for a specific tenant and environment.
Select environment and tenant. Create button will be active.
Create Route: Click Create to create route service.
Created route.
Actions perform on the created route service.
You can see service code in YAML and JSON format.
Edit: Click Edit to edit service information like name, annotation and spec.
Delete: Click Delete to delete the created route service.
DaemonSet
A DaemonSet ensures that all (or some) nodes run a copy of Pod. As nodes are added to the cluster, Pods are added to them. As nodes are removed from the cluster, those Pods are garbage collected. Deleting a DaemonSet will clean up the Pods it created.
Some typical uses of DaemonSet are:
• Running a cluster storage daemon, such as glusterd, ceph, on each node.
• Running a logs collection daemon on every node, such as fluentd or logstash.
• Running a node monitoring daemon on every node, such as Prometheus Node Exporter, Flowmill, Sysdig Agent, collected, Dynatrace OneAgent, AppDynamics Agent, Datadog agent, New Relic agent, Ganglia gmond or Instana Agent.
Select Environment and Tenant. You can see related daemonSet.
Actions perform on DaemonSet.
View: Click View to see DaemontSet in YAML and JSON format.
You can describe a DaemonSet in a YAML file. To view it, click View as shown below.
Configure Map
Users can write configuration files in any format, and mount them into the service for the selected environment and tenant.
• Config Name: This name must be unique; we recommend using the service name.
• File Name: This is the file name in the service. For example, redis.conf or common.properties.
• Content: This is the content in the file.
Click Create, you will see the screen below.
Actions perform on the created configuration.
Edit: Click Edit to edit configuration details.
View: Click View to view configuration.
Delete: Click Delete to delete configuration map.
Jobs
The DevOps users can check different jobs running on each environment and their details through this option.
Users can view and delete the existing jobs.
View: Click View to see the job details in YAML and JSON format.
Delete: Click Delete to delete jobs.
Service
Kubernetes Service
Here, you can search and create service in specific environment for specific tenant.
Once you select environment and tenant, the Create button will act.
Create service: Click Create. Here you provide service name, Service port will be auto filled up, and click Submit.
You can see expand and see created service features like Port Name, Protocol and Port.
Actions perform on service.
You can perform View and Delete actions on services.
Click View and you can view services in YAML and JSON format.
Service in YAML and JSON format.
Delete: Click Delete to delete the created service.
Node
Kubernetes Node
Here, You can search node for the selected tenant and view node details.
When you click Kubernetes Node, you will see Node name, Labels, Create Time and Actions.
Click View and you will see the details in YAML and JSON format.
FAQs
Q: Does it support Github?
A: Yes, it integrates perfectly with Github.
Q: How many templates does it have?
A: It has 2 templates nodejsand go. You can configure a new template manually. First, create the service, then edit it and tick the As Template and submit. The new template will then be added to the template list.
Q: Develop skills/languages support.
A: Yes, it supports any languages which can be run in docker.