Here is a quick start guide for product factory.
1. Background
- All operations in this guide need to be performed in the MC environment portal, and are not allowed in other environment unless for troubleshooting purposes.
- Please make sure you have all read and write authority to make the operations beforehand.
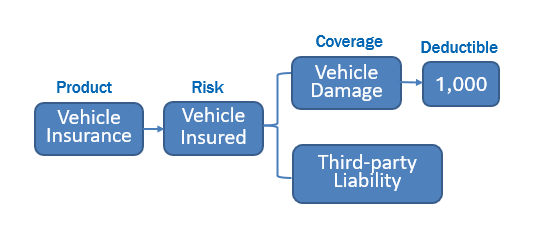
- This tutorial takes vehicle insurance as an example, whose subject is a car. It then introduces two coverages, namely Vehicle Damage and Third-party Liability, under which the relative deductible is set.
2. Overall Menu Navigation
For the first time to operate, we recommend that the user follow the steps below to navigate all the menus:
-
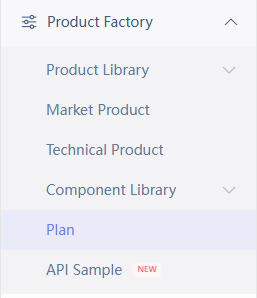
Log in to the home page of InsureMO and locate Product Factory menu the left menu bar.
-
Check Component Library menu, then check Risk menu under it
-
Check Technical Product Menu.
-
Check Market Product Menu.
-
Check Plan Menu.
3. Component Library Maintenance Quick Start
To create the designed product in the system, we need to first ensure that all required components exist in the Component Library.
3.1. Risk
3.1.1. Search for required components
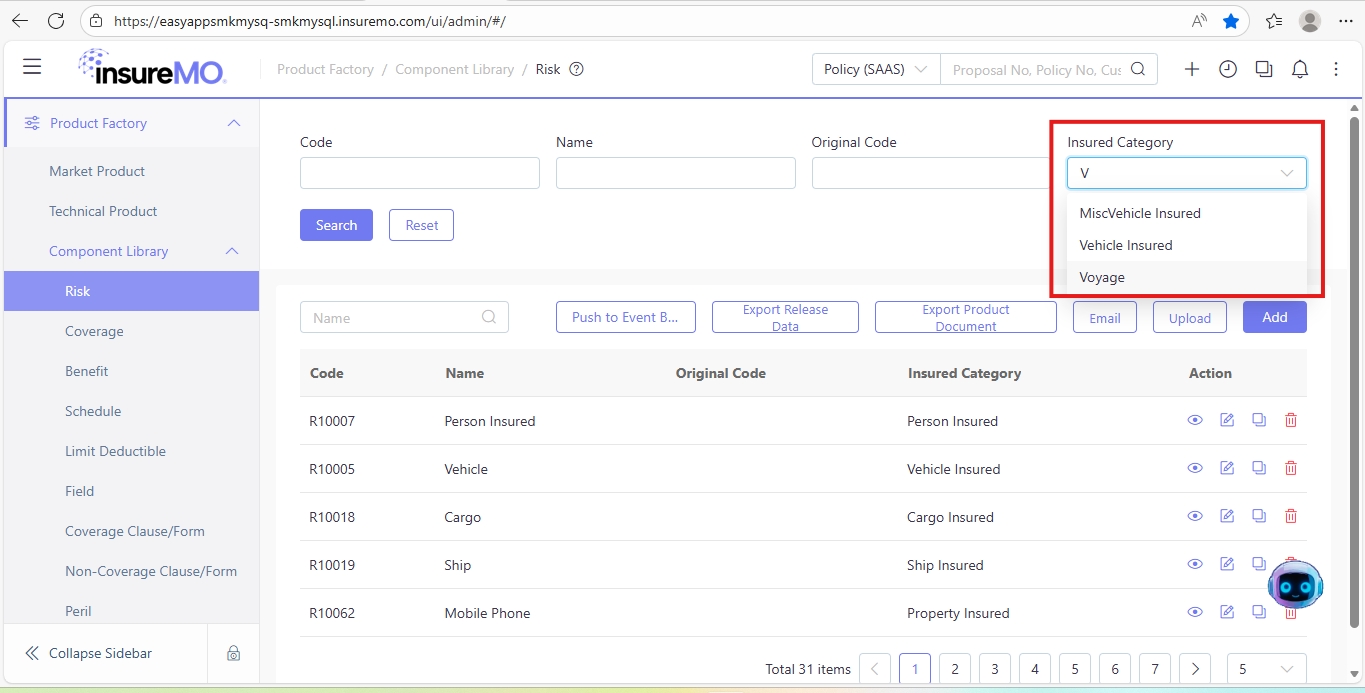
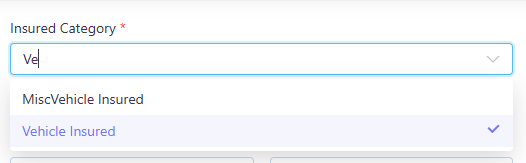
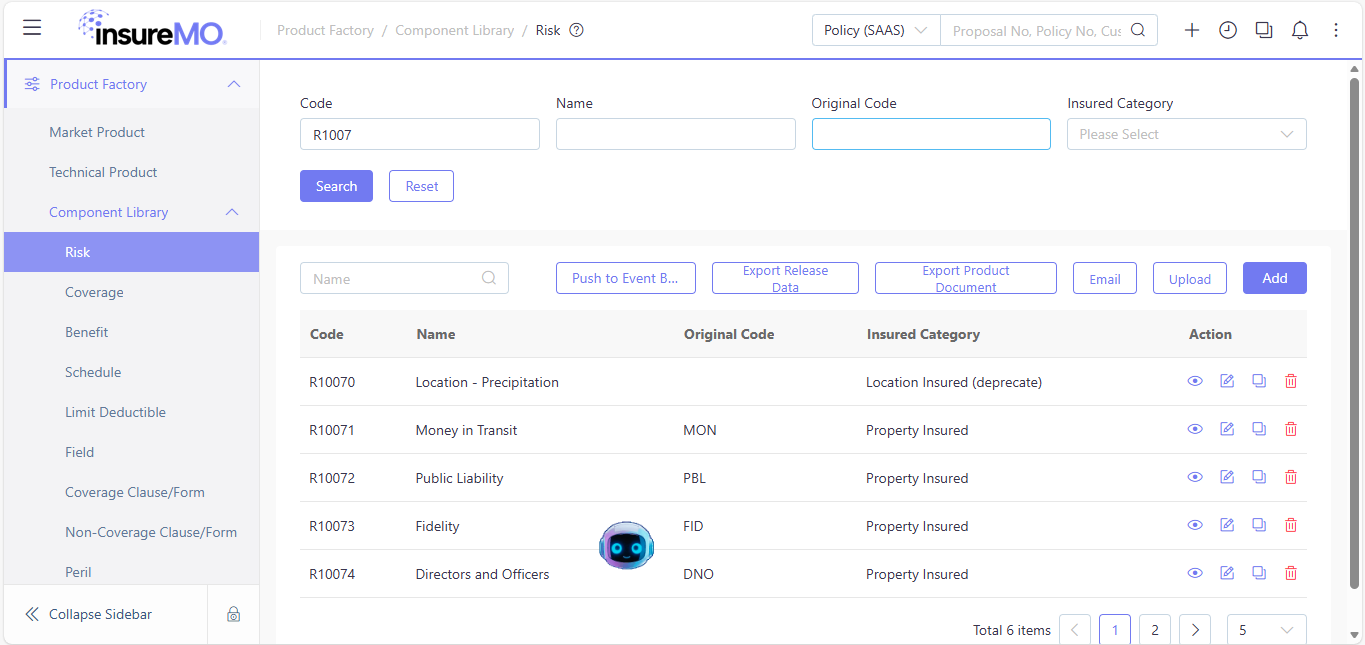
First, we need to check whether there exists usable First, we need to check whether there exists usable Risk component for our case. So search for vehicle insured in the Insured Category column of the risk library.
The values of the Insured Category attribute are fixed and preconfigured discrete options. Two operation methods are available:
- Select the target option directly from the dropdown list;
- Enter keywords to search for and match the desired option.
If you have relevant information, you can also search for risk component records in the Code, Name, or Original Code fields.
When searching in the system, you can perform an exact search or a fuzzy search:
- Exact search requires you to enter a value that exactly matches the corresponding attribute of the target in the input box.
- Fuzzy search does not follow wildcard rules. By default, the text you enter will appear in sequence anywhere in the target. Therefore, it is better to enter fewer characters than to make typos.
Click Search to filter the results.
3.1.2. Add required components
If you find the required risk component, you can proceed to the next step. If not, click Add to create the required risk component.
After clicking Add, the following interface will appear:
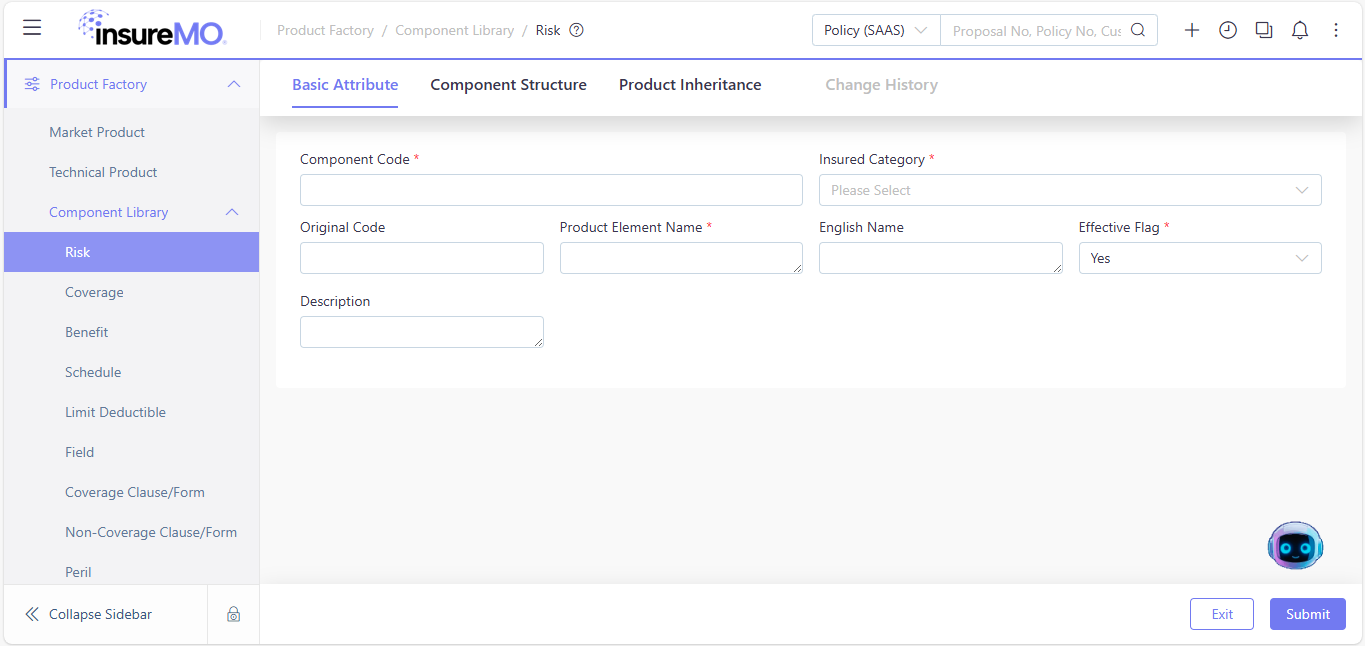
Fields marked with * are mandatory.
Among the mandatory fields:
- Insured Category and Effective Flag are selected via dropdown lists. In our case explained in Section 1, we select Vehicle Insured and Yes respectively, as applicable to the Vehicle Insurance scenario.
- Component Code and Product Element Name require manual entry. As Component Code serves as the primary key in the Product Factory (i.e., the field used to distinguish records), it must be unique - no duplicate entries are allowed in the Product Factory. To minimize errors, we recommend adopting a sequential numbering rule when assigning Component Code. For example, if you retrieve an existing record with “R10074” in the system, assign “R10075” to the new risk component.
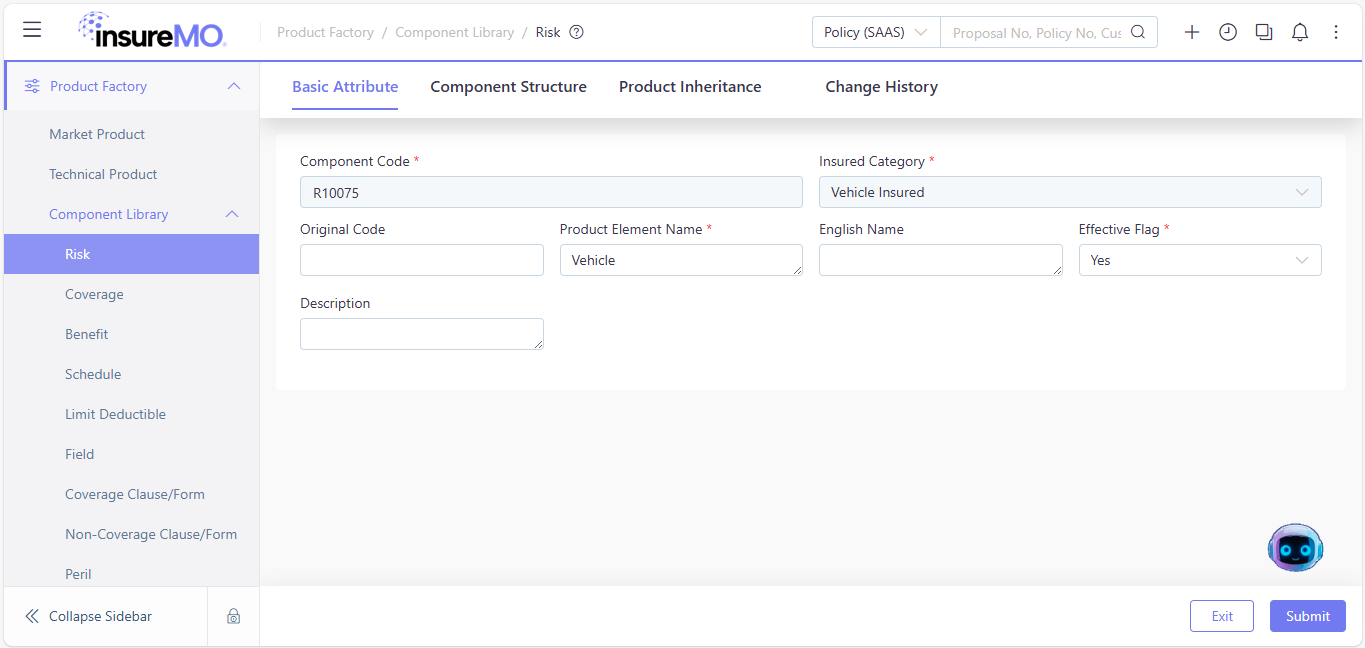
After completing the edits, click Submit in the bottom right corner to submit the required risk component to the system. Note that Exit option will bring you back to the search page and lose all your modification.
Note:
- The Exit option will redirect you to the search page and discard all your modifications.
- The Component Code and Insured Category fields cannot be modified after the initial submission; other fields can be updated.
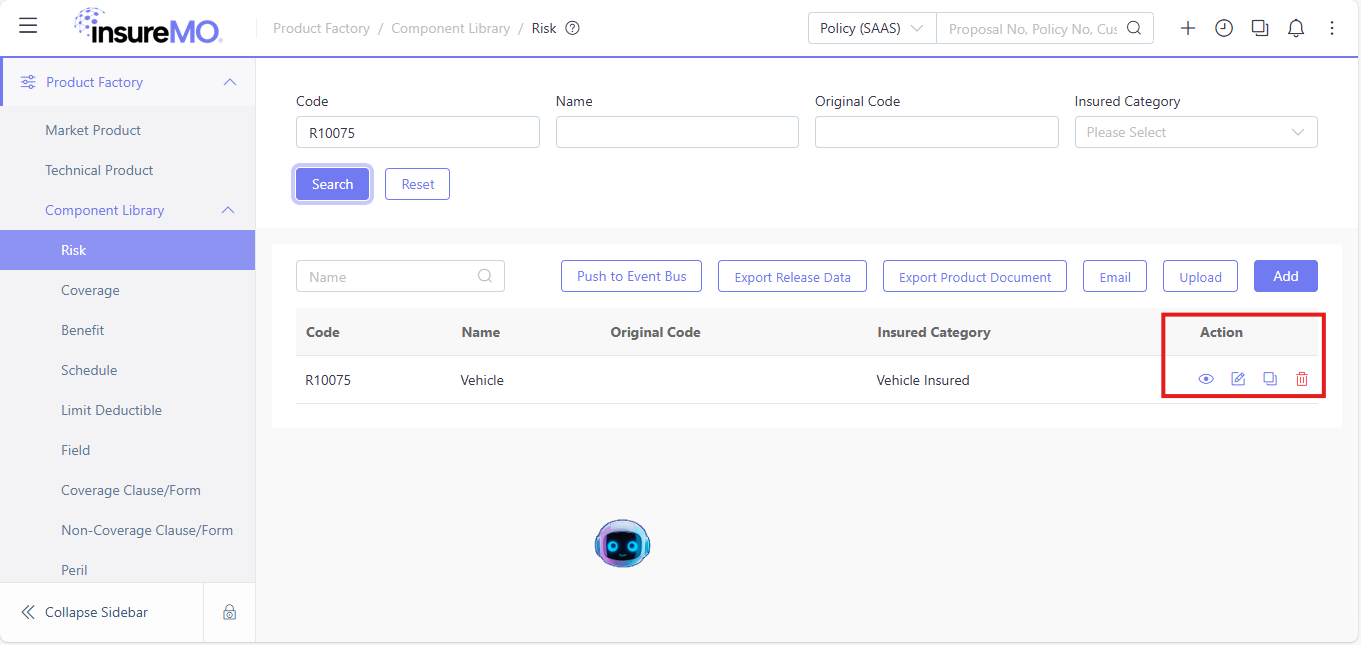
After submission, you can search for this risk component record again (see the figure below) and perform Actions such as viewing, editing, copying, or deleting it.
3.2. Coverage
3.2.1. Search for required components
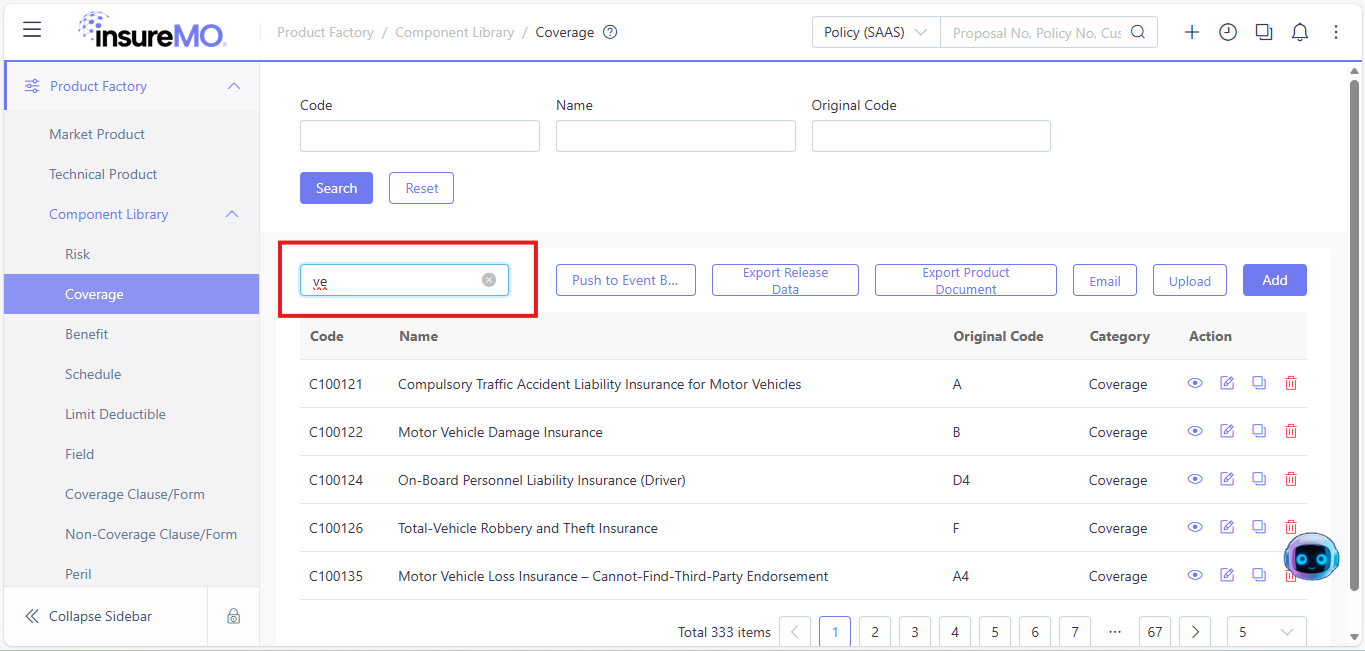
Similarly, you can first search for the required Coverage component. In addition to the search methods taught in Section 3.1.1, you can also search for the Product Element Name field of the target Coverage component record in the input box marked by the red box in the figure below. The advantage of this search method is that, in English input mode, the search results will automatically refresh in real-time with each character you enter, helping you find the target more quickly. The rules for exact search or fuzzy search are consistent with those mentioned above.
3.2.2. Add required components
If you find the required Coverage component, you can proceed to the next step. If not, click Add to create the required Coverage component.
After clicking Add, the following interface will appear:
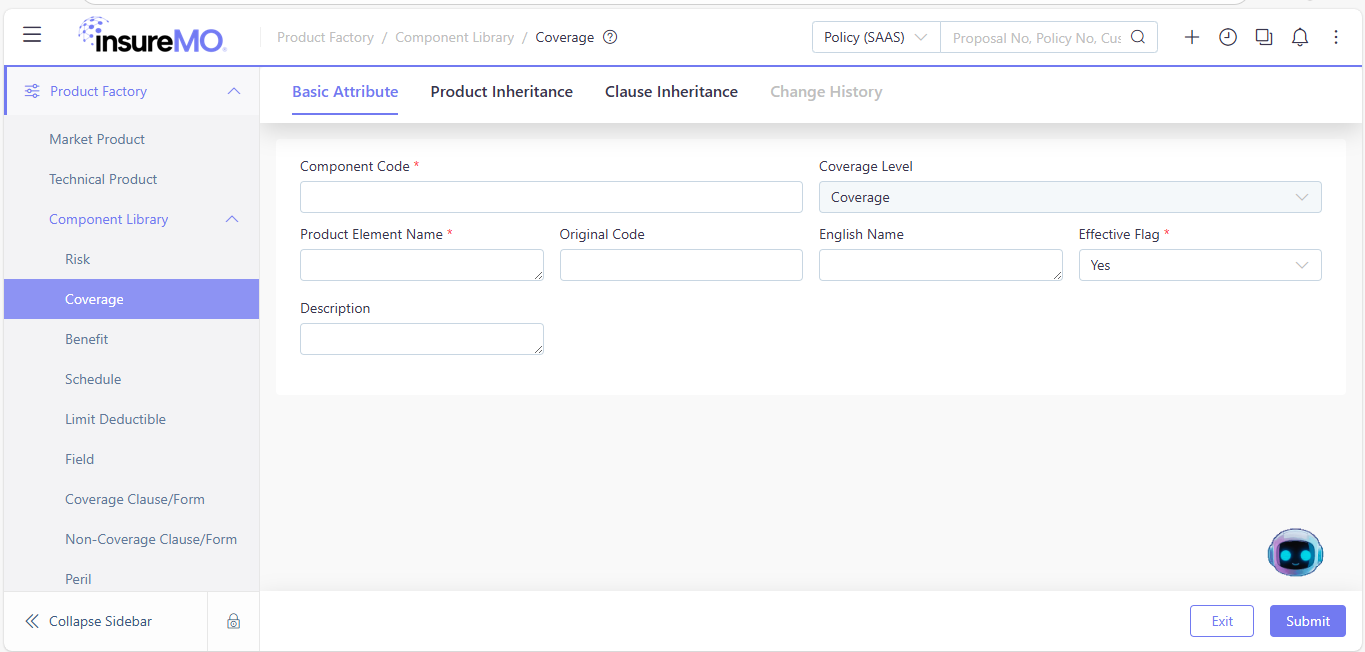
Notably, in the initial editing interface of a Coverage component, the Coverage Level field is selected as Coverage` by default and cannot be modified.
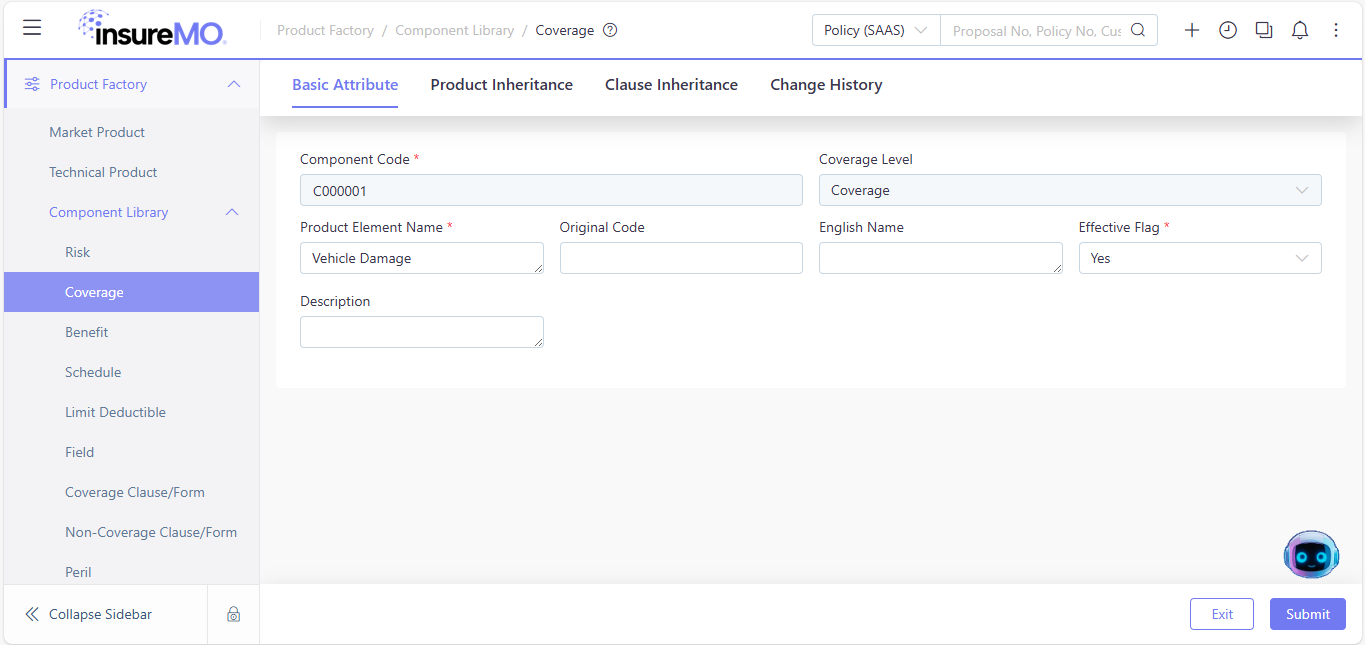
Similarly, fields marked with * are mandatory, and Component Code serves as the primary key in the Product Factory. In our case explained in Section 1, we enter the relevant information for the “Vehicle Damage” Coverage component based on the actual scenario.
After completing the edits, click Submit to submit the required Coverage component to the system. Note that Exit option will bring you back to the search page and lose all your modification.
Note:
-
The Exit option will redirect you to the search page and discard all your modifications.
-
The Component Code and Coverage Level fields cannot be modified after the initial submission; other fields can be updated.
Following the case, we continue to enter the relevant information for the “Third-party Liability” Coverage component:
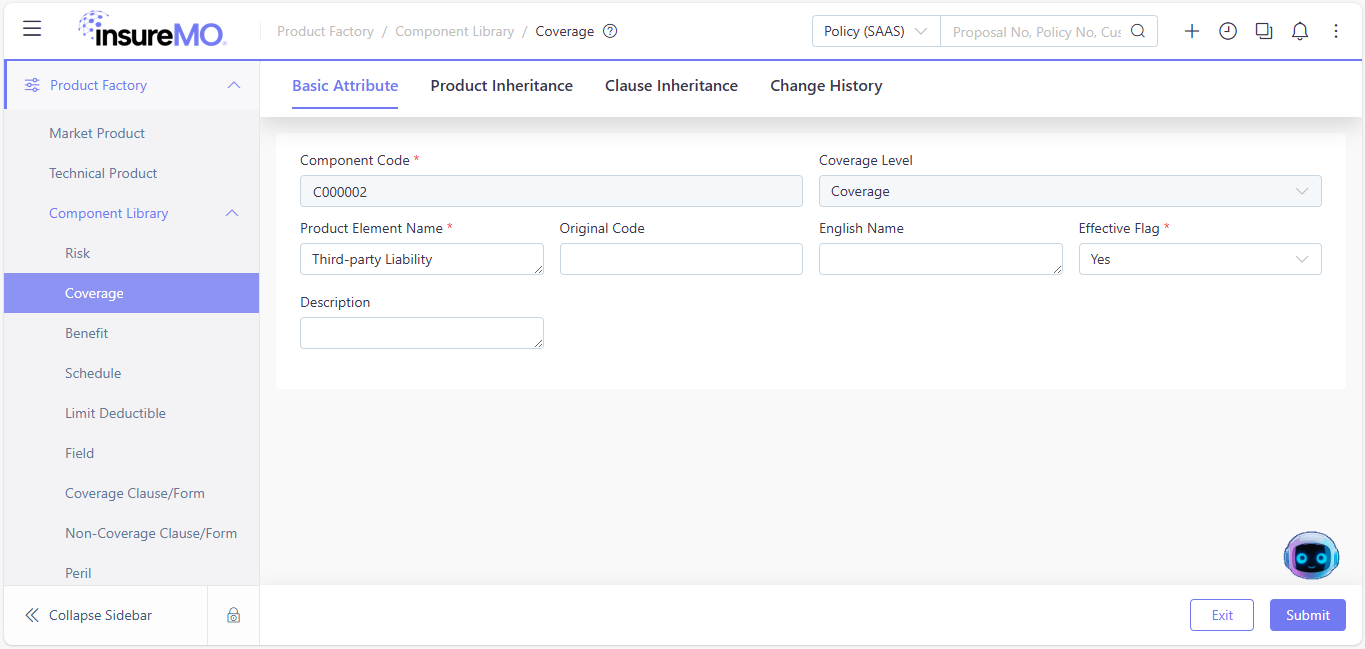
After submission, we can search for the entered Coverage component records again (see the figure below) and perform actions such as viewing, editing, copying, or deleting them.
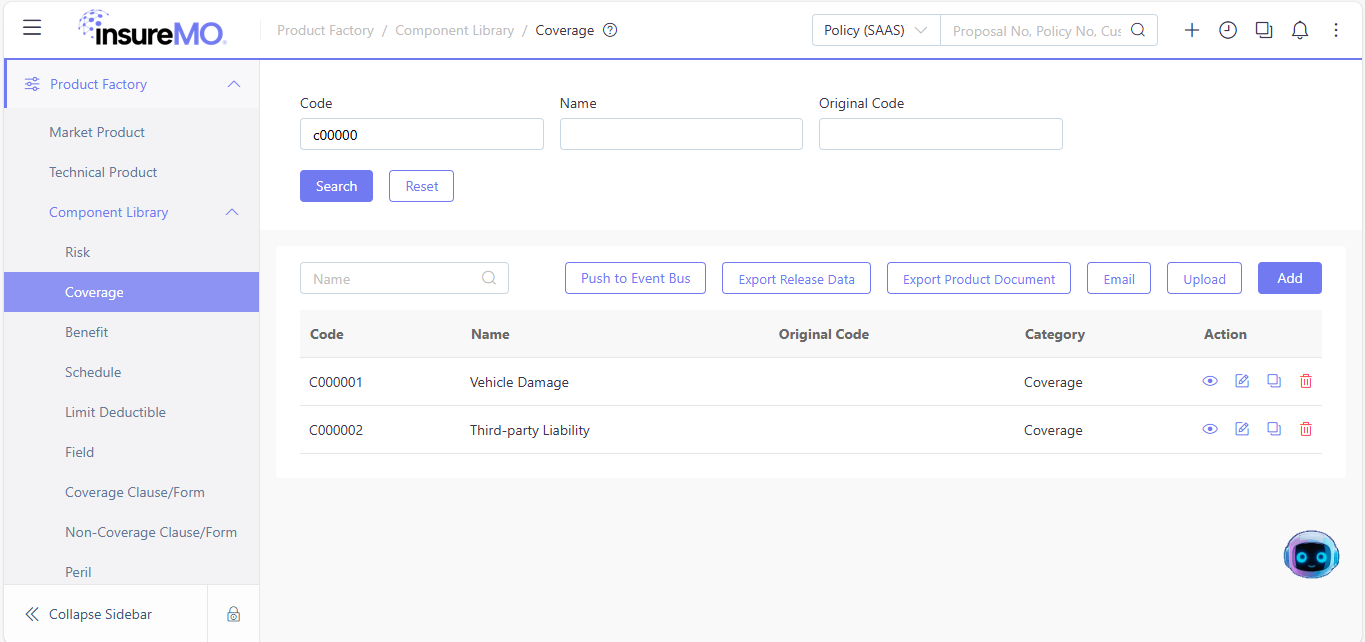
3.3. Limit Deductible
Similarly, as required by the case, we first search the Limit Deductible Library to check if an available Deductible component exists. If not, click Add to create a new Deductible component.
In the initial editing interface of a Limit Deductible component, fields marked with * are mandatory, as shown in the figure below:
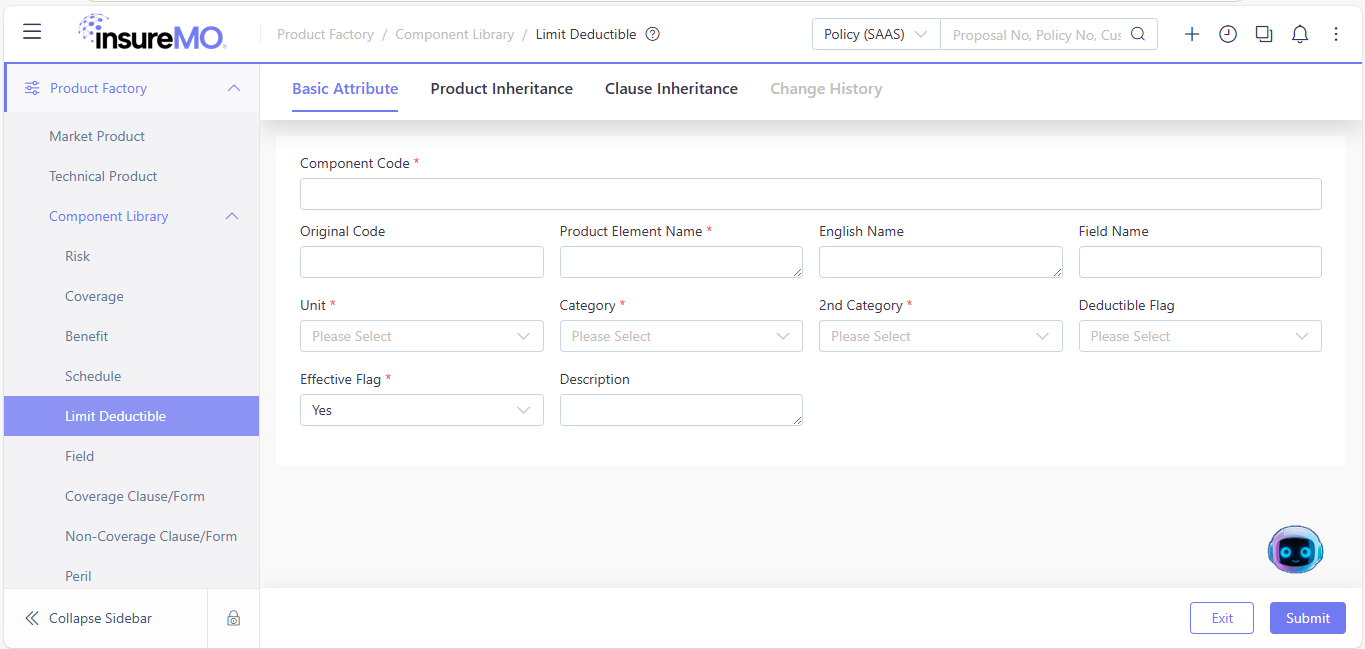
Among the mandatory fields:
- Unit, Category, 2nd Category, and Effective Flag are selected via dropdown lists. In this case, we select “Deductible Amount”, “Deductible”, “Occurrence Deductible”, and “Yes” respectively, based on the actual scenario.
- Component Code and Product Element Name require manual entry.
In this case, we enter the relevant information for the “Vehicle Insurance Deductible” Deductible component according to the actual requirements.
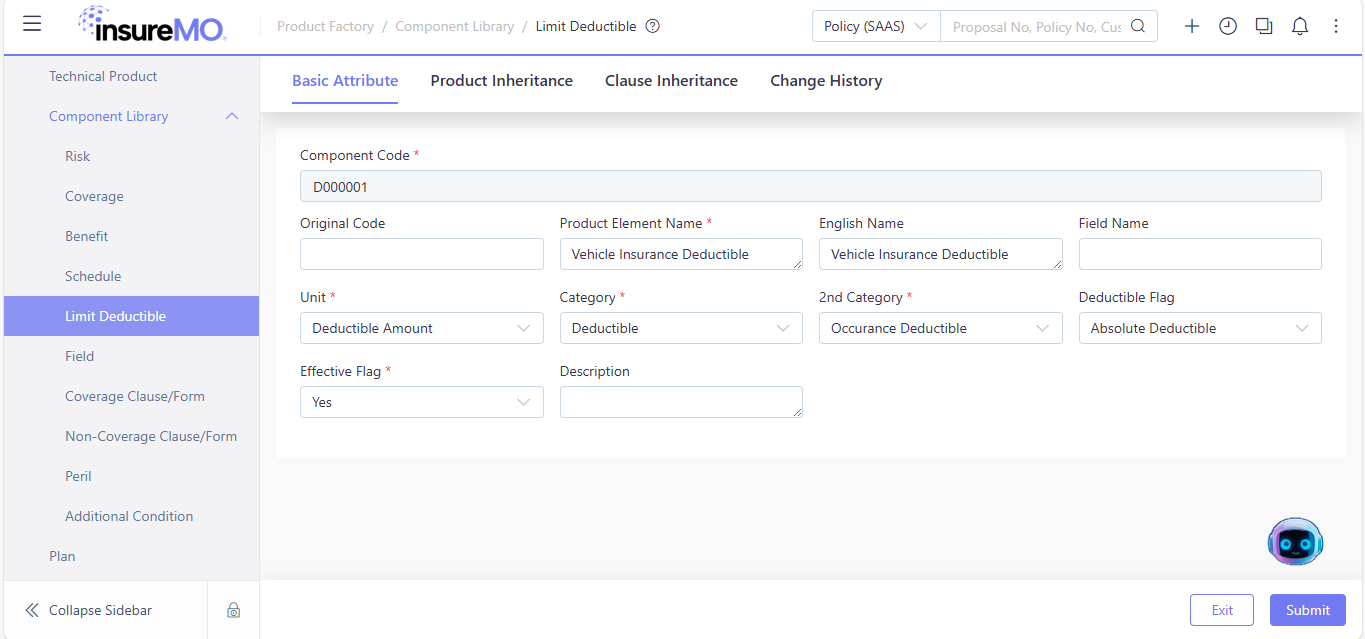
After completing the edits, click Submit to submit the required Limit Deductible component to the system.
Note:
- The Exit option will redirect you to the search page and discard all your modifications.
- Please note that the Component Code field cannot be modified after the initial submission; other fields can be updated.
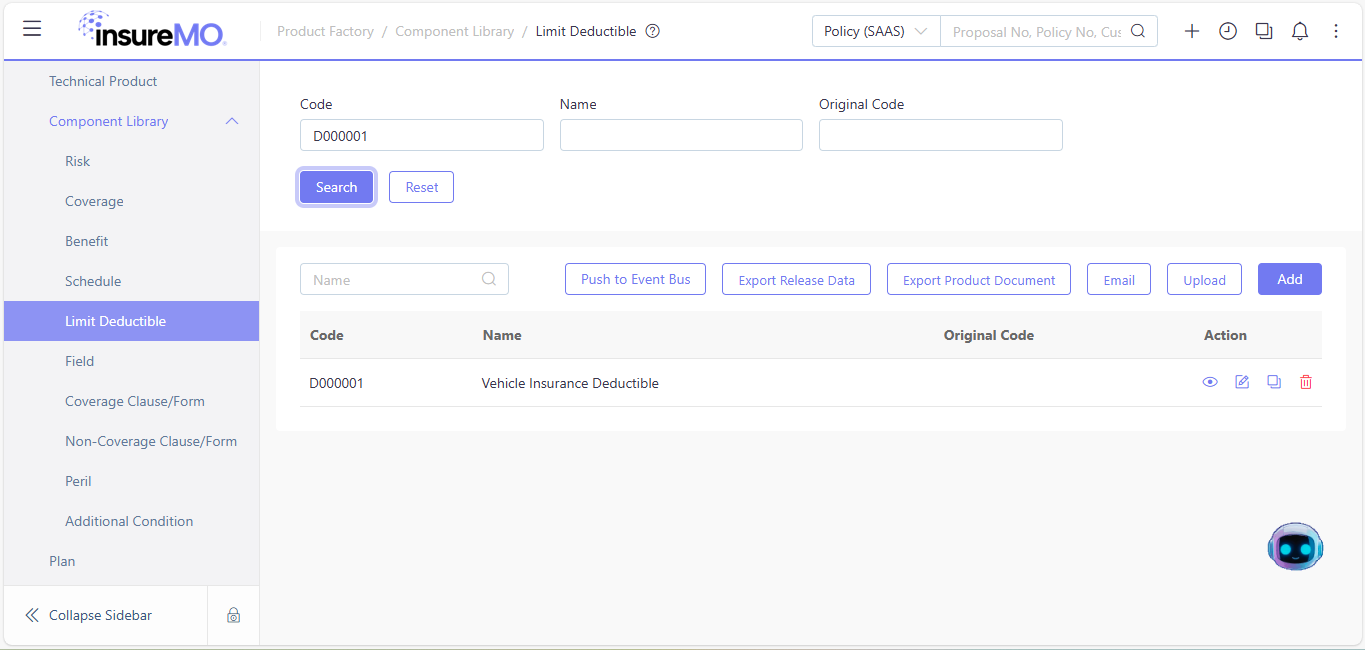
After submission, you can search for this Limit Deductible component record again (see the figure below) and perform actions such as viewing, editing, copying, or deleting it:
3.4. Other Components
All other component will follow the same operation steps like above-mentioned components but just attributes will be different.
- Benefit
- Schedule
- Field
- Coverage Clause/Form
- Non-Coverage Clause/Form
- Peril
- Additional Condition
User can freely select the component to maintain upon your needs.
4. Technical Product Quick Start
4.1. Product Attribute Maintenance
After all components have been added, you can start creating the Technical Product:
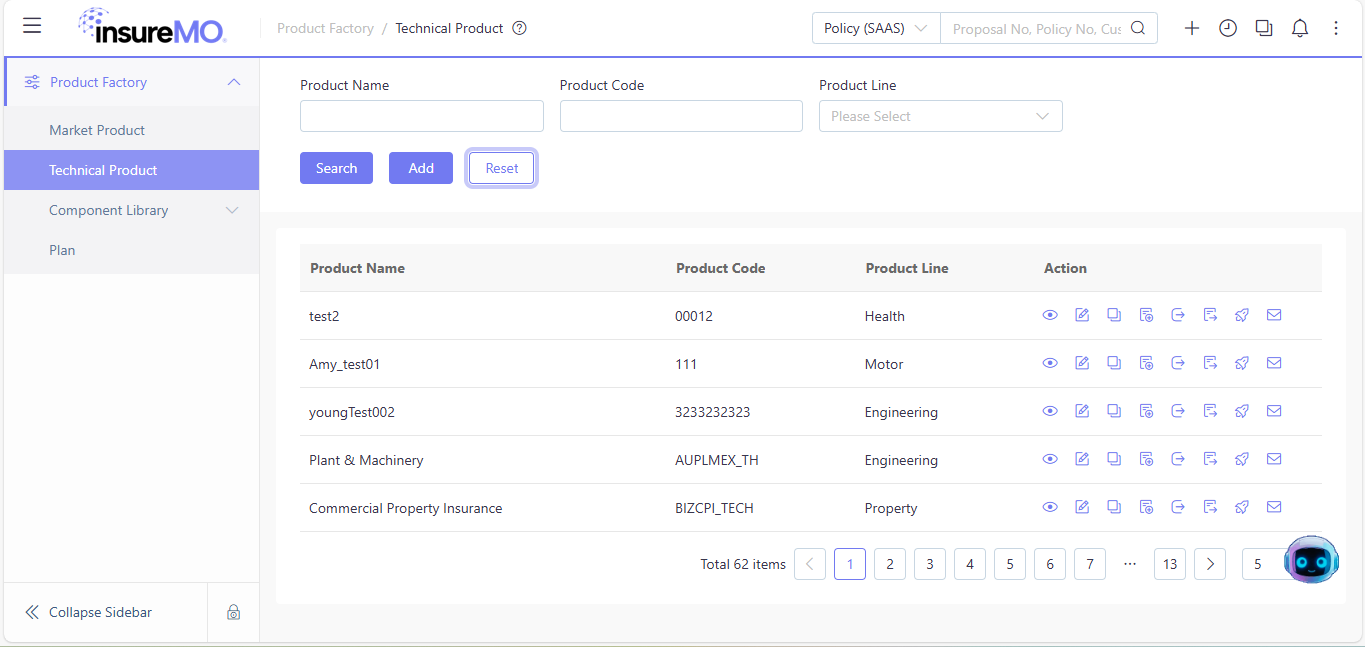
Click Add, and the following interface will appear:
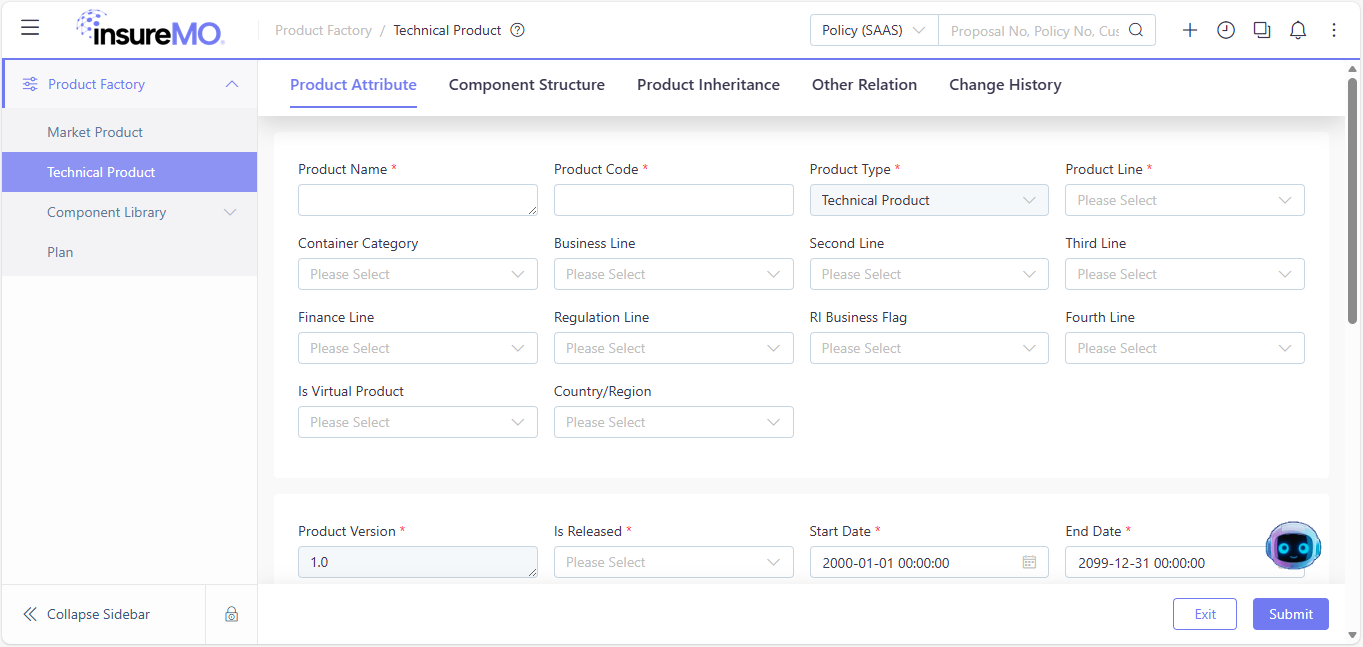
Similarly, in the initial editing interface of the Product Attribute for a Technical Product:
- Fields marked with
*are mandatory. - Among the mandatory fields,
Product Codeserves as the primary key in the Product Factory.
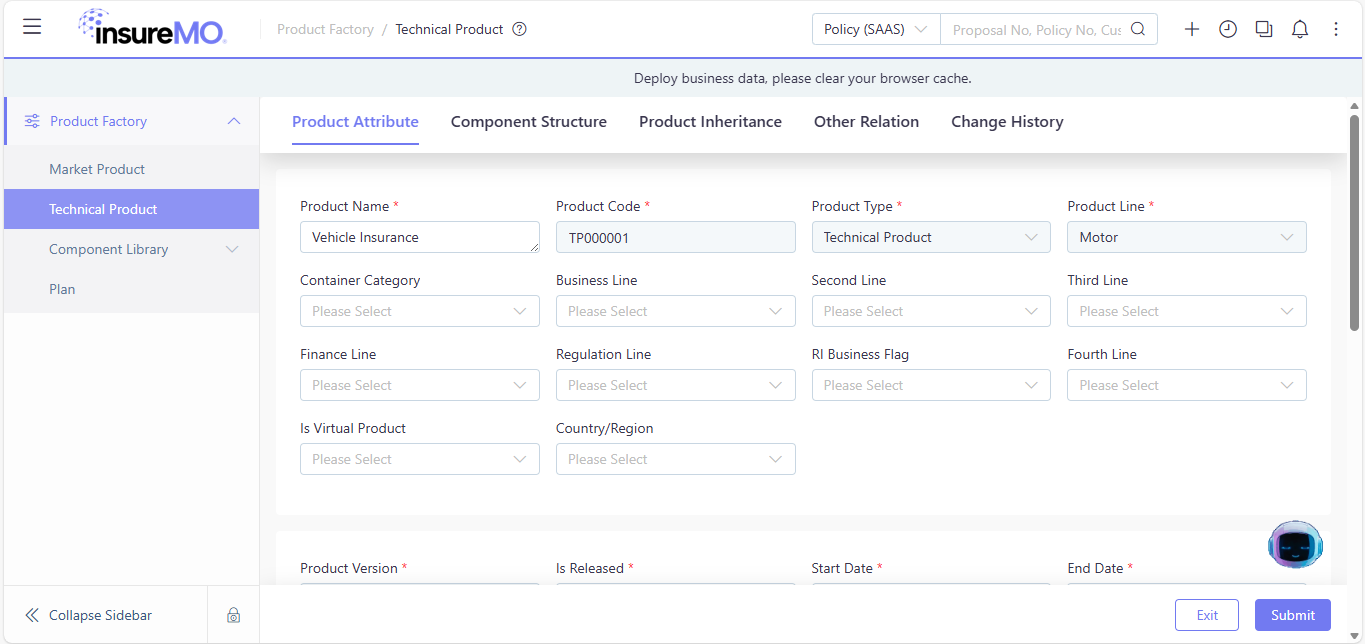
After completing the edits, click Submit to submit the edited Technical Product to the system.
Note:
- The Exit option will redirect you to the search page and discard all your modifications.
- Please note that the Product Code, Product Type, and Product Line fields cannot be modified after the initial submission; other fields can be updated.
- Only after submitting the Technical Product with Product Attribute completed can you proceed to edit its Component Structure.
After submission, you can search for this Technical Product record again and perform actions such as viewing, editing, copying, or deleting it.
4.2. Component Structure Maintenance
We now have the required Technical Product created. According to the industry best practice, an Insurance Product has a mapping relationship with one or more Coverages along with their attributes like limits and deductibles.
Therefore, in accordance with the design structure of insurance products, we search for, select, and add the required components as child nodes in levels to create a tree structure in the Component Structure panel.
Here for our case, we first add the level Risk, then the level Coverage, finally the level Limit Deductible, following the steps below:
-
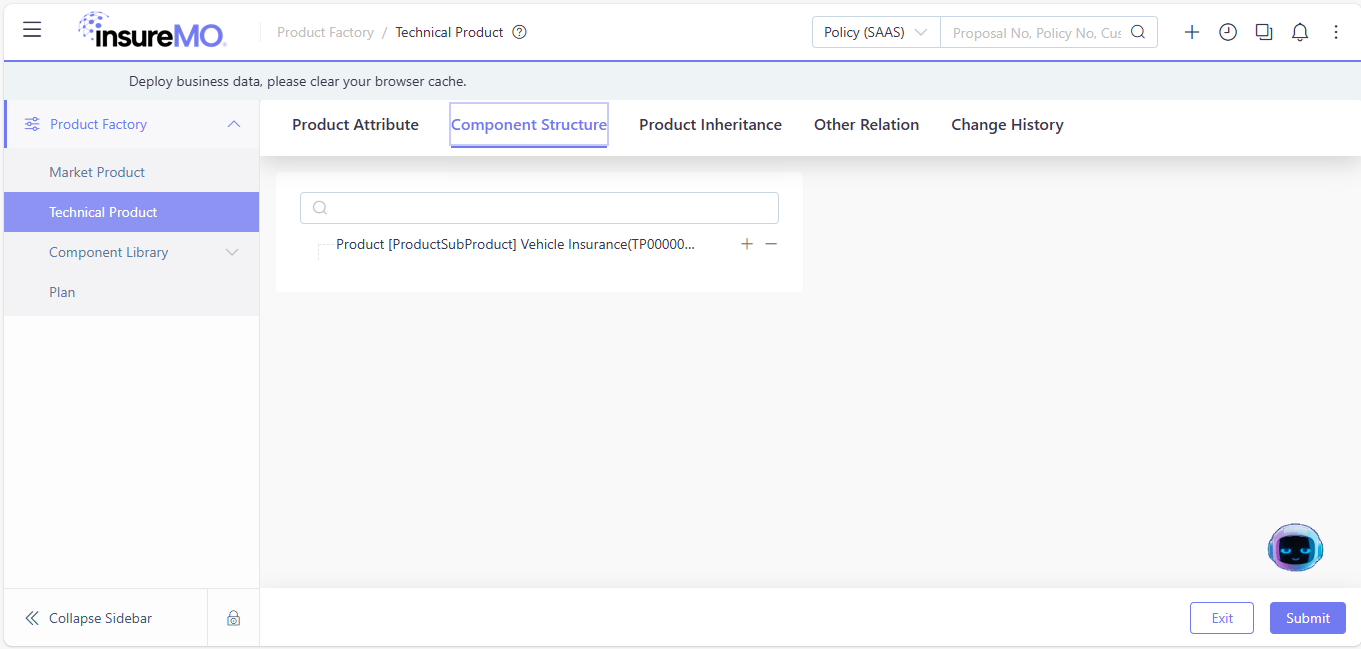
Click the Component Structure tab in the top toolbar. You will see the following interface:
-
Move the mouse pointer to the node area of
Product [ProductSubProduct] Vehicle Insurance TP00000.... A + sign will appear on the right side of the node entry. Click +, and a search module will appear on the right side of the interface (see the figure below), allowing you to search for and select the required component elements: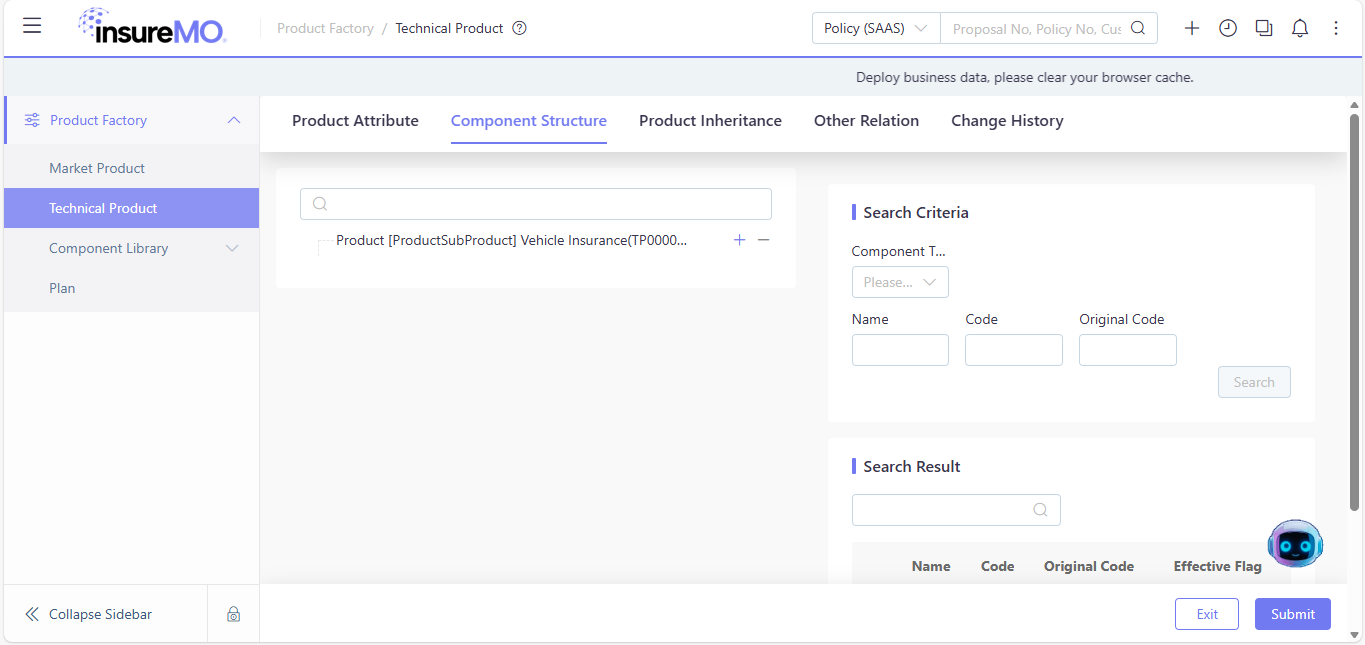
-
In the Search Criteria tab, you can enter filter criteria. The Component Type field is mandatory—please select the target attribute from the dropdown list. Different component types in the dropdown list correspond to different component libraries.
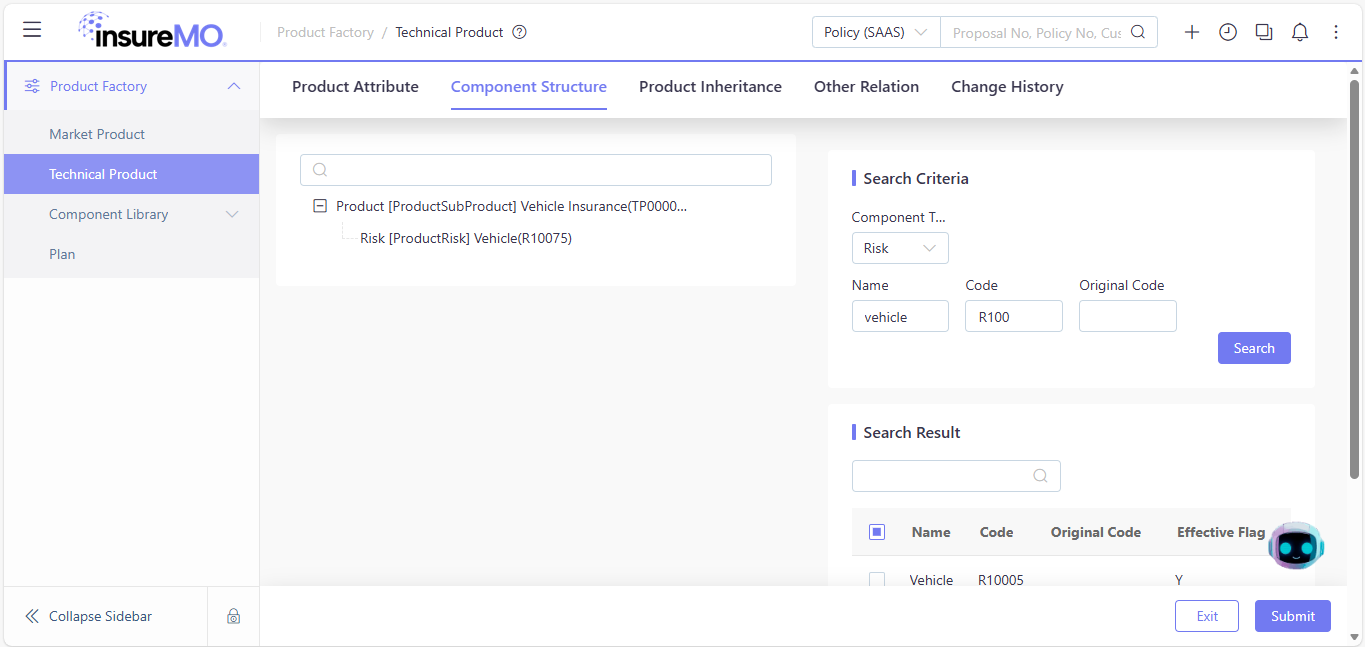
In this case, we want to first add one Risk component of
Vehicle. So search in the colomn as below (we use the Component Type, Name and Code fields for fuzzy filtering), then click Search. The results are shown in the figure below: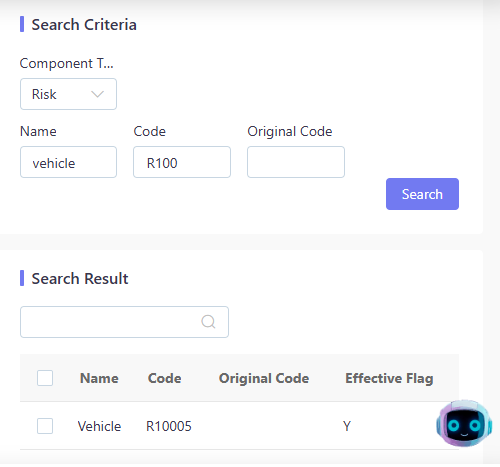
-
Select the required components:
- Click the checkbox on the left side of an entry to select it individually.
- Or click the checkbox next to Name to select all entries.
In this case, we select the Risk component with the code of R10075.
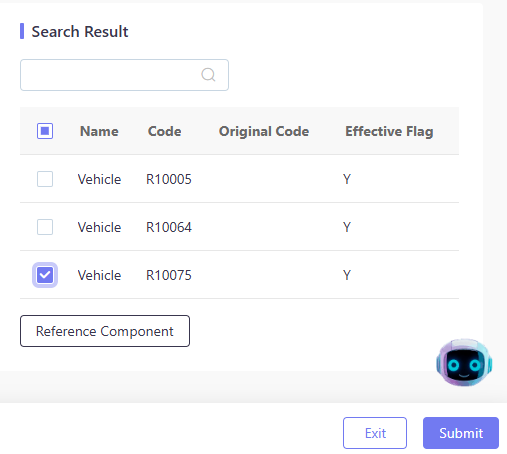
- Click Reference Component to add the selected entries under the parent node on the left.
-
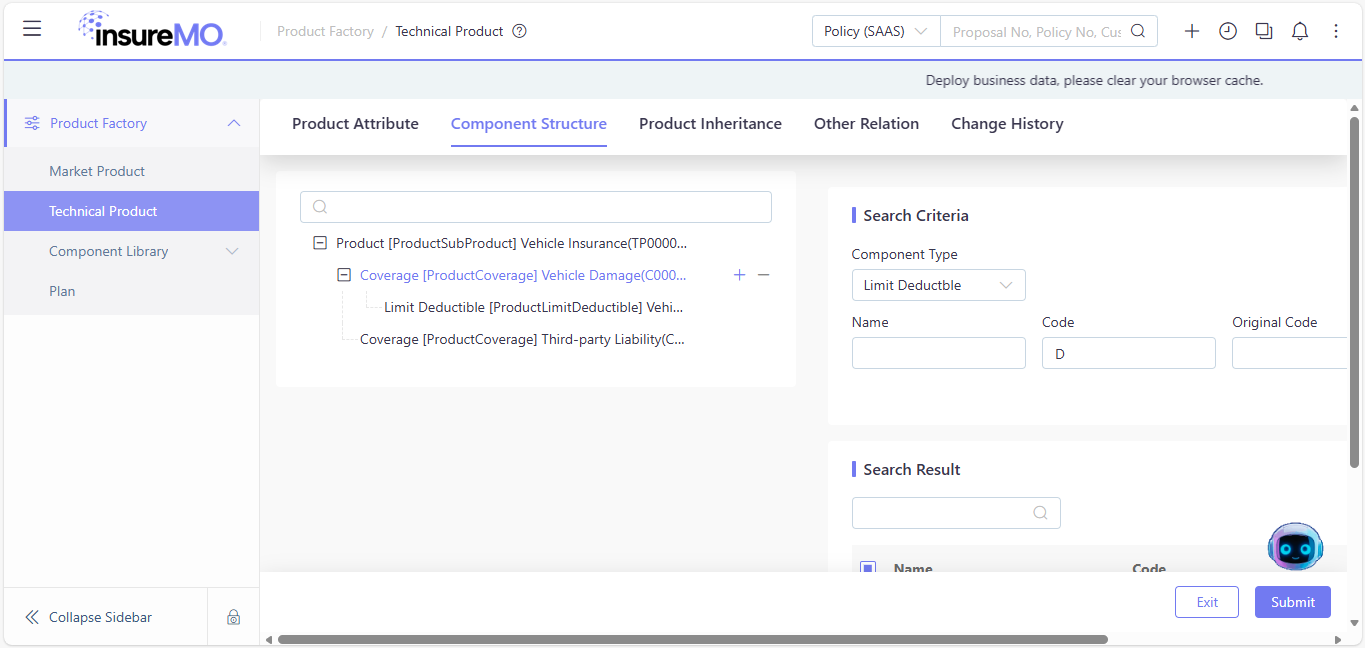
Then we want to add two Coverage components with Component Codes “C000001” and “C000002”.
- Note: To successfully add child node for items at level 2 (e.g., Risk in our case) and above, click the parent node first. After it is selected (the entry turns blue), click + sign on the right side of the entry.
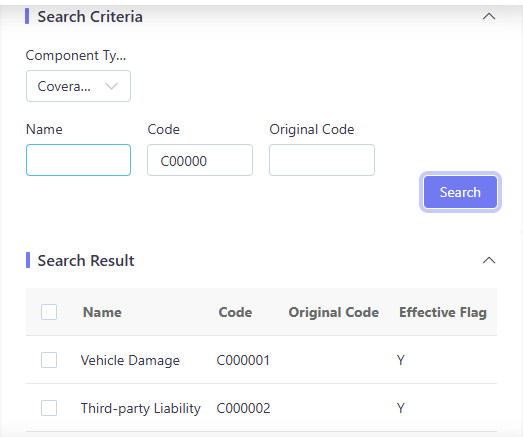
- We use the Component Type and Code fields for fuzzy filtering,, then click Search. The results are shown in the figure below:
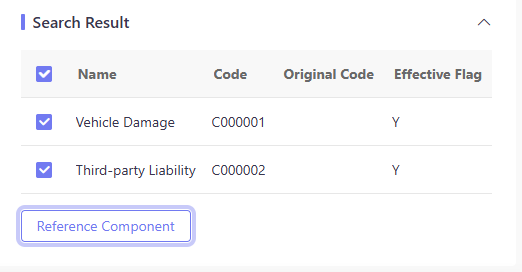
- Then we select the two filtered Coverage components: Vehicle Damage and Third-party Liability. Click Reference Component to add the selected entries.
-
After successful addition, you will see that new Coverage component child nodes have been added to the Component Structure Tree on the left (see the figure below). To delete an unwanted child node:
- Move the mouse pointer to the child node entry area. A
-sign will appear on the right side of the entry. - Click - to delete the child node.
Additionally, click the checkbox on the left side of a parent node to expand or collapse its child nodes.
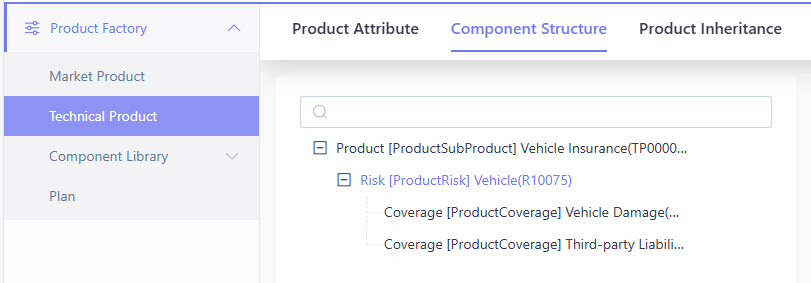
- Move the mouse pointer to the child node entry area. A
-
Then following the same step, we have the Deductible component added.
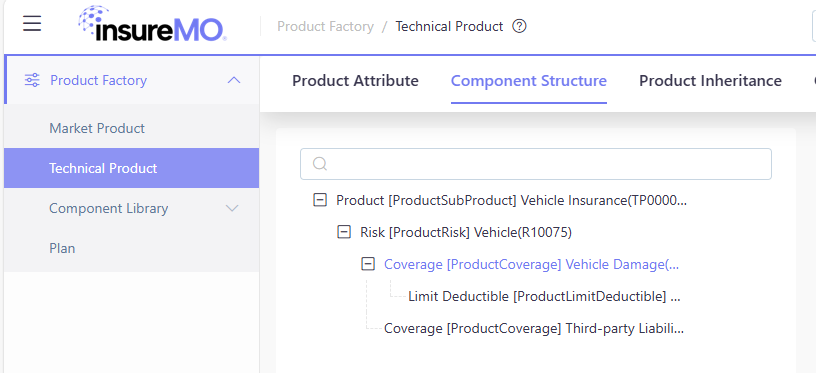
-
After completing the edits, click Submit to submit the updated Technical Product to the system.
Note: The Exit option will redirect you to the search page and discard all your modifications.
After submission, you can search for this Technical Product record again (see the figure below) and perform actions such as viewing, editing, copying, or deleting it:
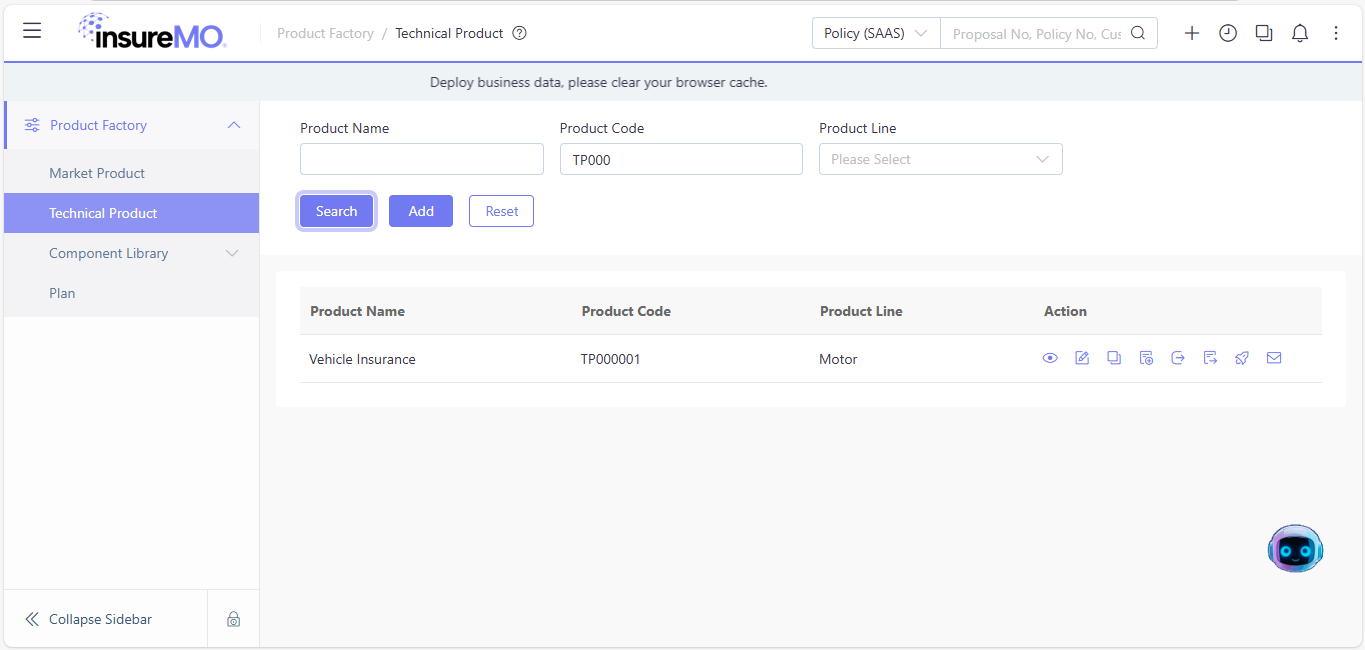
After submission, you can search for this Technical Product record again (see the figure below) and perform actions such as viewing, editing, copying, or deleting it:
4.3. Other Relation Maintenance
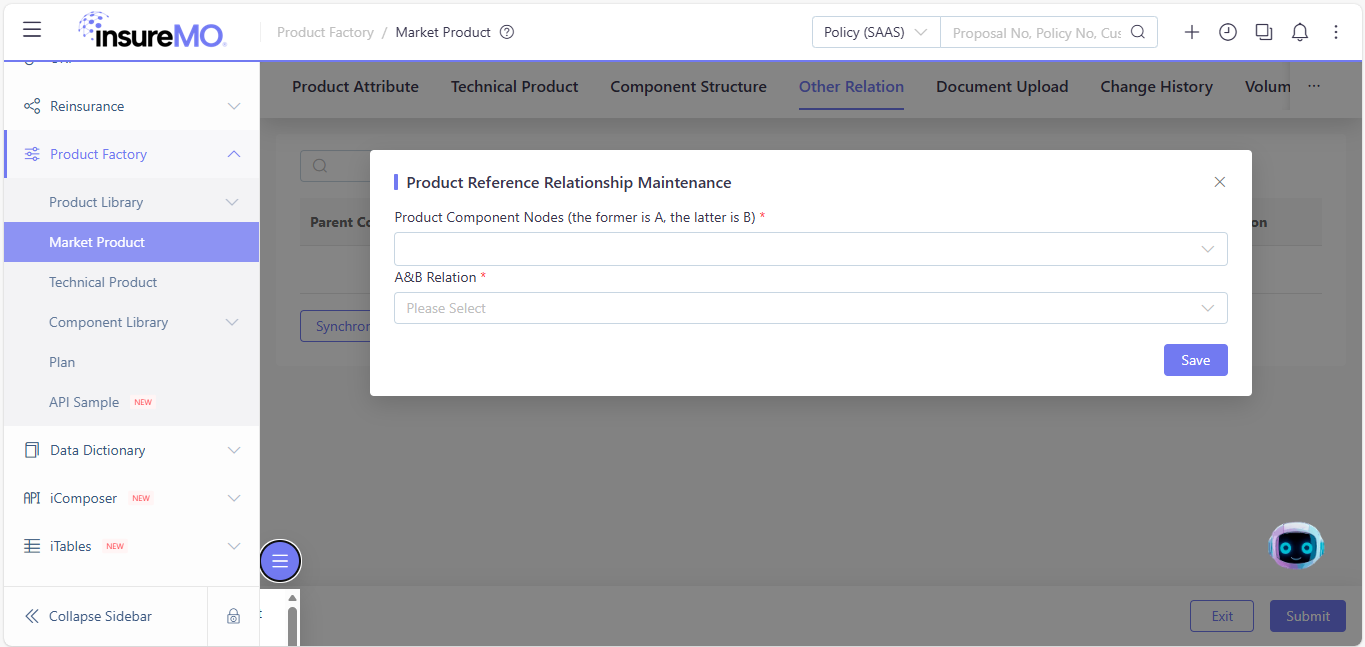
As shown in the figure below, you can also maintain the association rules for components in the Other Relation tab. Click Submit after completing the edits:
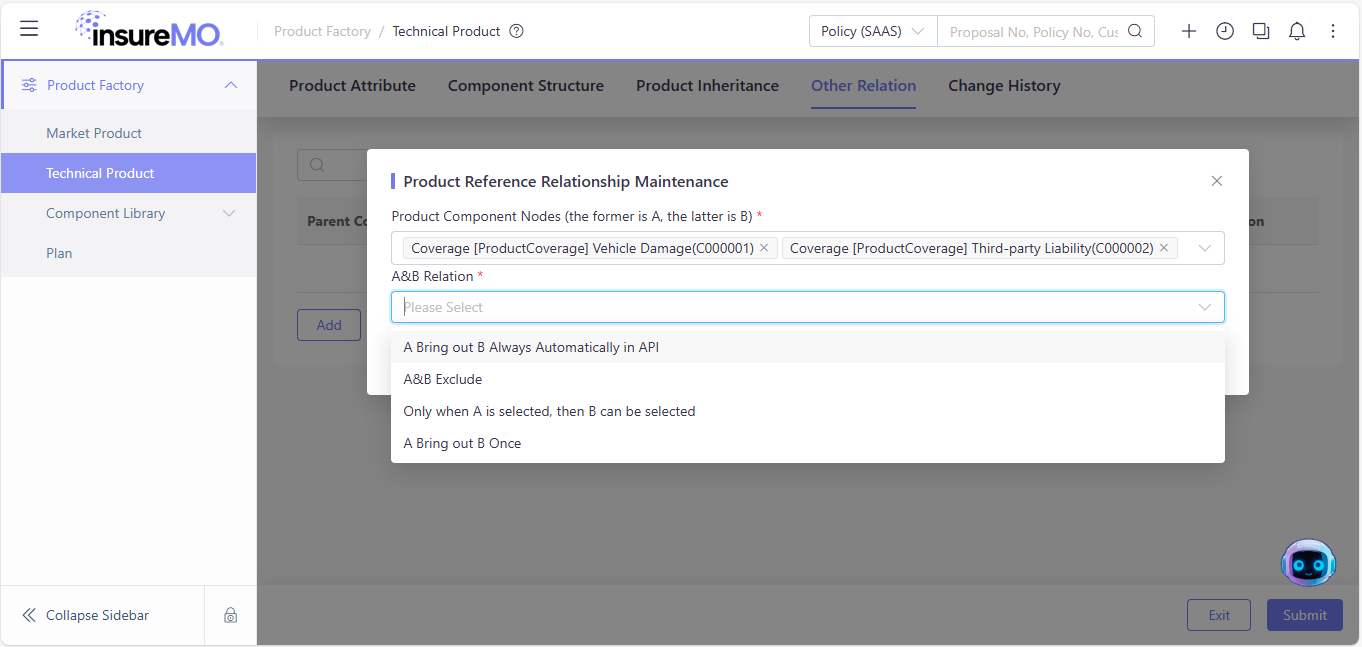
4.4. Product Inheritance Maintenance
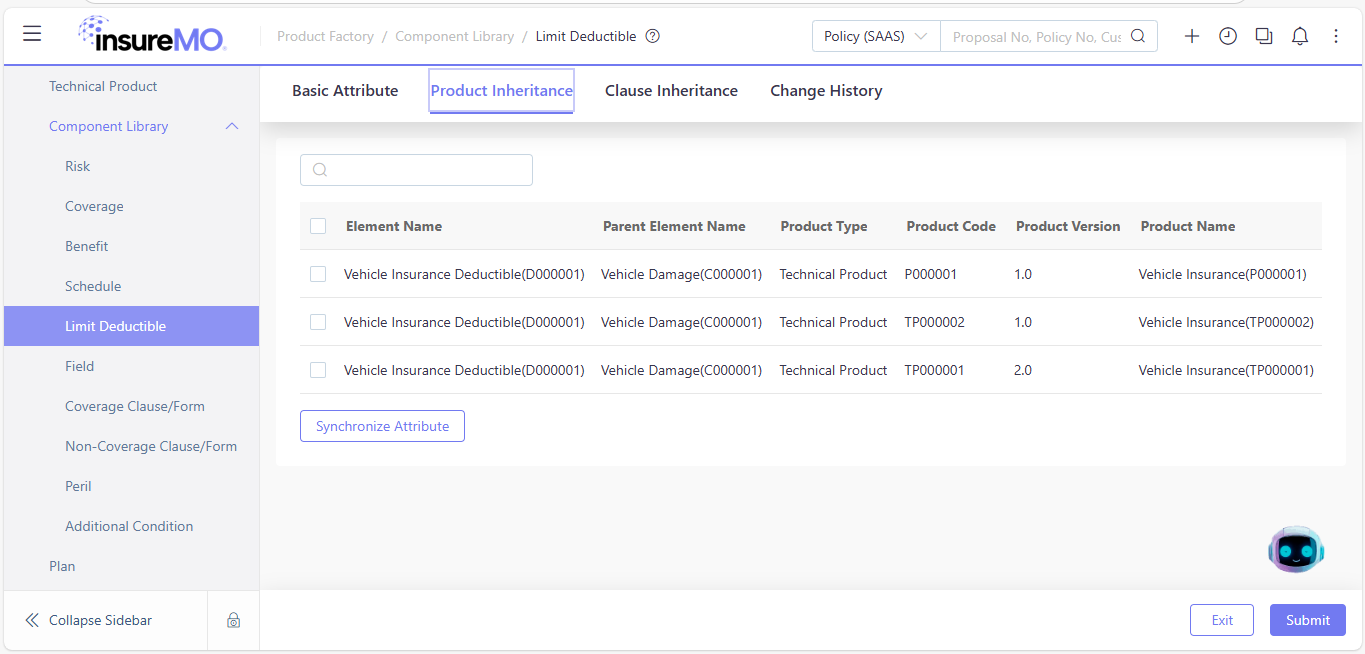
After maintaining the Component Structure, you can click the Product Inheritance tab in the corresponding component record (Limit Deductible in this case) to view and synchronize the Product Inheritance relationships, as shown in the figures below:
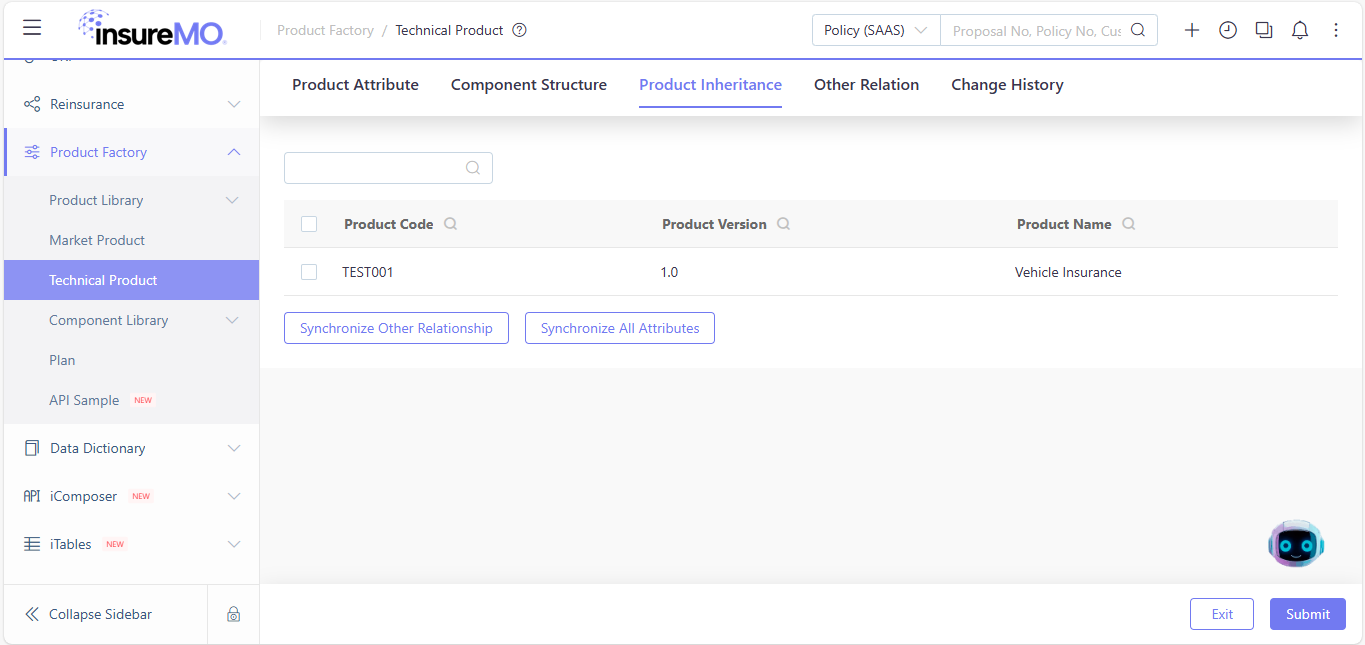
And you can also check the Product Inheritance interface in the Technical Product module.
4.5. Change History Maintenance
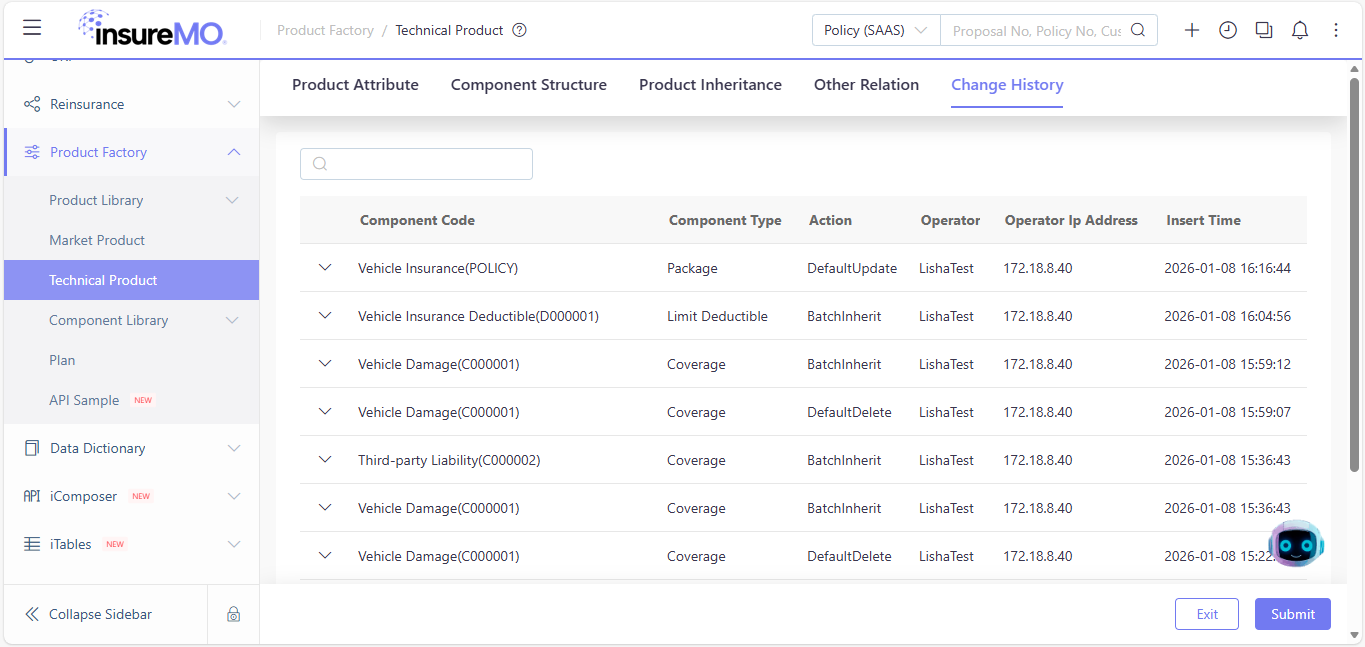
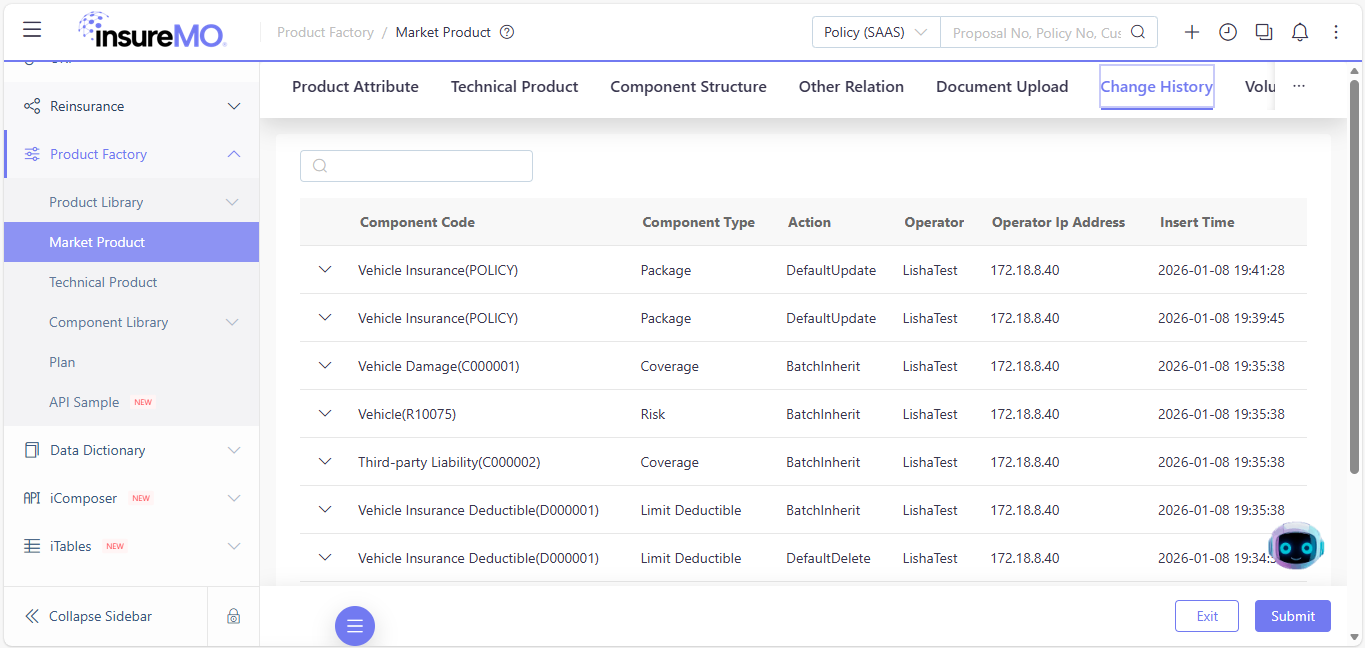
You can click the Change History tab to view how the current product structure is constructed, as shown in the figures below:
5. Market Product Maintenance Quick Start
5.1. Product Attribute Maintenance
After the Technical Product is created, you can start establishing the Market Product:
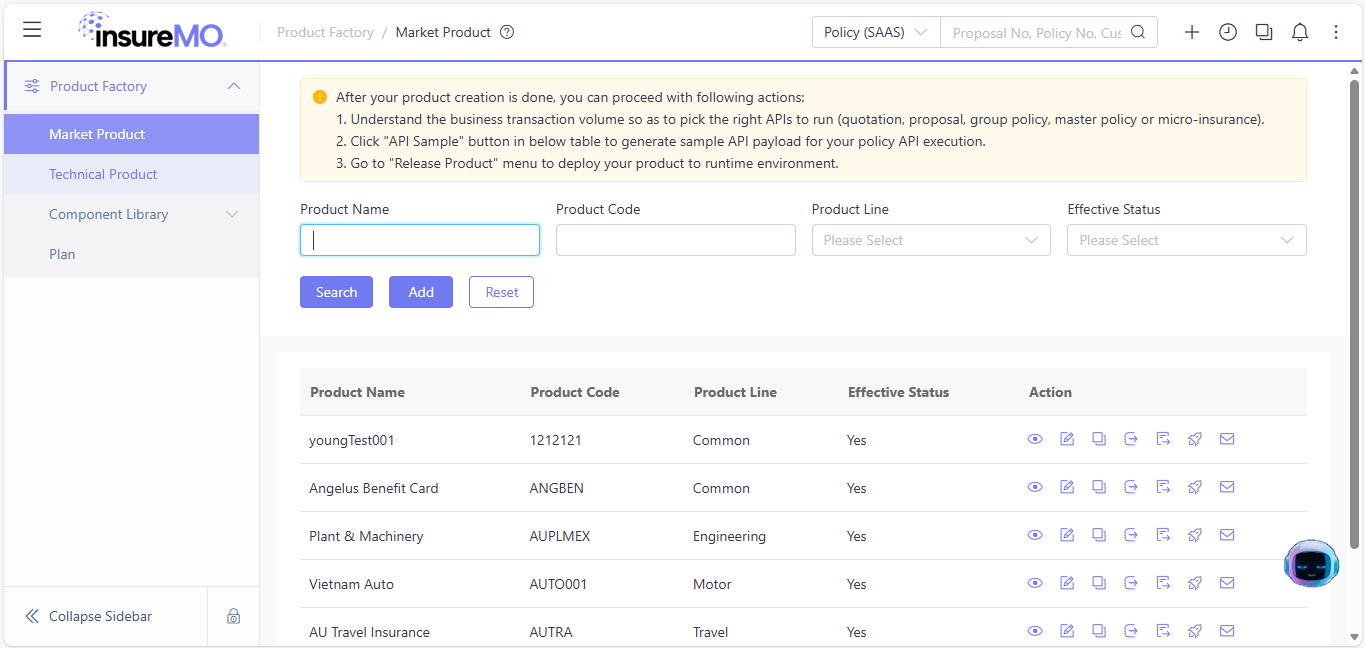
Click Add button, and the following interface will appear:
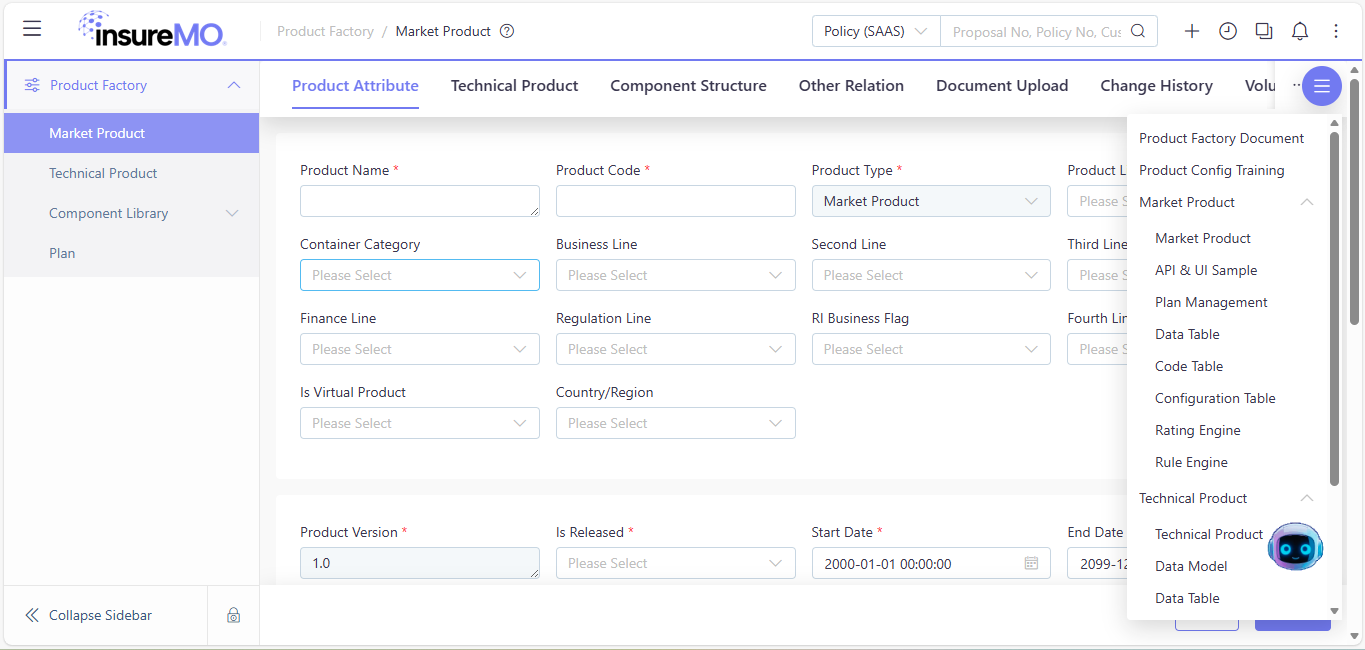
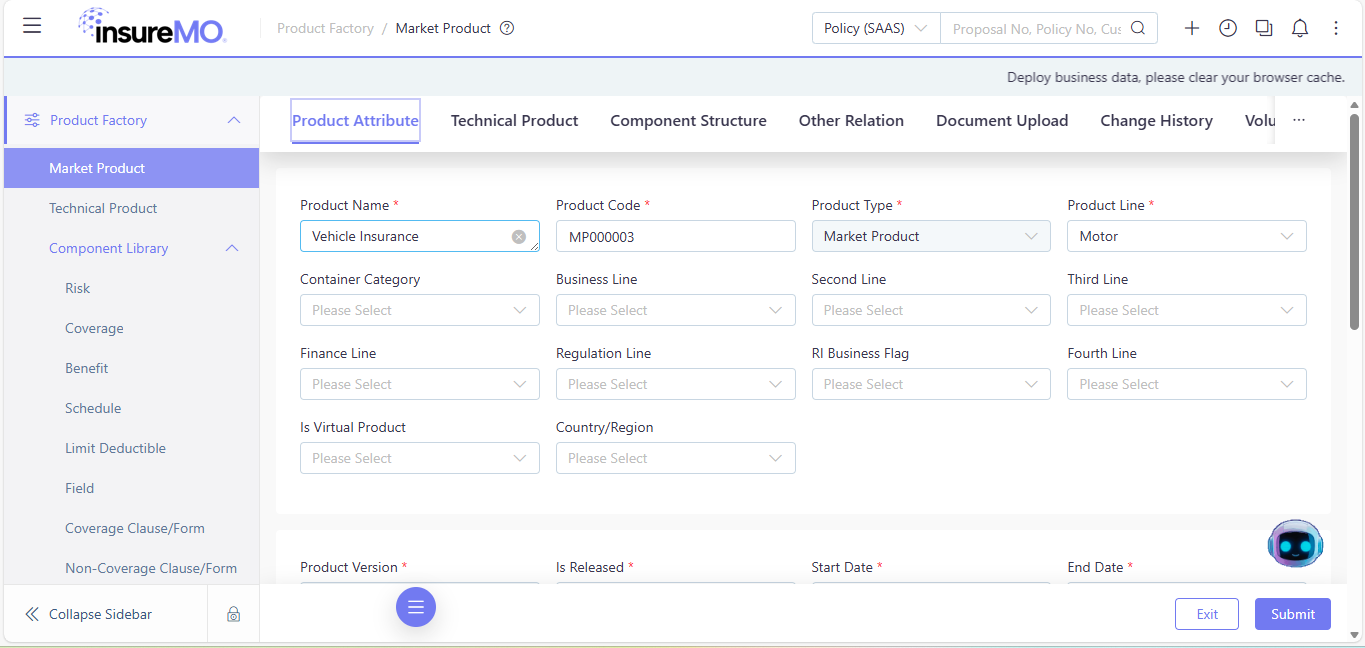
Similarly, after completing the edits, click Submit to upload the basic information.
Note: Only after submitting the Market Product at the Product Attribute page can you continue to edit its Technical Product information.
5.2. Technical Product and Component Structure Maintenance
Step 1: Inherit Technical Product
-
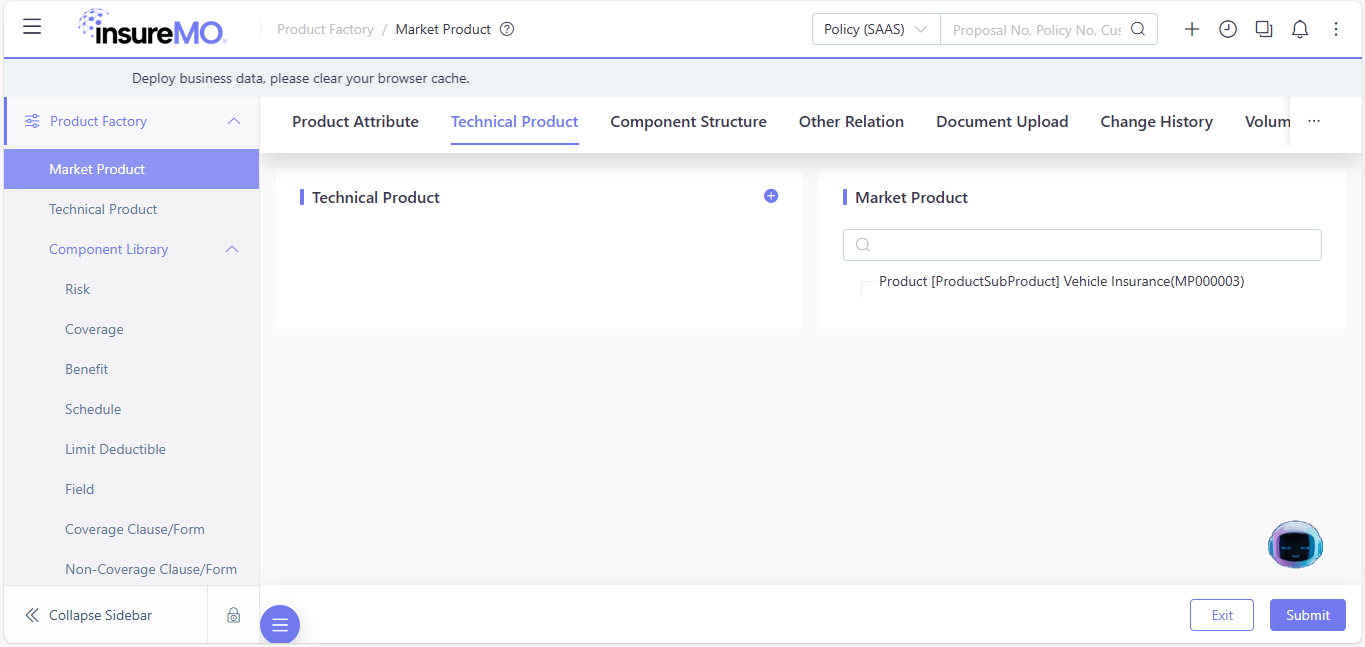
Select the Technical Product tab.
-
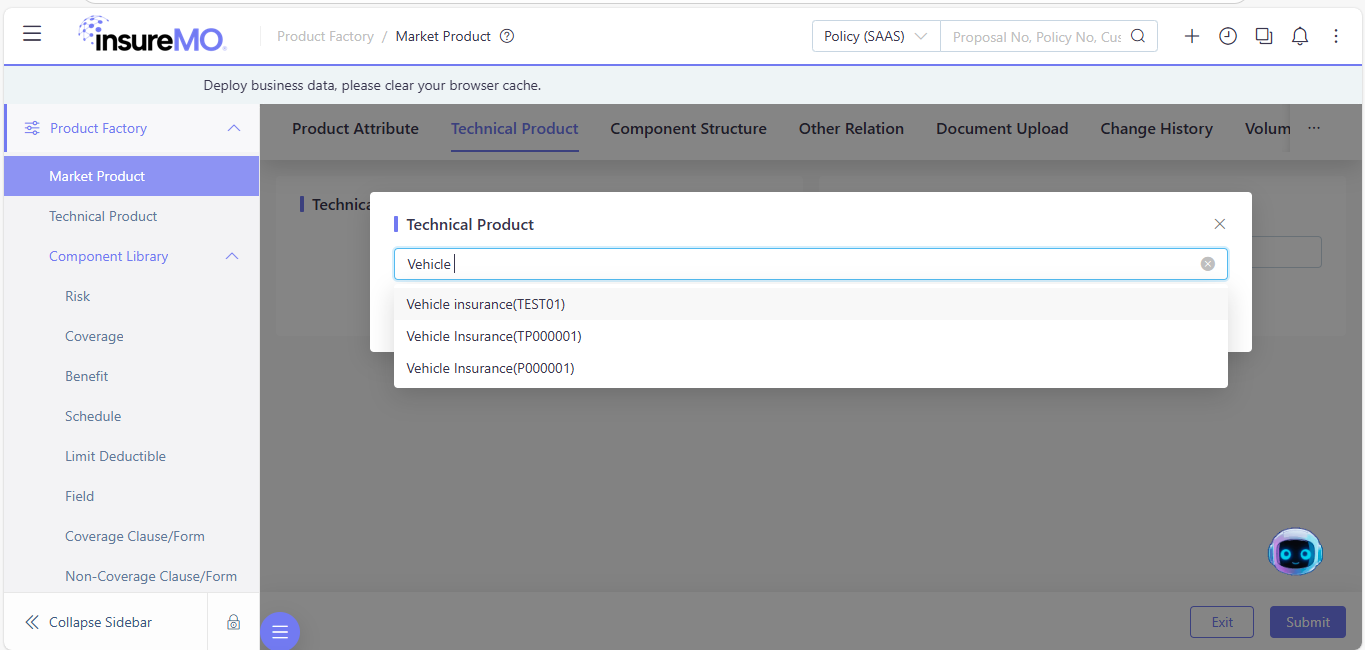
Click + botton next to the Technical Product tag, as shown below. Search and choose the Technical Product you need to inherit from the search box. Click Confirm to upload the choice.
-
After adding the Technical Product, select the nodes to be inherited in the Market Product, whose tag truns blue.
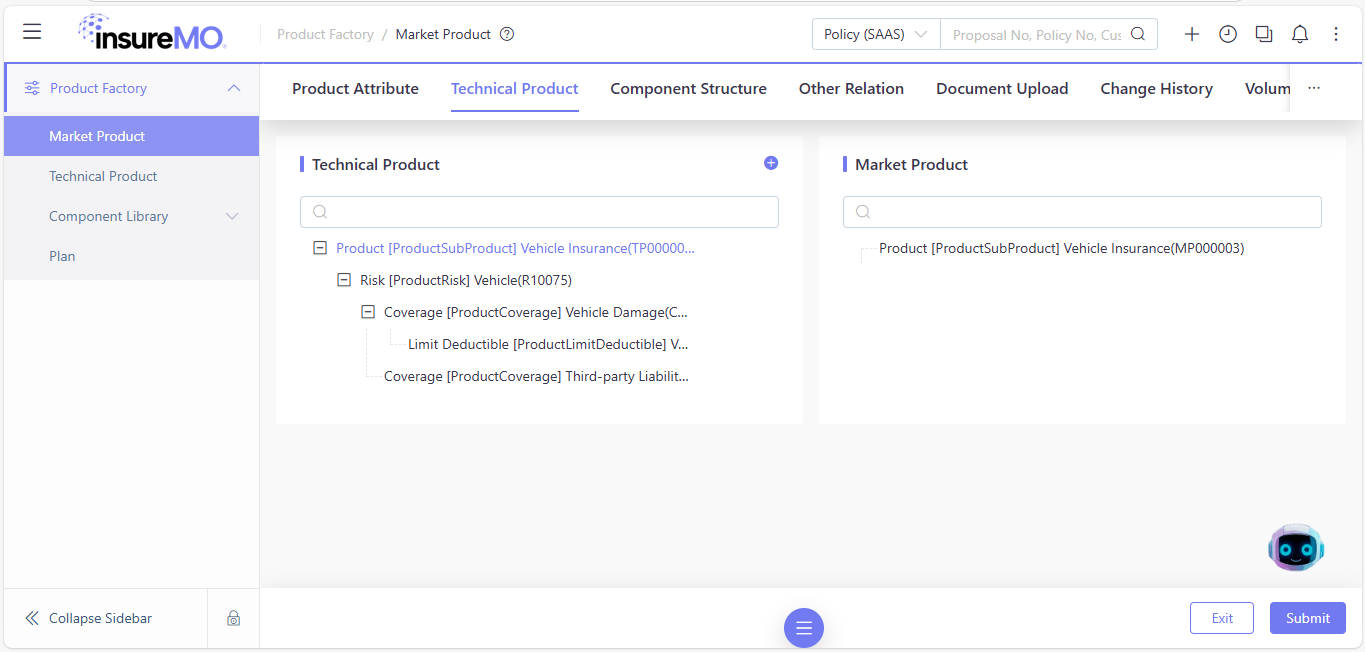
-
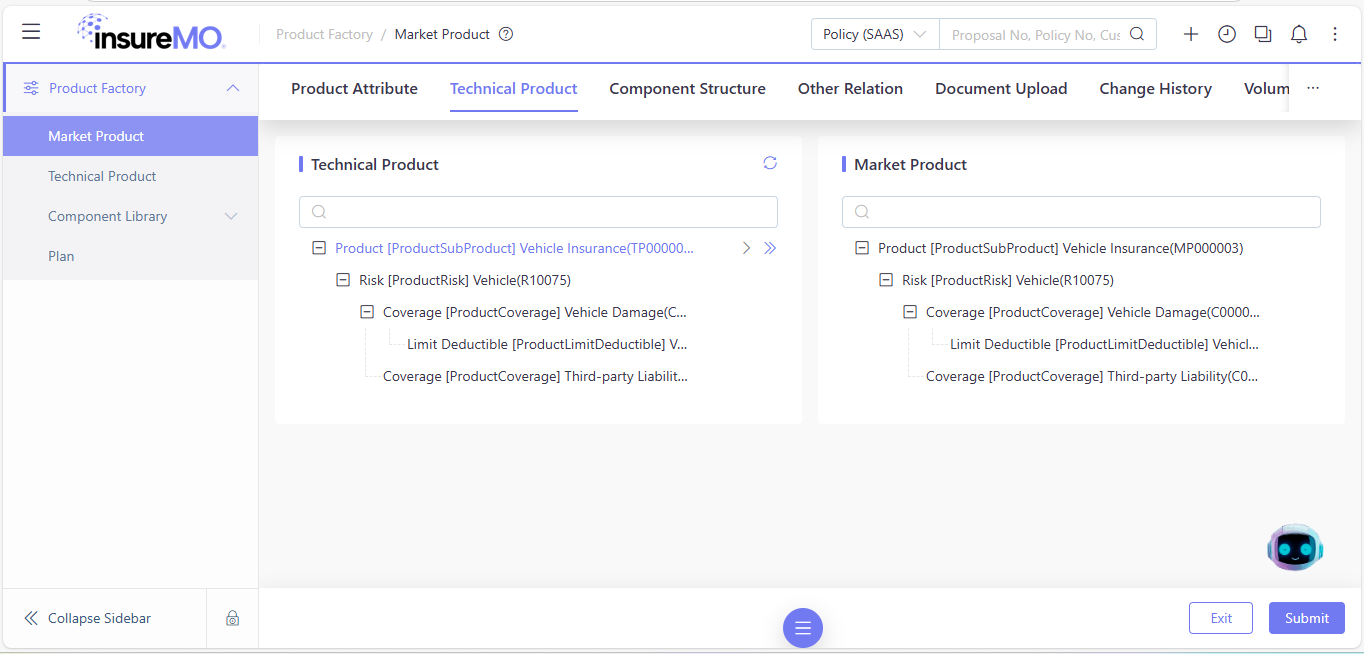
When you hover the mouse pointer over the corresponding node, two buttons (> and >>) will appear on the right:
- Click >: The Market Product will inherit the selected node itself;
- Click >>: The Market Product will inherit the selected node and its child nodes.
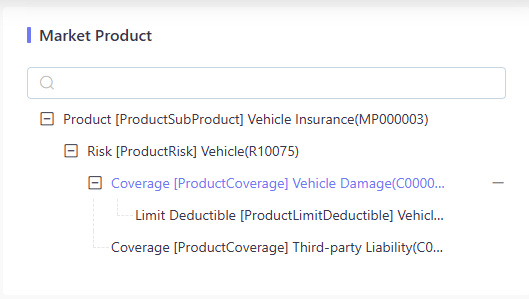
- You can also delete nodes from the Market Product tree at this stage. Hover the pointer around target tags and click - on the right. You can rechoose the Technical Product after deleting all child nodes of the Market Product tree on the right of the dashboard.
Click Submit after selection to upload the settings.
Step 2: Adjust Component Structure
Next, select the Component Structure tab to perform component pruning (i.e., adjust the component hierarchy as needed):
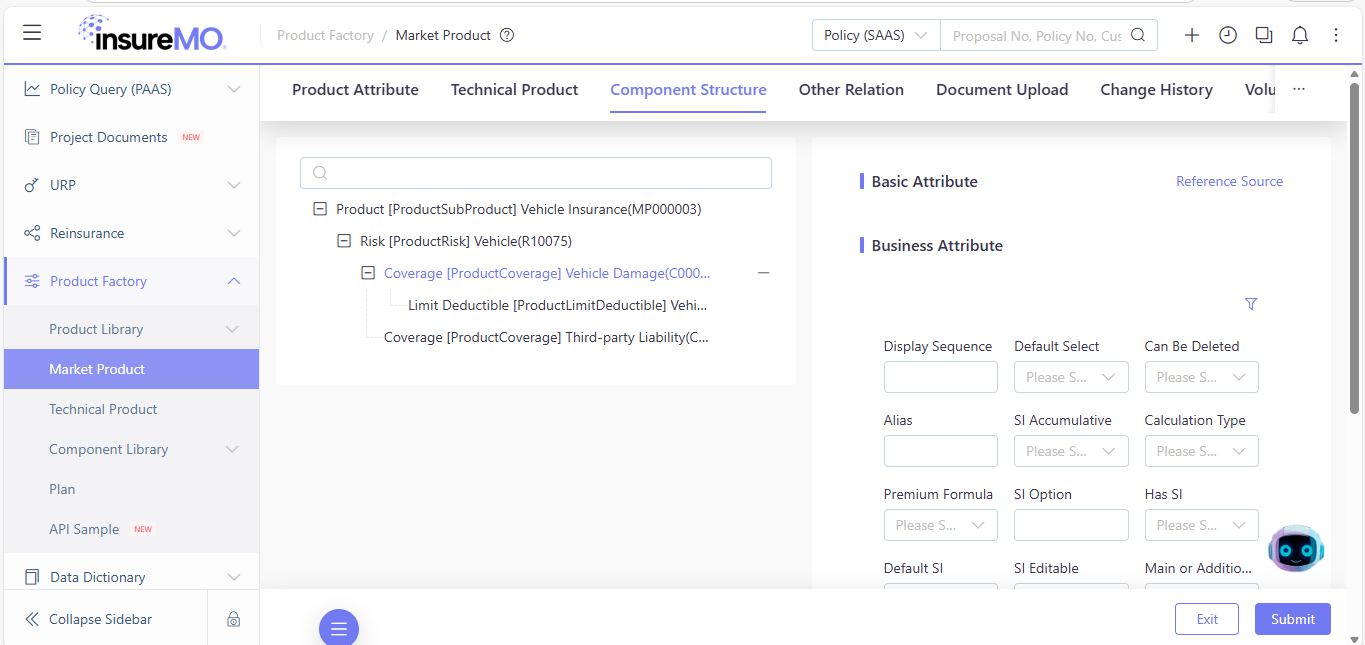
You can also edit business attributes of each component as needed.
Click Submit after completing the adjustments to upload the settings.
5.3. Other Relation Maintenance
The operations are similar to those in Section 4.3. You can synchronize existing relationships or add new ones.
5.4. Document Upload Maintenance
You can click Document Upload tab to upload, view and manage files related to this market product, as shown in the figures below:
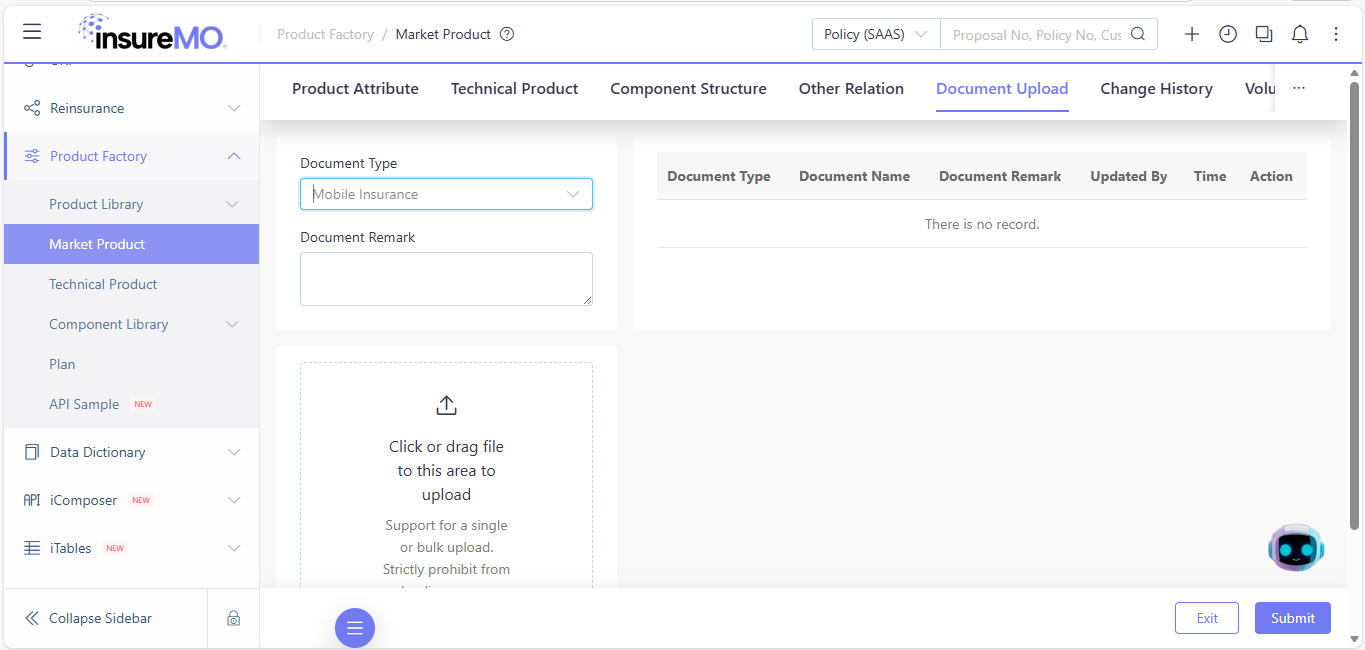
If you want to upload files, please select one Document Type first, then the upload interface in the lower left corner will appear. It support for a single or bulk upload in multiple formats.
5.5.Change History Maintenance
This module is very similar to that in Section 4.5. You can click Change History tab to view how the current product structure is constructed.
6. Plan Maintenance Quick Start
6.1. Basic Information Maintenance
After the Market Product is created, you can start establishing the Plan:
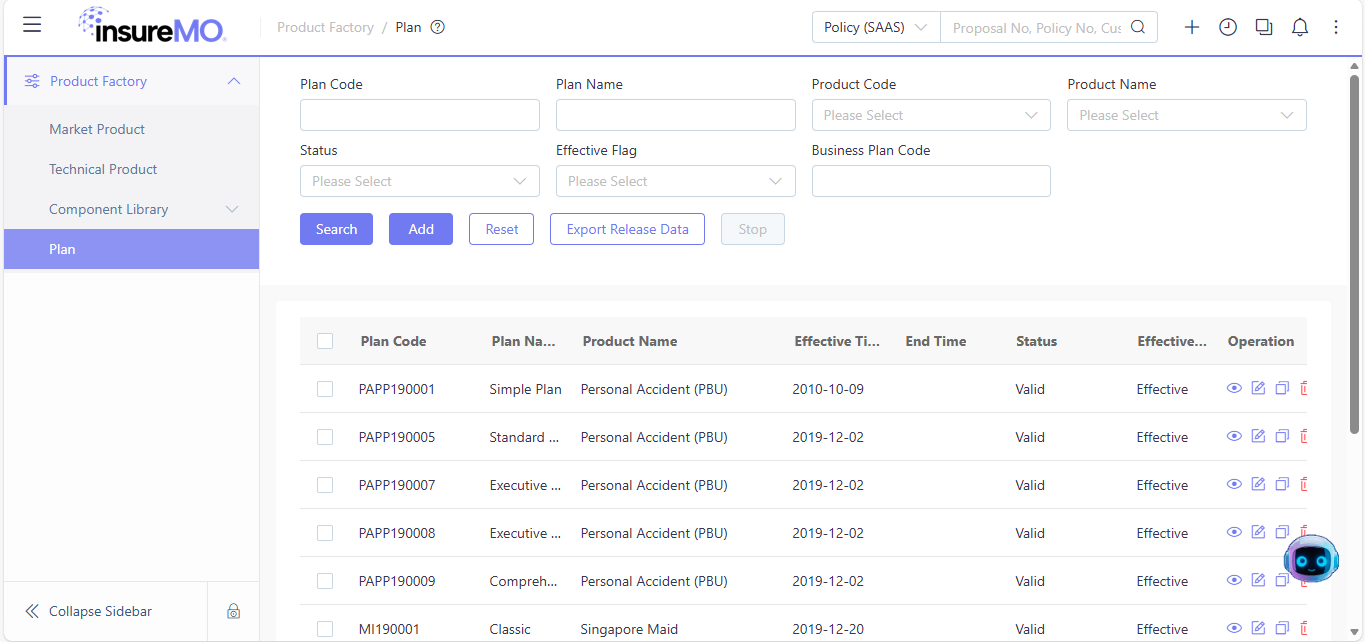
Click Add button, and the following interface will appear:
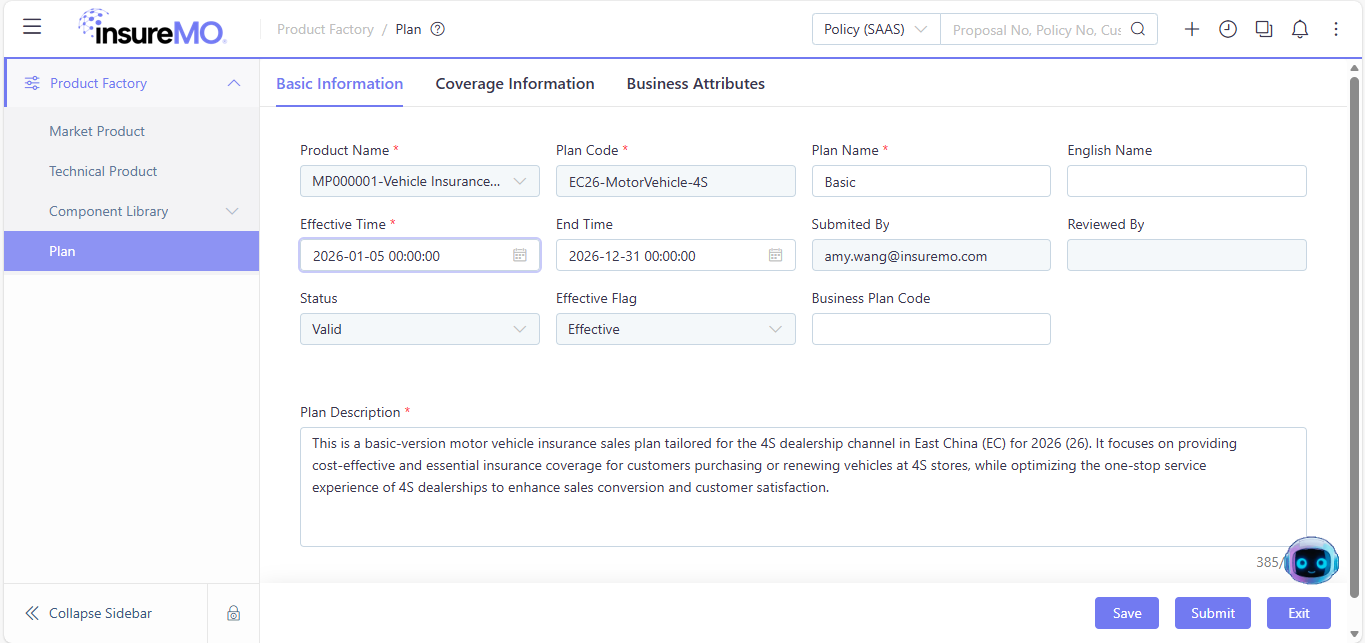
Similarly, after completing the edits, click Submit to upload the basic information.
Note: Only after submitting the Plan at the Basic Information page can you continue to edit its Coverage information.
6.2. Coverage Information Maintenance
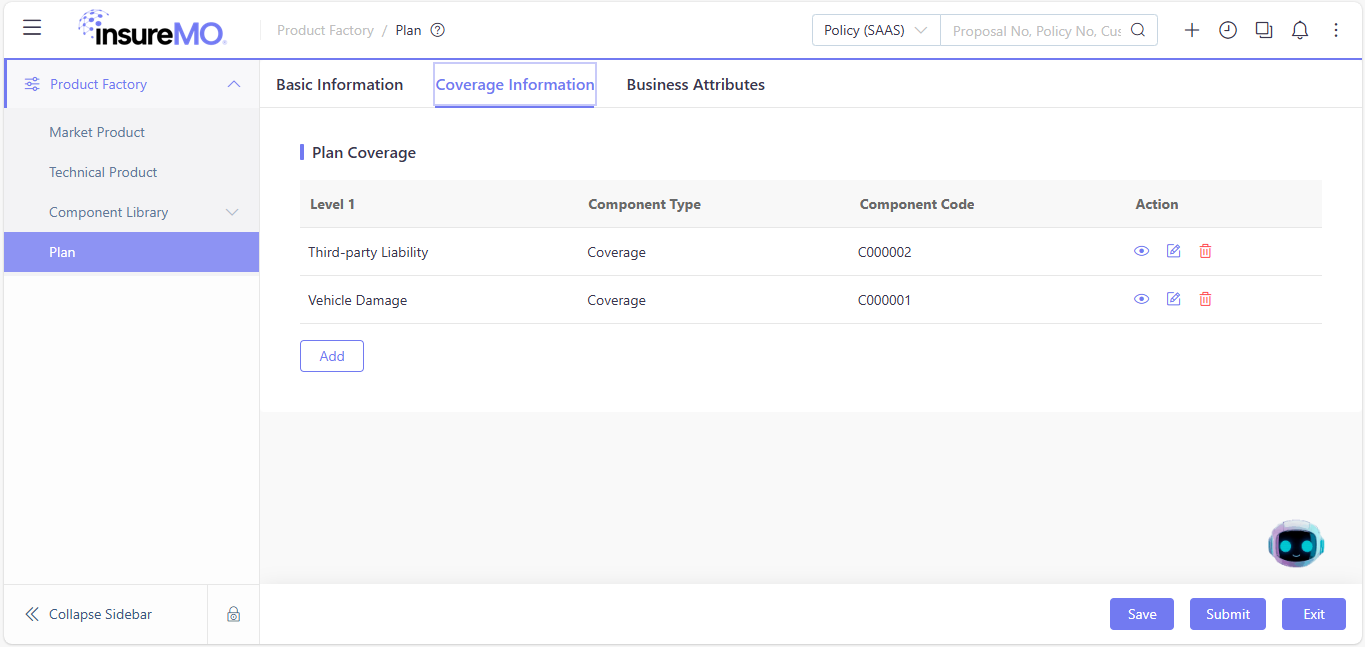
After editing the Basic Information, you can start configuring the Coverage Information for different sales plans:
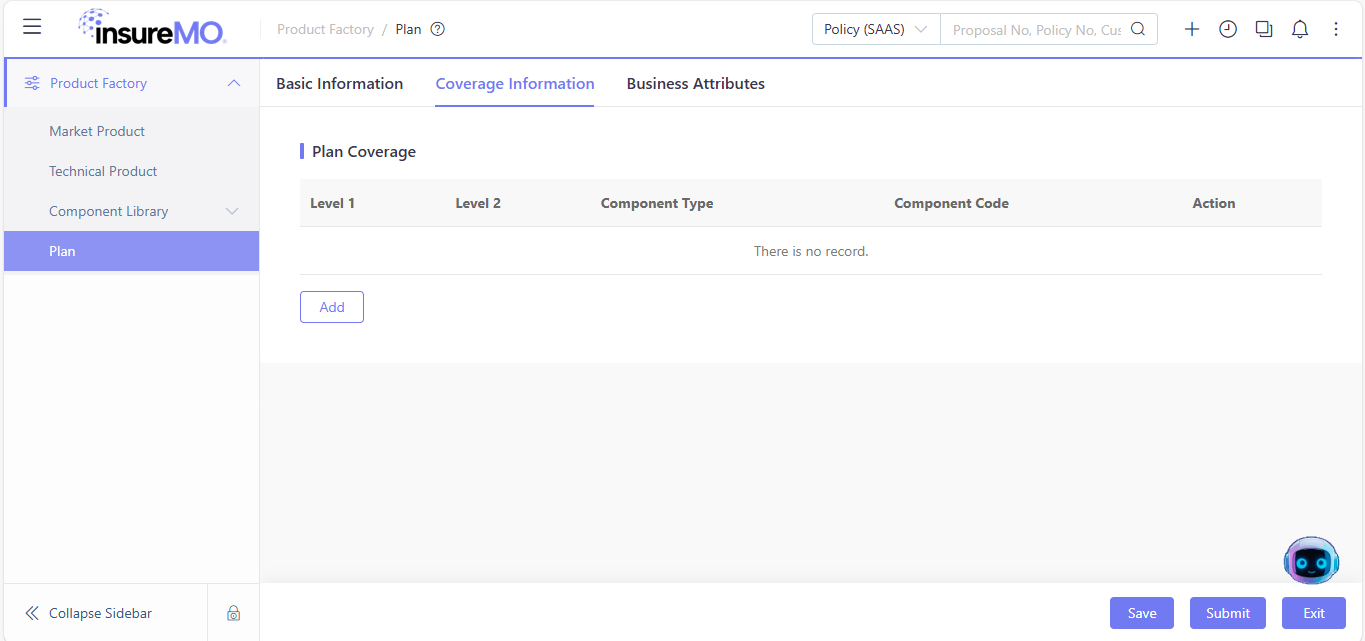
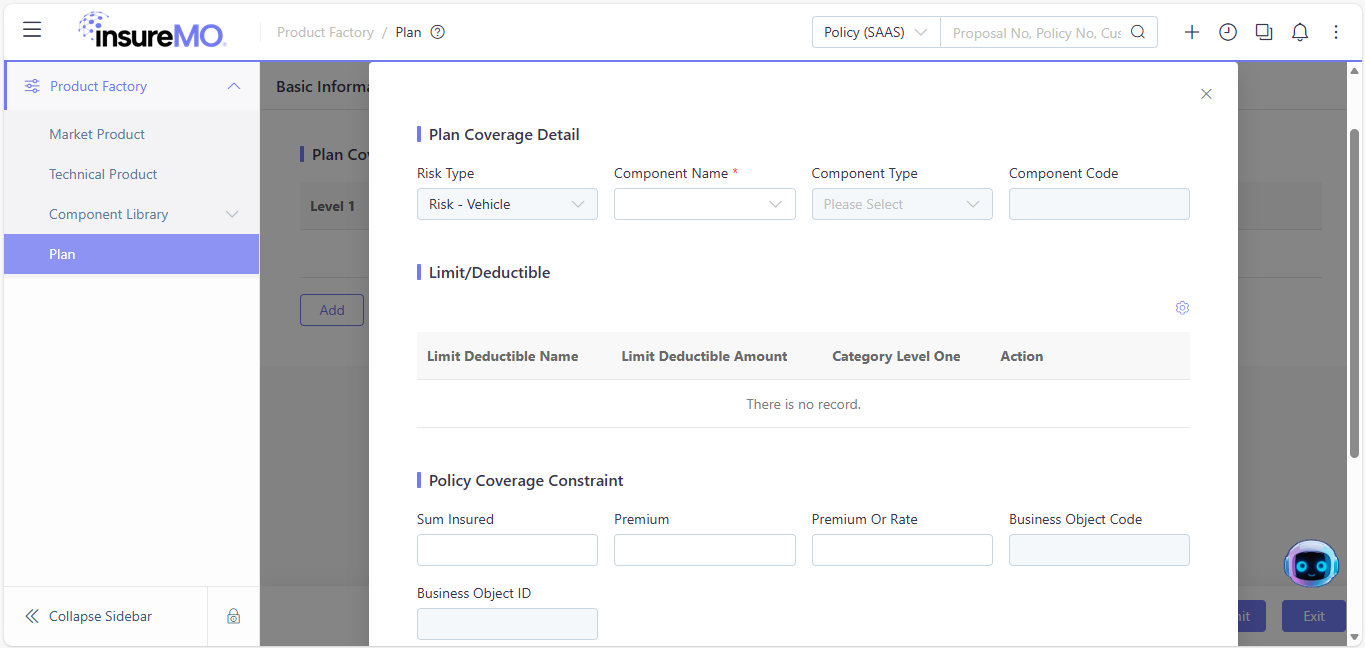
- Click Add. You must first select a parent node in the Component Name field before you can select its child nodes. Fields of Risk Type,Component Type and Component Code are automatically generated by the system once the page is Saved.
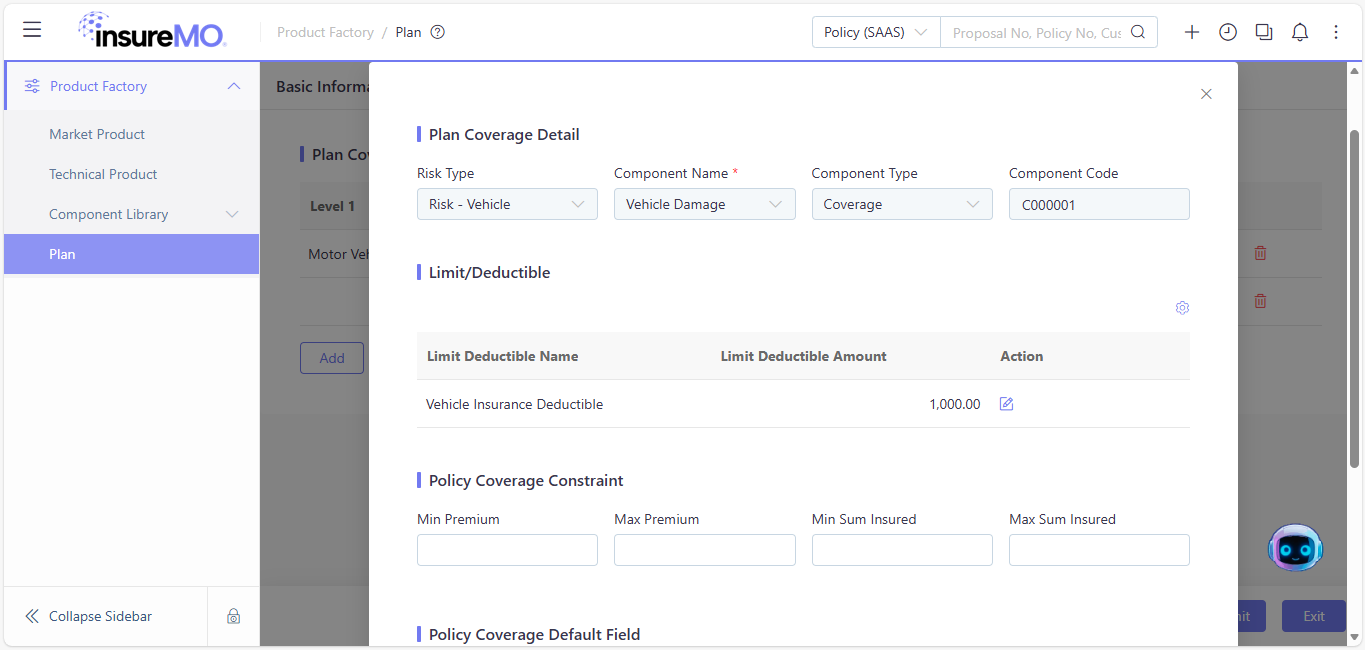
- Additionally, if you select a Coverage associated with a Limit/Deductible component, you can edit the Limit/Deductible amount for that Coverage, as shown in the figure below:
-
Policy Coverage Constraint and Policy Coverage Default Field are not mandatory fields. You can select and define attributes required by the sales plan.
-
Click Submit after completing the edits:
6.3. Business Attributes Maintenance
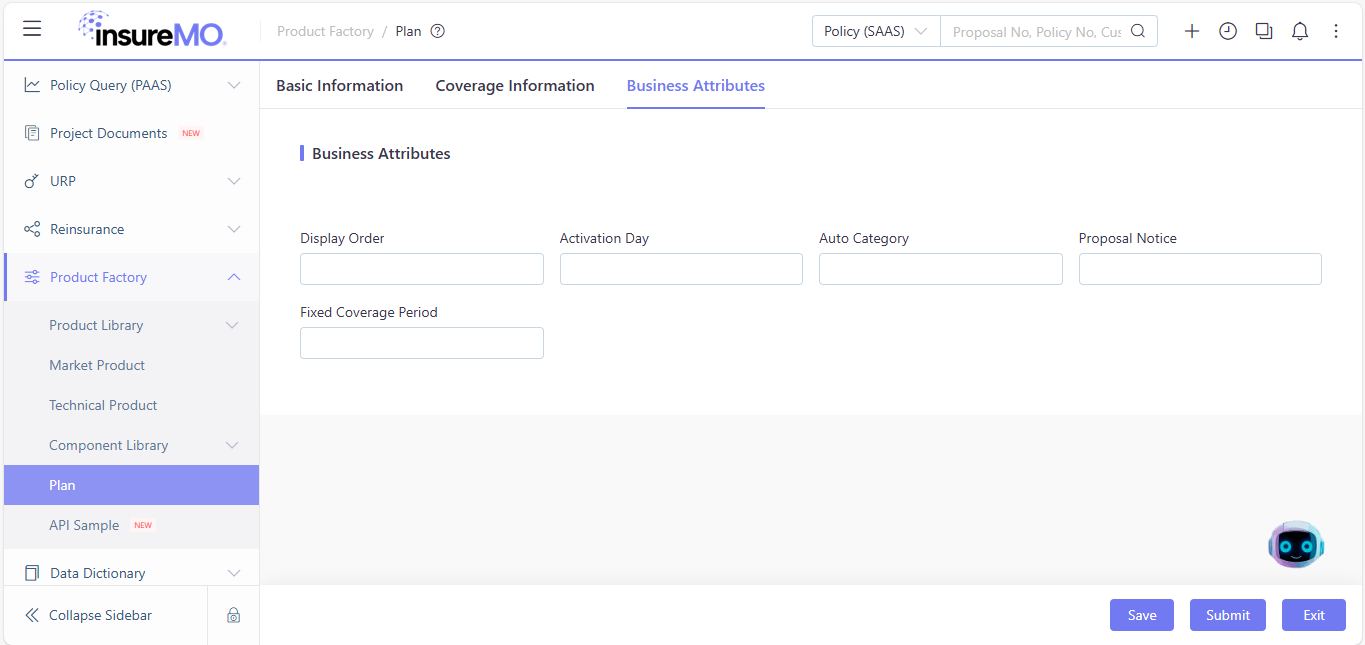
Add business attributes of the sales plan here. Click Submit to upload your modifications.