Basic Concepts
The majority of our InsureMO APIs are crafted to be atomic, so that each API performs a single, distinct system function without the requirement for customization.
However, it is often essential to integrate various atomic actions for complex real-world business scenarios within insurance applications. This integration process is widely known as API orchestration, as per industry standards.
Therefore, we’ve introduced a tool to simplify the creation of APIs with orchestrated functionality. It helps users bypass traditional development methods, achieving their objectives more efficiently and effortlessly.
User Scenarios
Developers and system analysts who want to create APIs to integrate diverse atomic business actions.
API Orchestration Composition
Key Concepts
RESTful API
The primary deliverable of our configuration process is the creation of RESTful APIs, which can be invoked by any internet-connected application. For those with prior Java experience, a RESTful API can be conceptualized as a Java class containing a single method designed to expose API endpoints.
Currently, our system only supports the following combinations with RESTful APIs:
- GET APIs with request parameters;
- POST APIs with request bodies;
- POST APIs with request bodies and parameters.
Service Function
Service functions refer to a collection of distinct system behaviors essential for executing RESTful APIs. Unlike RESTful APIs, which are designed for external invocation, service functions are primarily intended for internal code management. The segmentation of system behaviors into service functions facilitates the organization of API source code and enhances the reusability of code.
For those with a Java background, service functions can be envisioned as a Java class equipped with multiple methods, each dedicated to implementing specific system behaviors.
Batch Implementation
We have introduced the Batch-V2 Framework for managing batch scheduling, including the conditions and timing of batch execution.
With the help of iComposer, you can develop a batch through our out-of-box UI. It is essential to have prior knowledge of the Spring Batch framework before initiating batch implementation.
Interaction with InsureMO
The primary benefit of iComposer is the ease with which you can locate and invoke resources on InsureMO through our integrated code assistant.
APIs and SDKs
For ease of API invocation, most InsureMO APIs are exposed via SDKs. We provide two kinds of SDKs:
| Feature | V1 SDK or Vela SDK | V2 SDK or New SDK |
|---|---|---|
| Status | Deprecated | Active |
| Tech Stack | Java | Open Swagger (Can adapt to all tech-stack) |
| Foundation Dependency | Yes | No |
| Scope | Limited: GI, APP framework | All: GI, LI, APP framework, non insurance services |
| Invoke Method | getBean() | getSDK() |
| Guide | Platform SDK API | Welcome to InsureMO SDK for Java |
You may select either SDK based on your preference for API interaction.
Static Methods
Static methods are special functions designed to provide specific utilities. The most common methods, including mathematical operations, data type conversions, and constant definitions — can be invoked directly in a program without creating instances.
Domain Models
To facilitate API invocation, many APIs are designed to leverage Java models rather than maps. When calling such APIs, it is crucial to use these domain model interfaces and import the domain models into your scripts.
InsureMO offers a suite of model utilities to assist with retrieving and setting API parameters and values.
Common Utilities
In addition to API-related features, the platform provides a set of utilities to expedite development. These utilities include:
- JSON, maps, or models conversion: IComposerJsonUtils
- Debugging log and troubleshooting: Error/Info/Debug
- External APIs invocation: IComposerRestTemplateManager
- Retrieval of configuration parameters form Config Center: IComposerEnv.getEnvParameter
The Invocation Structure
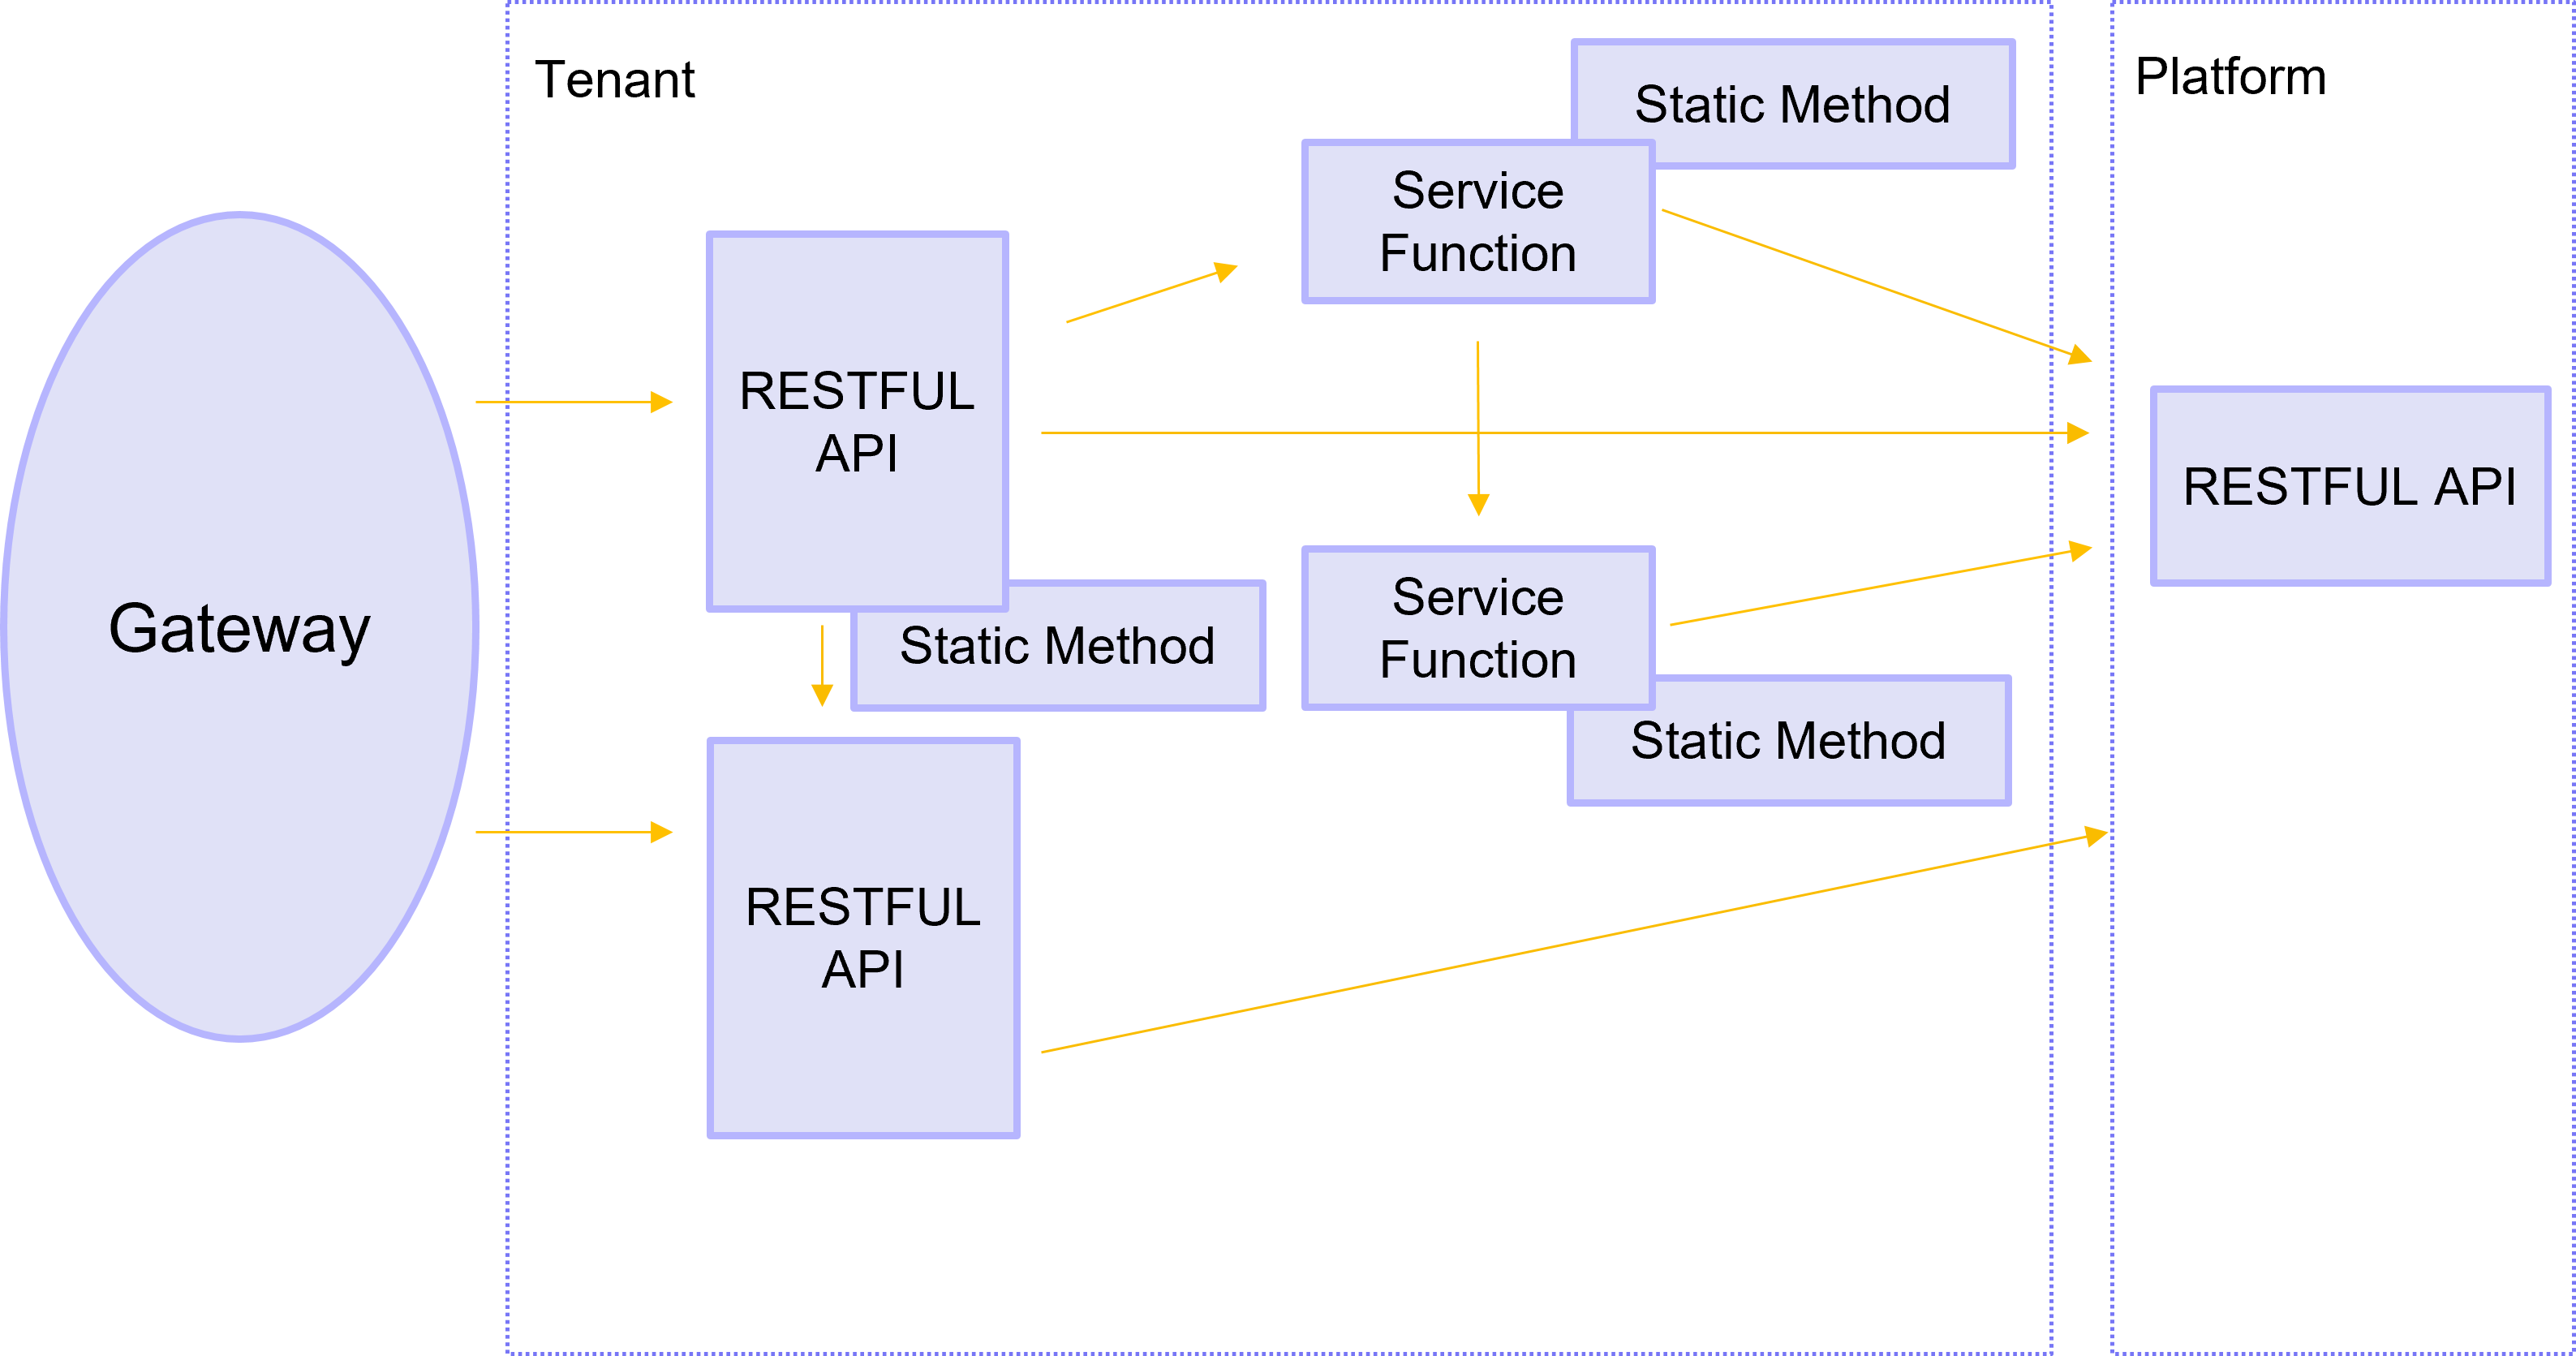
The API orchestration has two layers: the platform layer and the tenant layer.
- Tenant Layer: At this level, it is required to configure RESTful APIs and their corresponding internal service functions.
- InsureMO Platform Layer: The platform provides pre-defined SDKs and static methods for invocation and utilization.
| Provider | Name | Example | Invocation Keyword |
|---|---|---|---|
| Tenant | Restful API | - | - |
| Tenant | Service function | - | getCommonService |
| InsureMO | API and SDK | proposalRestful | getSDK |
| InsureMO | Static method | Util, Domain | Import |
The following diagram illustrates the comprehensive invocation structure for API orchestration configuration. In short, there are multiple invocation paths, each supporting a one-to-many relationship:
- Restful API (Tenant) -> Service Function (Tenant)
- Restful API (Tenant) -> SDK (InsureMO)
- Restful API (Tenant) -> Static Method (InsureMO)
- Service Function (Tenant) -> Service Function (Tenant)
- Service Function (Tenant) -> SDK (InsureMO)
- Service Function (Tenant) -> Static Method (InsureMO)
- Restful API (Tenant) -> Restful API (Tenant)
Comparison with BFF Development
Apart from API orchestration configuration, InsureMO offers an alternative approach for API extension via application development based on the APP framework.
The diagram below compares the API orchestration configuration with BFF development.
Briefly, iComposer simplifies the initiation and scripting process for novices, while BFF development is suited for more sophisticated scenarios.
| - | BFF | iComposer | iComposer Advantage and Disadvantage |
|---|---|---|---|
| Language | Java | Groovy and Java compatible | Groovy is more user-friendly and simple to write while Java is characterized by its strict grammatical rules and minimal error tolerance. |
| Editor | IDE | InsureMO native UI & IDE | UI is especially advantageous for beginners, as it saves time in setting up the development environment while IDE might excel in providing prompts and validation. |
| Compilation | Entire project | Single file based & Entire Project | Single file compilation can accelerate compilation speed while entire project compilation can detect more errors. |
| Local Environment | With | Without | Making changes can expedite the development process for testing, but it also increases the risk of encountering blocking errors. |
| JAR Dependency | Free | Restricted | Restricted dependency aims at improving InsureMO support, but it limits users’ ability to extend functionality independently. |
| Call Structure | Extend, inheritance, polymorphism | API -> Service function | Restricted abstraction is intended to make code easier to understand. |
| Microservice | Tight match | Loose match | Code groups decoupled with microservice provide more flexible code management, including hotfixes and microservice switches. |
| Troubleshooting | Local debugging | Manual and auto print logs | Printing logs is a quicker method to produce results, while local debugging offers a more comprehensive approach for detailed checks. |
| Performance | Good + | Good | Groovy may have inferior performance compared to Java, but this is generally acceptable as most complex operations are handled at the platform level. |
| Target File | Source codes in GIT | Configuration data in DB | Source codes are better for merging and reviewing which have both been facilitated by GIT tools. |
| Deployment | At client side | At InsureMO side | We can have better control on the InsureMO side. |
| Applicability | All comprise: API, Service, Batch, DBScript | Most capabilities comprise: API, Service, Batch | Only limited scenarios support orchestration. |
Comparison with Rating and Rule Configuration
Apart from API orchestration configuration, InsureMO provides an alternative method for rating and rule configuration via our configuration UI. There are distinct differences between these two configuration approaches.
In short, while both involve configuration tasks, API orchestration configuration requires more advanced knowledge and skills than rating and rule configuration. API orchestration demands a more extended learning period to fully understand and become proficient.
| Feature | Rule and Rating | iComposer |
|---|---|---|
| Same | Groovy and Java compatible | - |
| - | InsureMO native UI editor | - |
| - | Dynamic compilation | - |
| - | Configuration data | - |
| Usage | Specific to rules and ratings | API and service orchestration |
| Language knowledge | Function oriented | Object oriented |
| Type knowledge | String, Long, Double, List | String, Long, Double, List |
| - | - | Map, Object |
| Invoke knowledge | Rule - N/A | Class, method, and new object |
| - | Rating - Formula invoke formula | - |
| Utility | Basic operator (DSL) such as mathematics and evaluator | All Operators (e.g., Map, JSON, RestTemplate) |
| Domain knowledge | Field and list in the domain model | Fields, lists and objects in domain model |
| - | - | Business API |
| Tracking | Focused on Detailed Values | Focused on invoke Structure |
Benefits of iComposer
There are several benefits to choosing iComposer:
-
User-Friendly Interface
iComposer provides an intuitive UI for crafting APIs without the need for complex setup procedures. Upon selecting iComposer, users are presented with a ready-to-use UI screen, enabling immediate commencement of API creation. This eliminates the need for intricate environment configuration and local build processes.
-
Simplified Language and Code Syntax
Groovy is adopted as the primary language, significantly reducing the amount of code required. By maintaining the essential code invocation structure and function reusability while eliminating complex programming concepts such as inheritance, iComposer simplifies the codebase, making it more comprehensible, manageable, and reusable.
-
Comprehensive Insurance Atomic Behaviors
The comprehensive suite of InsureMO SDKs handles a vast array of core insurance behaviors. Powered by a substantial number of InsureMO SDKs, the majority of key insurance behaviors are already handled and users need only focus on the orchestration and client-customized behaviors.
-
Robust Runtime Engine
iComposer is backed by a powerful runtime engine provided by the InsureMO appframework. As a micro-service-based and seamlessly powered InsureMO appframework, iComposer generically supports all technical aspects related to an API or even an application development.
-
User-Centric Code Assistant
iComposer is equipped with a user-friendly code assistant powered by InsureMO AI. Generative AI plays a significant role in insurance API generation. AI dialog is already embedded in iComposer and there is more and more insurance behavior being trained via InsureMO AI to further simplify the complexity of insurance API development.
Therefore, iComposer can be helpful in multiple scenarios:
Implementation Wide
- Insurance API externalization platform for channel and digital insurance.
- Small and medium Scale application insurance project implementation.
Non-Implementation Wide
- Insurance API training and experiment scenario construction.
- AI code mate to generate insurance code samples.
UI Operation
Restful API/Service Function Search Pages
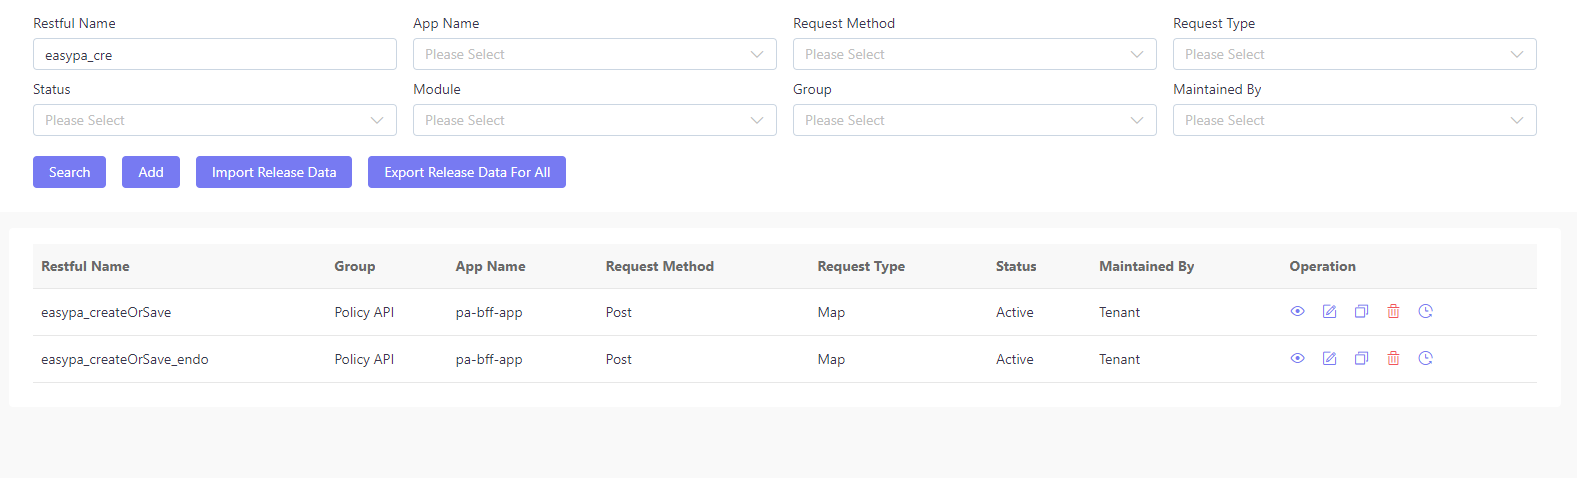
You can view the search page for Restful APIs or Service Functions by clicking the menu.
- RESTful API
- Service function
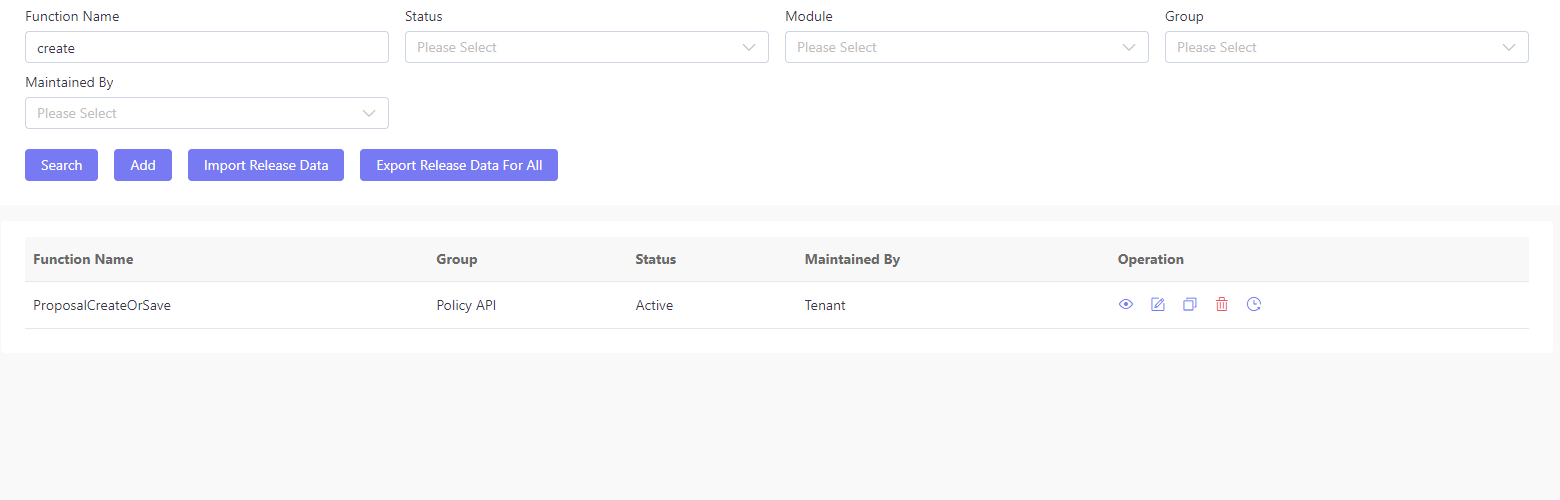
On the search pages, you will see all configured Restful APIs or service functions. Also, there are several operations you can perform.
| Operations | Description |
|---|---|
| Search | The system provides search criteria for you to choose from. After inputting or selecting the criteria, click Search. |
| Create | If you want to create an API or function, click Add. |
| View | After searching and locating the existing APIs or functions, you can click View for details. In the view mode, all the information will be read-only. |
| Edit | After searching and locating the existing APIs or functions, you can click Edit to edit related information. |
| Copy | After searching and locating the existing APIs or functions, you can click Copy. A window will pop out with all the details of the selected API or function, excluding the name. You need to name this new API or function before saving. |
| View History | After searching and locating the existing APIs or functions, you can click View History for the edit history on the configuration audit page. |
Restful API Detail Pages
Restful API Attributes
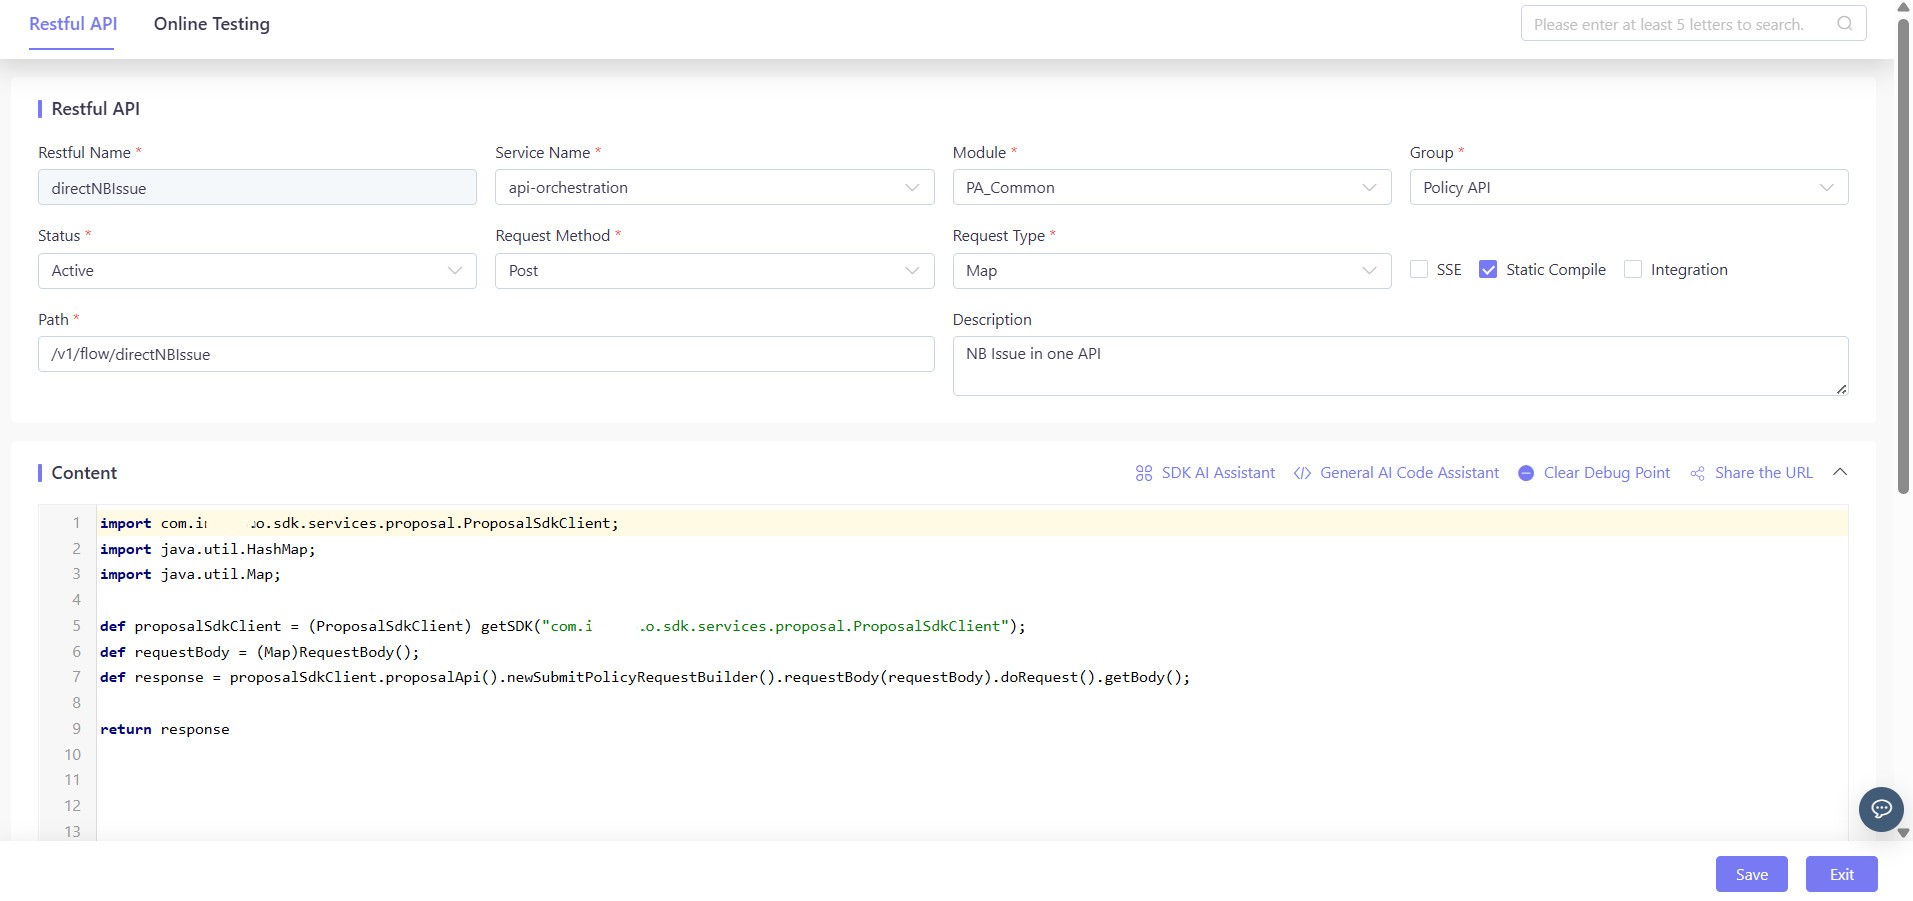
After you add or edit a Restful API, a window will pop up for you to maintain the detailed information for the API.
You can input Restful API attributes and code scripts here.
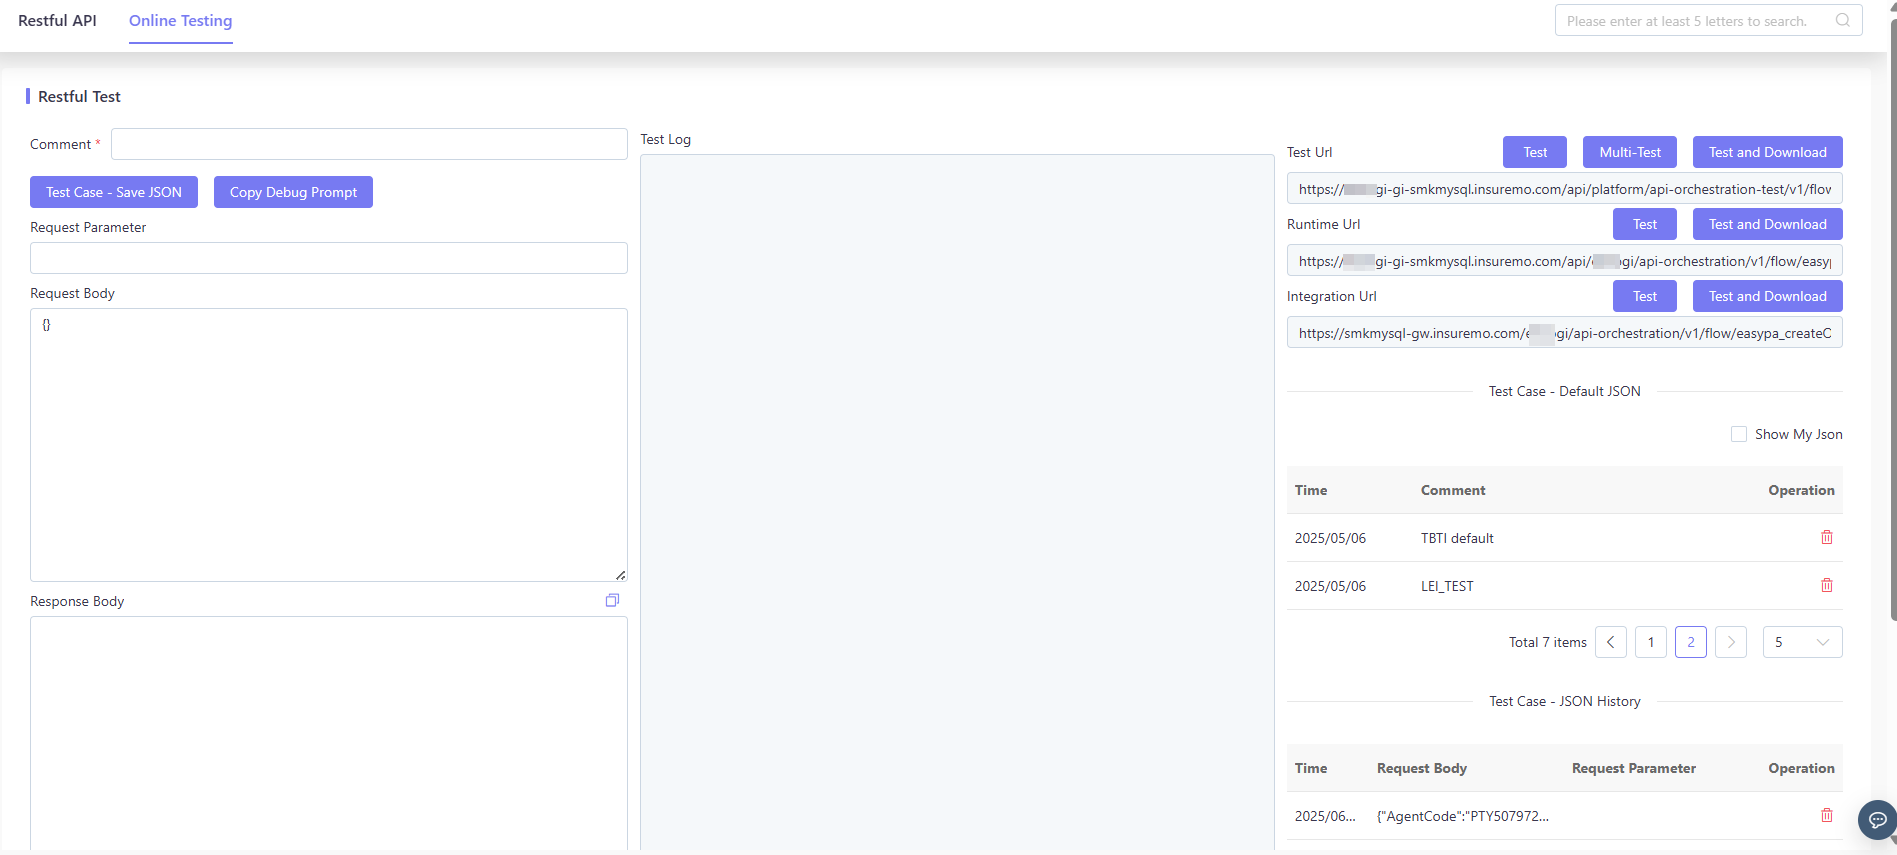
Restful API Online Testing
Upon adding or modifying a Restful API, a Test tab is conveniently accessible on the right-hand side of the interface. This tab allows you to quickly enter test mode and immediately conduct functional tests on the API. The user-friendly testing interface facilitates the input of parameters, the initiation of requests, and the real-time viewing of the API’s response results.
After entering the request values and clicking Test, the system will automatically send a request to the API and display the response body. If the API code generates log output, the log information will be displayed in real-time in the log box.
Service Function Detail Pages
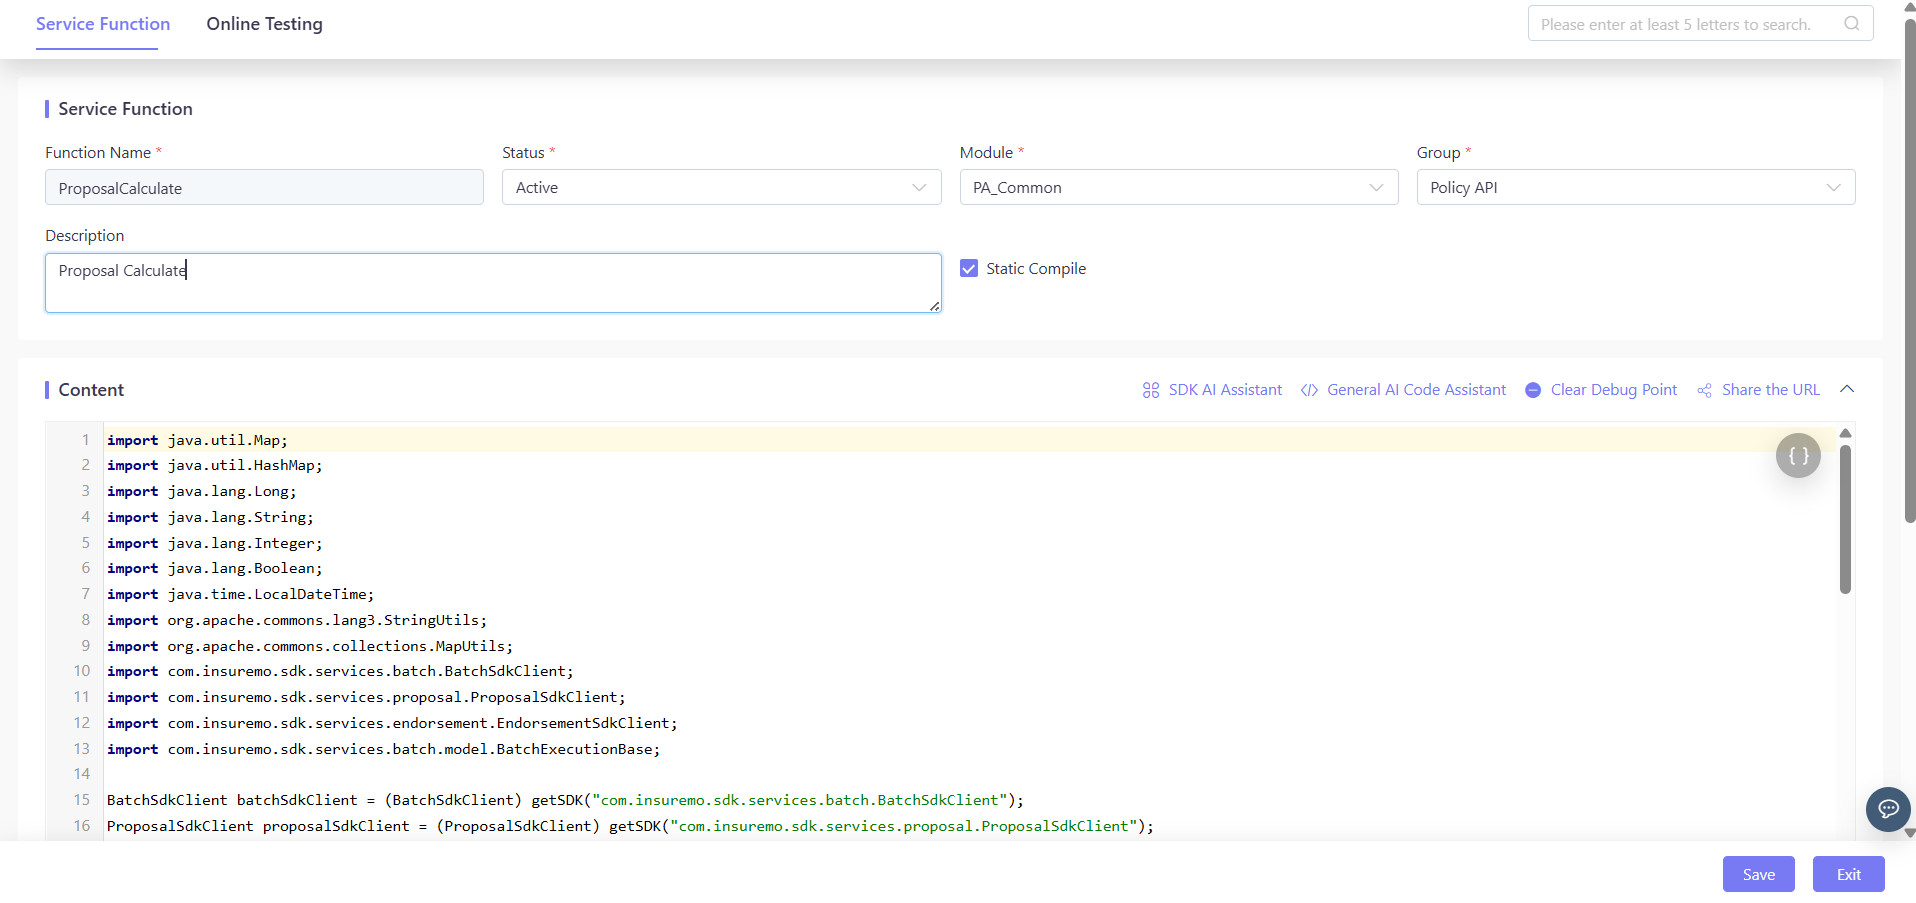
Service Function Attributes
Upon adding or editing a service function, a window will pop up, enabling you to maintain the detailed information for the service function.
In this section, you can input service function attributes and code scripts here.
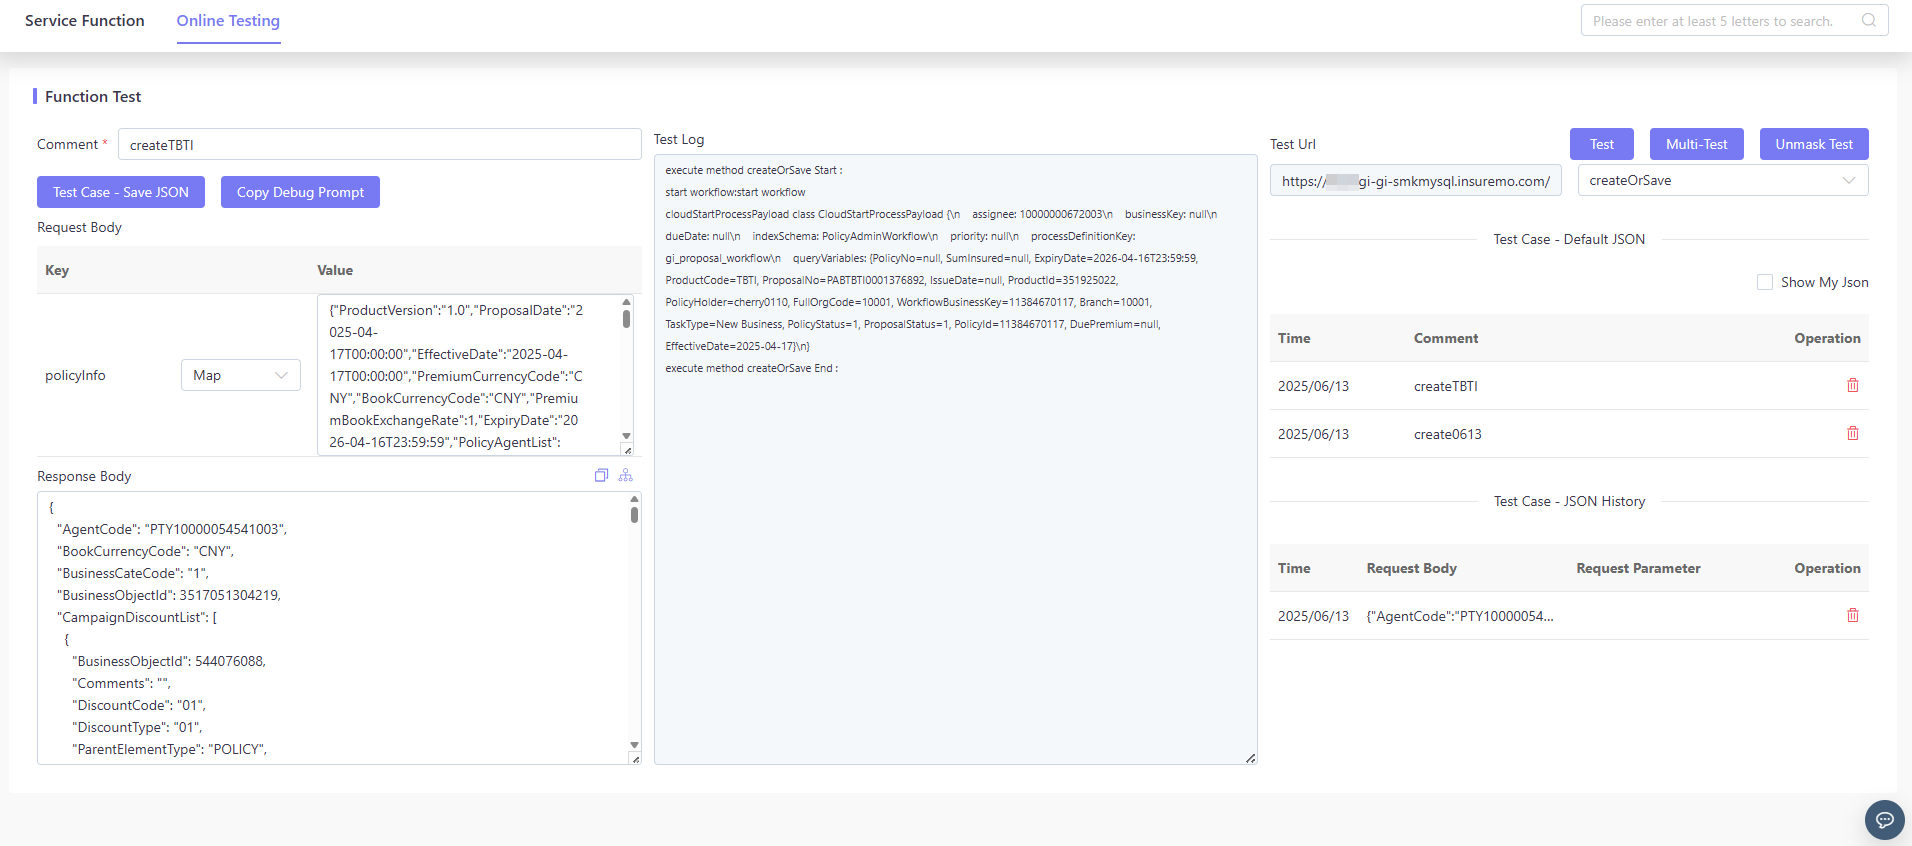
Service Function Online Testing
Following the addition or editing of a service function, a window will pop up, allowing you to test the service function.
Design Time and Runtime API Execution
API execution is divided into two stages: development and runtime, each with its own characteristics.
- If it’s design time behavior, it should be carried out in MC environments via platform testing service URLs. Compared with runtime behavior, it will be slower due to cache or log handling.
- If it’s runtime behavior, it can be executed in any runtime environment via tenants’ service URLs.
| Purpose | At Level | Environment | URL | Characteristics |
|---|---|---|---|---|
| Development and design | Platform | Portal/MC | /api/platform/api-orchestration-test/v1/flow/<restful_name> | Platform service |
| - | - | - | - | Without cache |
| - | - | - | - | With tracking logs |
| - | - | - | - | Not scalable |
| - | - | - | - | Platform to upgrade |
| - | - | - | - | Always the latest platform version |
| Test and production | Tenant | Runtime | /api/<tenant_code>/<tenant_appname>/v1/flow/<restful_name> | Tenant service |
| - | - | - | - | With cache |
| - | - | - | - | Without tracking logs |
| - | - | - | - | Scalable |
| - | - | - | - | Tenants to upgrade |
| - | - | - | - | Tenants to appoint a platform version |
Design Time Test
To facilitate development, we provide an API testing UI alongside each RESTful API or service function. This interface allows you to test APIs using custom request bodies and review the response information.
URLs
As API testing is based on platform services, you will get your own URLs displayed on the testing page. If you want to construct your design time test cases or suites via tools like Postman, you can copy these URLs and run them in your local environment.
Remember to add placeholders for service names in case your test cases will be reused in runtime environments.
Cache
All design time codes will immediately take effect once you save and call them. However, without caching support, the execution speed of design-time code is significantly slower compared to the actual system execution. Therefore, the comparably poorer execution performance for design time is acceptable.
Logs
Logs are crucial for troubleshooting and reviewing code errors. There are multiple ways to log:
-
Manual Print Logs
Manual print logs are a prevalent method for troubleshooting. Two levels of messages are associated with this process:
-
Debug Message Example:
debug (“I want to see {} and {}” , to_print1, to_print2) -
Info Message Example:
info (“I want to see {} and {}” , to_print1, to_print2)
Both types of messages will appear on the testing page so that you can immediately know the variable status in each API call. These logs will also be saved to the log monitor and you can share the traceIDs with others for further analysis.
Once an API is executed in runtime, only info logs are saved, while debug logs are displayed only when the debug level is changed. To save the log monitor disc space and prevent potential system issues, it is recommended to categorize most logs as debug logs and to generate info logs only when necessary.
-
-
System Auto Generated Invocation Logs
When your APIs encompass multiple service functions, it can be challenging to identify which parts of the logic have been executed.
By default, the system generates an automatic invocation trace to assist you in determining which part of the configuration has been covered.
This feature is particularly beneficial when if-else statements are involved in the logic, enabling you to quickly pinpoint which part of the code is expected to execute.
Test History
Each time after testing is performed, the system will record the request and response data for user to retrieve.
For common and reusable test data, user can save it under Test Case - Default JSON by entering a name in the comments and clicking Test Case - Save JSON.
All users can save their data under Test Case - Default JSON. To view only the data saved under your own account, check the Show My JSON checkbox. This will filter the Test Case - Default JSON to display only your saved entries.
Clicking on any entry in Test Case - Default JSON or Test Case - JSON History will display the corresponding request and response data in the left input and output boxes, facilitating quick reuse and reference.
Runtime Engine Deployment
For runtime environments, all executions will be carried out in the tenant’s own microservices. Here are some important tips to follow.
Check Runtime Engine CI/CD and Deployment
By default, an iComposer CI/CD will be created after the tenant onboarding if iComposer is selected as the deployment option. It is our runtime engine for the configuration script to be invoked. Here are some key points related to the runtime engine:
-
The CI/CD name is the service name that will be required in various places. It is defaulted to
api-orchestration. If you cannot locate such CI/CD or want to modify the naming, contact SiteOps for support. -
To deploy the runtime engine, select Deployment Only. You will need to provide a deployment image version. Our version follows a format such as 24.02.004, where 24.02 is the major version and 004 is the hotfix version. It is crucial to choose the most appropriate major release version, and it is always recommended to opt for the latest hotfix version.
-
One CI/CD equates to one microservice running for all features. If your project has performance considerations that necessitate the creation of multiple services, contact the InsureMO SiteOps team for support.
Add Services in the Data Table and Deployment
For the first creation, you need to locate the tenant_orchestration_service data table, override it, and input service names respectively. Subsequently, ensure that you select the appropriate services during each API creation process. This action is essential for mapping APIs to the correct services during runtime execution.
Add Config Center Parameters and Deployment
All services require a JDBC database setting to start and execute. For the first creation, input the corresponding service details into Config Center and fill in relevant JDBC information of your tenant database given by the SiteOps team.
Add Static Routing and Deployment
All services require a static routing configuration to enable API gateways to locate and invoke the services. It is imperative to complete the static routing configuration in the API gateways and ensure it is deployed. Failure to do so may result in a 404 error during runtime execution.
Test with Runtime URLs
Once all the aforementioned configurations and deployments are in place, you can commence testing the APIs in the runtime environment. Ensure that you update the service names in the previous testing URLs to your tenant-specific service URLs before invoking your configured APIs.
Version Dependency and Compatibility
When executing the API, discrepancies in results between MC environments and runtime environments may occur. These discrepancies are caused by different design time and runtime dependency versions, but the chances are small.
In the MC environment, the version is consistently maintained as the latest, which can be directly viewed through the UI:
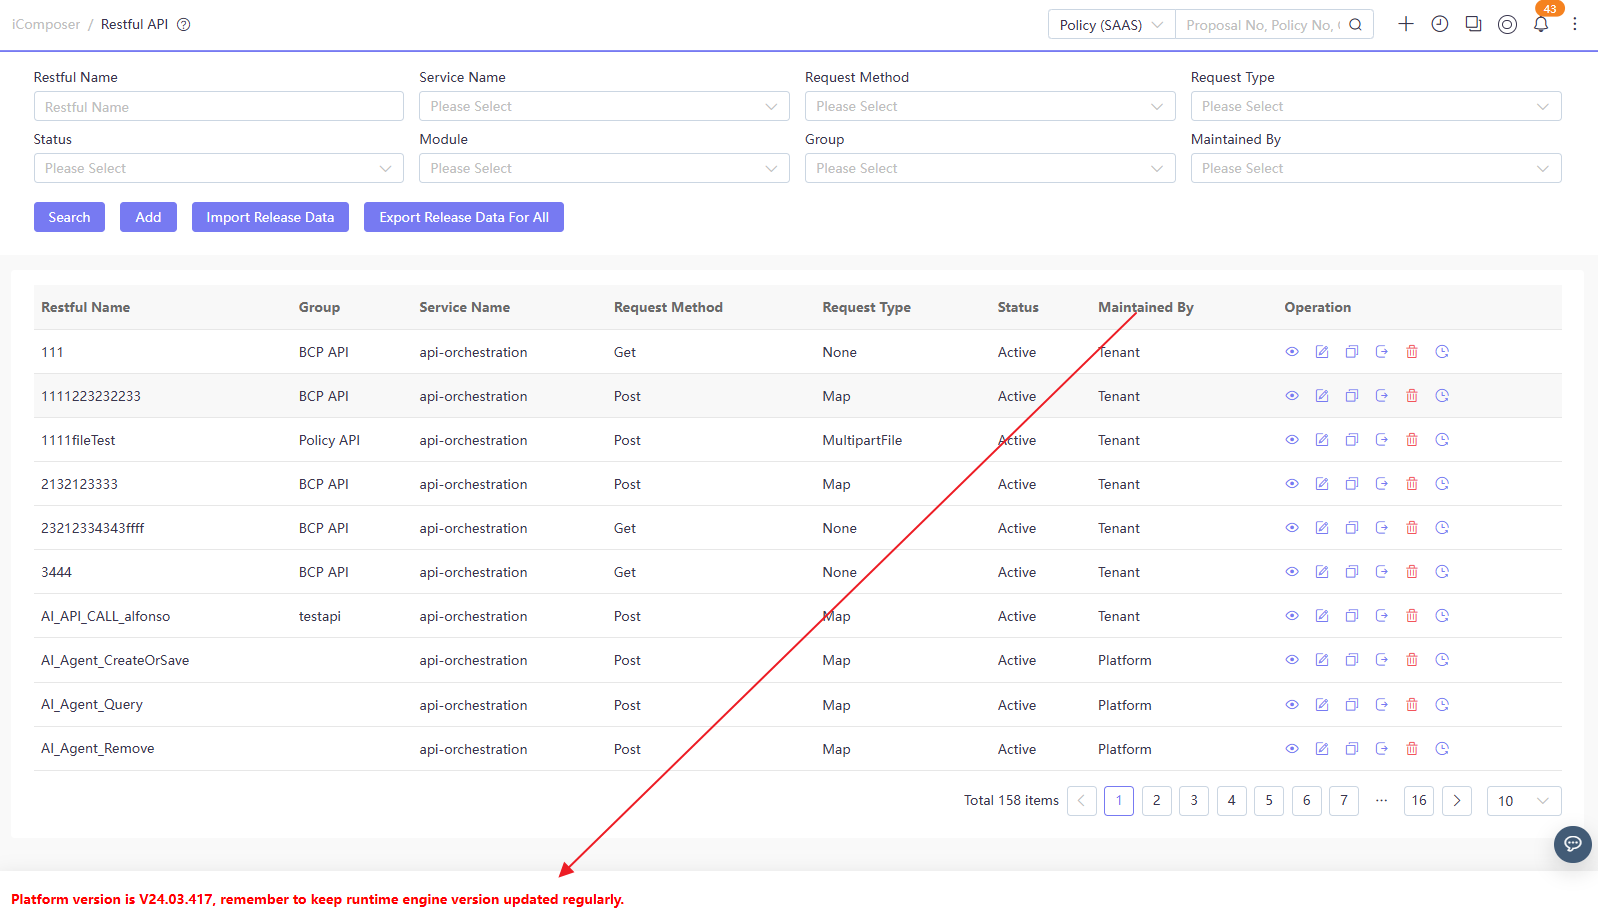
Assume the platform version is 24.03 and has been upgraded across all environments. In MC environments, the latest version (e.g., 24.03.417), will be kept. However, for UAT and PROD environments, the runtime engine is controlled by yourself. If the engine is not frequently updated, it may lag, either by a hotfix version (e.g., 24.03.008) or even a major version (e.g., 24.02.100).
In this situation, those programs running in the MC (24.03.417) might fail in UAT (24.02.100) due to two major reasons:
- New Features: The introduction of new features in version 24.03 may require an engine upgrade to ensure compatibility.
- Feature Changes: Changes to features from 24.02 to 24.03 should not occur, as platform features are designed to be compatible across versions. If you suspect otherwise, contact the InsureMO support team for assistance.
To access the latest platform features, we recommend timely upgrading the runtime engine, especially after major platform releases. At the platform level, mandatory version checks will be enforced to ensure that tenant runtime versions in all lower environments do not lag behind the production version.
iComposer Configuration Data Deployment
After the runtime engine is set up, the final step, also the most common one, is to deploy RESTful APIs or service function configuration data. Ensure that iComposer has been configured in portal MC first.
Like other configuration items, our configuration deployment is based on the module or group level. You can create different modules or groups if there are multiple teams working together on the API orchestration.
The configuration data will be automatically filled in, and you can use the config-data CI/CD to conduct the configuration data deployment. Once the deployment finishes, you can monitor its status via the DataIO UI, and changes will immediately take effect.
Although iComposer configuration data can be put in the same CI/CD as product configuration, it is recommended to contact SiteOps to create a separate iComposer configuration data repo due to the potentially higher frequency of changes.
Tenant Example
Suppose in the scenario that Tenant A needs to deploy the configuration data of RESTful API related to Policy Admin.
1. Contact SiteOps to Create the Service
Firstly, contact the SiteOps team to assist in creating the corresponding pa-icomposer-config-data-bizasset service.
2. Check in & Deploy
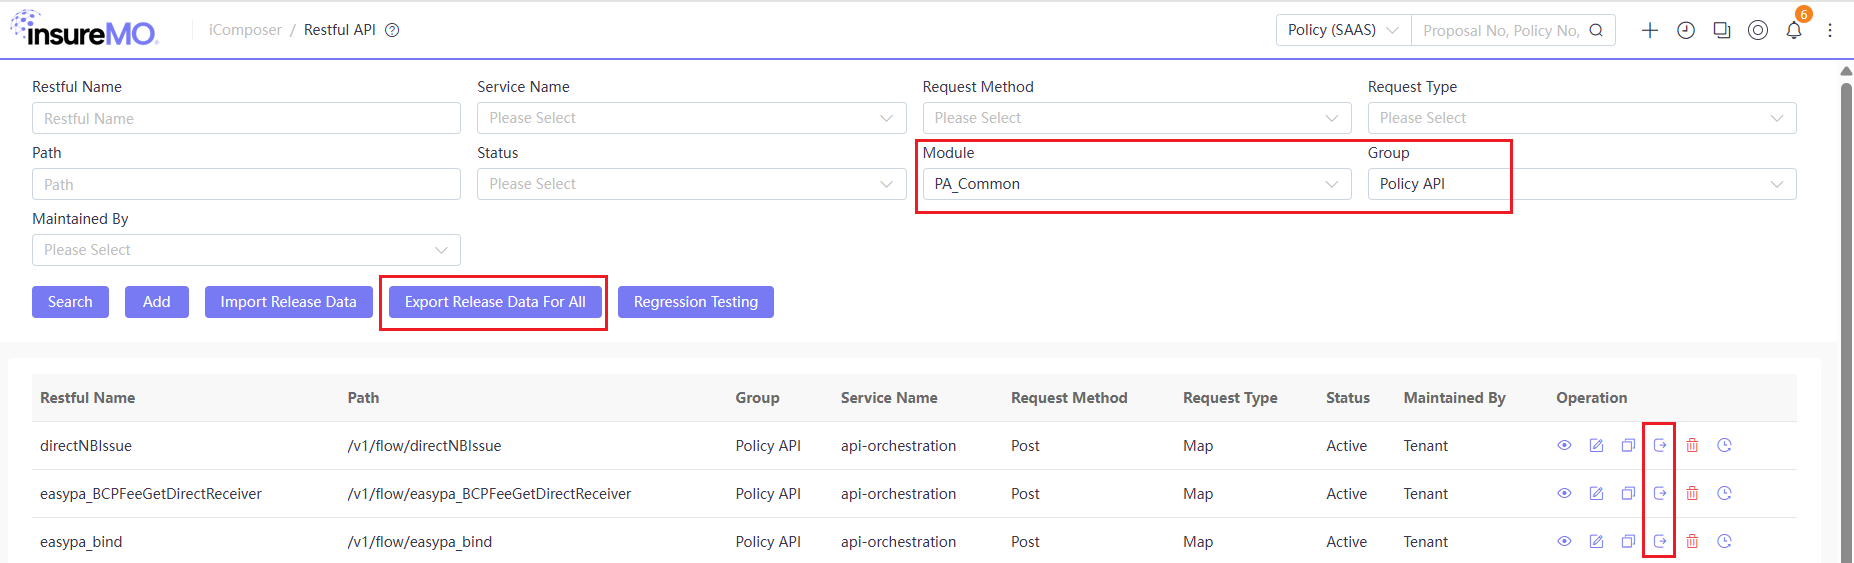
Utilize the RESTful API to screen out the policy admin group using the by group filtering option. After screening, you can choose to check in the entire group of data. If only a single piece of data has been modified, you can also check in that individual data. Once the check-in is successful, proceed to the CICD page, locate the aforementioned pa-icomposer-config-data-bizasset service, and initiate the deployment process.
3. Release Callback Static Compilation
If a tenant is not excluded from static compilation in the configuration center (note: only some legacy tenants are excluded, while new tenants are recommended to have static compilation forcibly enabled by default), the static compilation callback mechanism will trigger during iComposer data release.
Only some legacy tenants are excluded, while new tenants are recommended to have static compilation forcibly enabled by default.
If the target environment contains data that fails static compilation requirements, the release will fail.
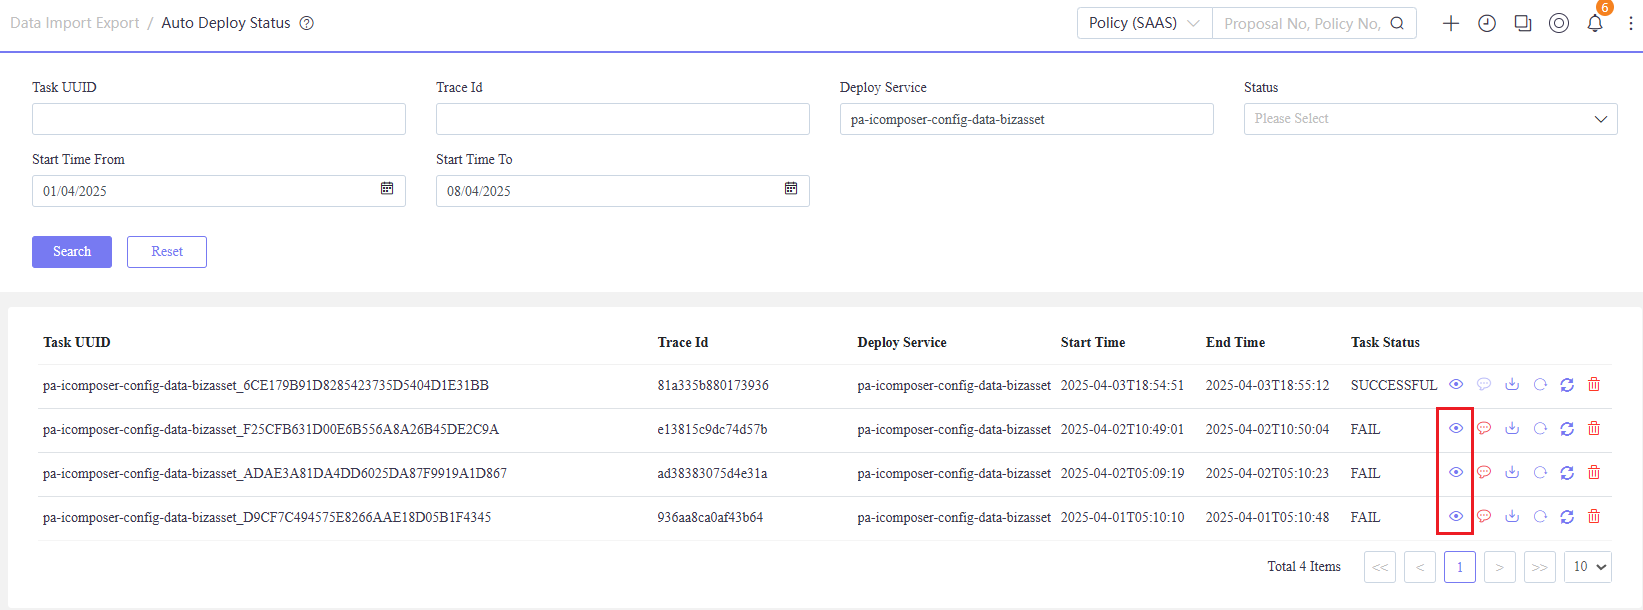
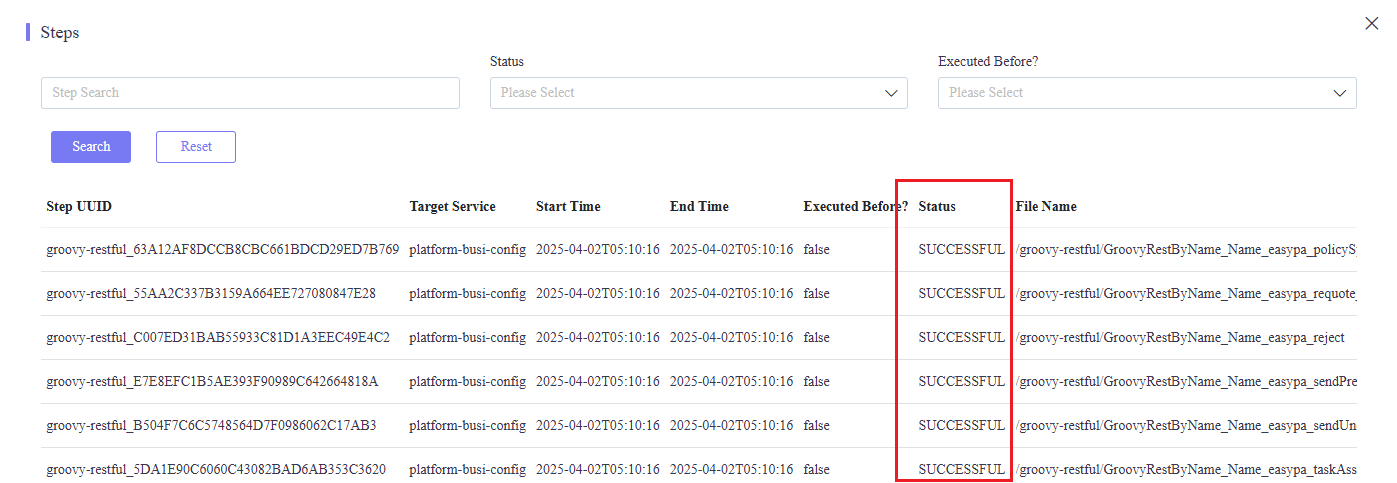
However, it’s crucial that even if the release is marked as failed, if the steps recorded in the release log show success, the data has actually been released. The overall release failure is attributed to target environment data non-compliant with static compilation rules.
4. Identify Data Not Compliant with Static Compilation
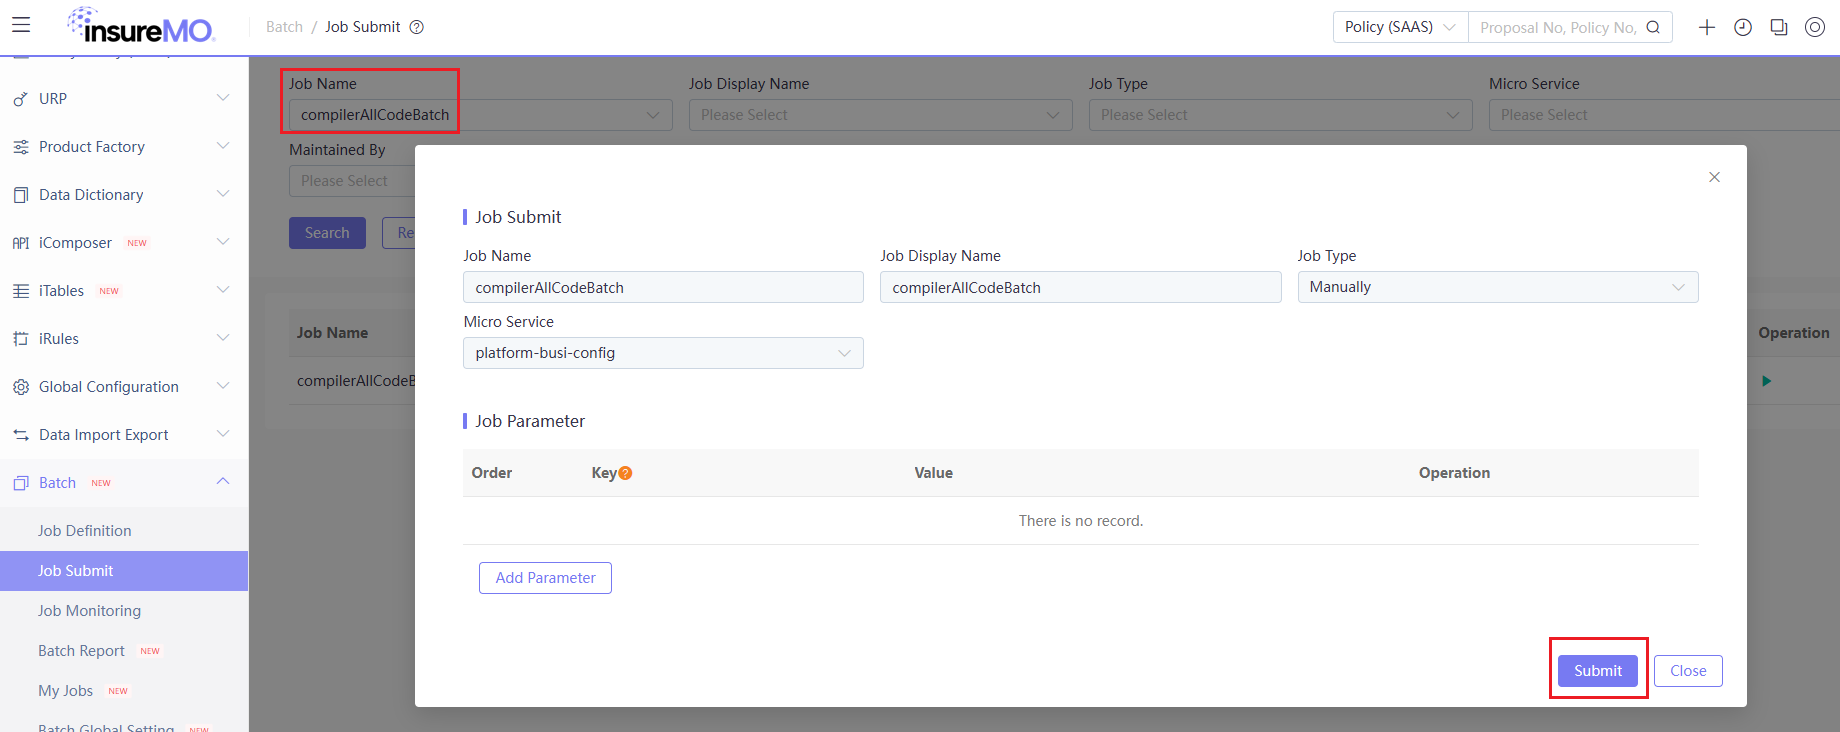
To identify data in the target environment that do not comply with static compilation, we provide the compilerAllCodeBatch function, which can find all such data at once. Modify the relevant data based on the Result Message returned by this function to ensure that subsequent releases are successful.


Static Compilation
For any RESTful API or service function to be saved, the system will perform compilation to increase execution speed and detect errors. Scripts with compilation mistakes detected cannot be saved until the errors have been corrected.
Because compilation is conducted only at the file level, mistakes detected will only exist in scripts you are going to save.
The common reasons for compilation errors comprise:
- Missing platform SDKs or static method paths;
- Wrong grammatical structures such as missing {};
- Variables not defined.
Now we are adopting static compilation which is a process that packages a program’s code and all its dependent library files into a single, self-contained executable file during the compilation phase. Unlike dynamic compilation, which loads libraries at runtime, static compilation ensures that the resulting program can run independently without relying on external libraries. Due to its advantages in performance, portability, and security, static compilation has become the preferred method in many development scenarios.
Compared with Static and Dynamic Compilation
| Property | Static Compilation | Dynamic Compilation |
|---|---|---|
| Development and Debugging | Detecting errors during the compilation phase can help identify issues, such as syntax errors, type mismatches, and missing library dependencies in advance. | Some errors may only be exposed at runtime, increasing debugging complexity. |
| Performance | Fast startup, no need to load external libraries at runtime, reducing the overhead of dynamic linking. | Startup may be slower as dynamic libraries need to be loaded at runtime, increasing memory and CPU overhead. |
| Security | More secure, as all code is contained within the executable file, unaffected by external library vulnerabilities. | May be affected by vulnerabilities in external libraries, requiring timely updates to dynamic libraries to address security issues. |
| Memory Usage | Larger executable files, but relatively stable memory usage at runtime, suitable for environments with ample memory resources. | Smaller executable files, but additional dynamic libraries need to be loaded at runtime, potentially increasing memory usage, suitable for memory-constrained environments. |
| Applicability | Suitable for applications with high startup speed requirements, single runtime environments, and high-security demands. | Suitable for applications with diverse runtime environments, frequent updates, and sensitivity to memory usage. |
Example Code
In RESTful API and Service Function contexts, there are distinct approaches for acquiring Spring Beans, SDKs, and common services, along with some fundamental type casting. For further clarification, see the examples provided in the following table.
| Category | Dynamic Compilation | Static Compilation |
|---|---|---|
| Restful API | def localExecutor = getBean(“com.insuremo.icomposer.service.impl.IComposerRestfulLocalExecutor”) | import com.insuremo.icomposer.builtins.methods.IComposerSystem; IComposerRestfulLocalExecutor localExecutor = (IComposerRestfulLocalExecutor) IComposerSystem.getBean(“com.insuremo.icomposer.service.impl.IComposerRestfulLocalExecutor”) |
| Restful API | def proposalSdkClient = getSDK(“com.insuremo.sdk.services.proposal.ProposalSdkClient”) | import com.insuremo.icomposer.builtins.methods.IComposerSystem; ProposalSdkClient proposalSdkClient = (ProposalSdkClient) IComposerSystem.getSDK(“com.insuremo.sdk.services.proposal.ProposalSdkClient”) |
| Restful API | def partyService = getCommonService(“PartyService”) | import com.insuremo.icomposer.builtins.methods.IComposerSystem; PartyService partyService = (PartyService) IComposerSystem.getCommonService(“PartyService”) |
| Service Function | def proposalSdkClient = getSDK(“com.insuremo.sdk.services.proposal.ProposalSdkClient”) | import com.insuremo.icomposer.builtins.methods.IComposerSystem; ProposalSdkClient proposalSdkClient = (ProposalSdkClient) IComposerSystem.getSDK(“com.insuremo.sdk.services.proposal.ProposalSdkClient”) |
| Service Function | def policyConstants = getCommonService(“PolicyConstants”) | import com.insuremo.icomposer.builtins.methods.IComposerSystem; PolicyConstants policyConstants = (PolicyConstants) IComposerSystem.getCommonService(“PolicyConstants”) |
| Type Conversion | def policyInfo = RequestBody() | import com.insuremo.icomposer.builtins.methods.IComposerSystem; Map policyInfo = (Map) IComposerSystem.getRequestBody() |
| Type Conversion | def productCode = RequestParameter().get(“productCode”) | import com.insuremo.icomposer.builtins.methods.IComposerSystem; String productCode = (String) IComposerSystem.getRequestParameter().get(“productCode”) |
| Type Conversion | List PlanList = skinPlanList.skinPlanList(skinInfo) | List PlanList = (List) skinPlanList.skinPlanList(skinInfo) |
| Type Conversion | def createOrSave (policyInfo) {…} | def Map createOrSave (Map policyInfo) {…} |
| Type Conversion | private String account = …platform.foundation.cfg.Env.getParameter(tenantCode + “.container.service.mail.account”) | import com.insuremo.icomposer.utils.IComposerEnv; private String account = IComposerEnv.getEnvParameter(tenantCode as String + “.container.service.mail.account”) |
| Type Conversion | String policyType = endoInfo.get(“NewPolicy”).get(“PolicyType”) | String policyType = ( endoInfo.get(“NewPolicy”) as Map)?.get(“PolicyType”) |
| Request Init | def httpRequest = ICmpHttpServletRequest() | HttpServletRequest httpRequest = ICmpHttpServletRequest() |
| Response Init | def httpResponse = ICmpHttpServletResponse() | HttpServletResponse httpResponse = ICmpHttpServletResponse() |
| RestTemplate | def restTemplate = SpringContextUtils.getApplicationContext().getBean(“restTemplateWithLoadBalance”); | import org.springframework.web.client.RestTemplate; import com.insuremo.icomposer.utils.IComposerRestTemplateManager; RestTemplate restTemplate = IComposerRestTemplateManager.serviceNameCall() |
| RestTemplate | def restTemplateContainer = SpringContextUtils.getApplicationContext().getBean(“origRestTemplateForContainerCall”); | import org.springframework.web.client.RestTemplate; import com.insuremo.icomposer.utils.IComposerRestTemplateManager; RestTemplate restTemplateContainer = IComposerRestTemplateManager.gatewayCall() |
| GlobalBeginRequest | def globalTransactionService = getBean(“…platform.foundation.tx.tm.GlobalTransactionService”); globalTransactionService.beginGlobalTransaction(AppContext.getTenantCode() + “-wfCreateOrSave”); | import com.insuremo.icomposer.utils.IComposerAppContext; import com.insuremo.icomposer.utils.IComposerGlobalTxContext; IComposerGlobalTxContext.beginGlobalTx(IComposerAppContext.getTenantCode() + “-wfCreateOrSave”) |
Error Example:
- Nonexistent Method
If the createOrSaveTest method does not exist under proposalCreateOrSave, dynamic compilation will allow the code to be saved without immediate errors, leading to failures during testing. In contrast, static compilation would provide error prompts during the save process, facilitating the early detection of such issues.
def proposalCreateOrSave = (ProposalCreateOrSave) getCommonService("ProposalCreateOrSave");
policyInfo = proposalCreateOrSave.createOrSaveTest(policyInfo)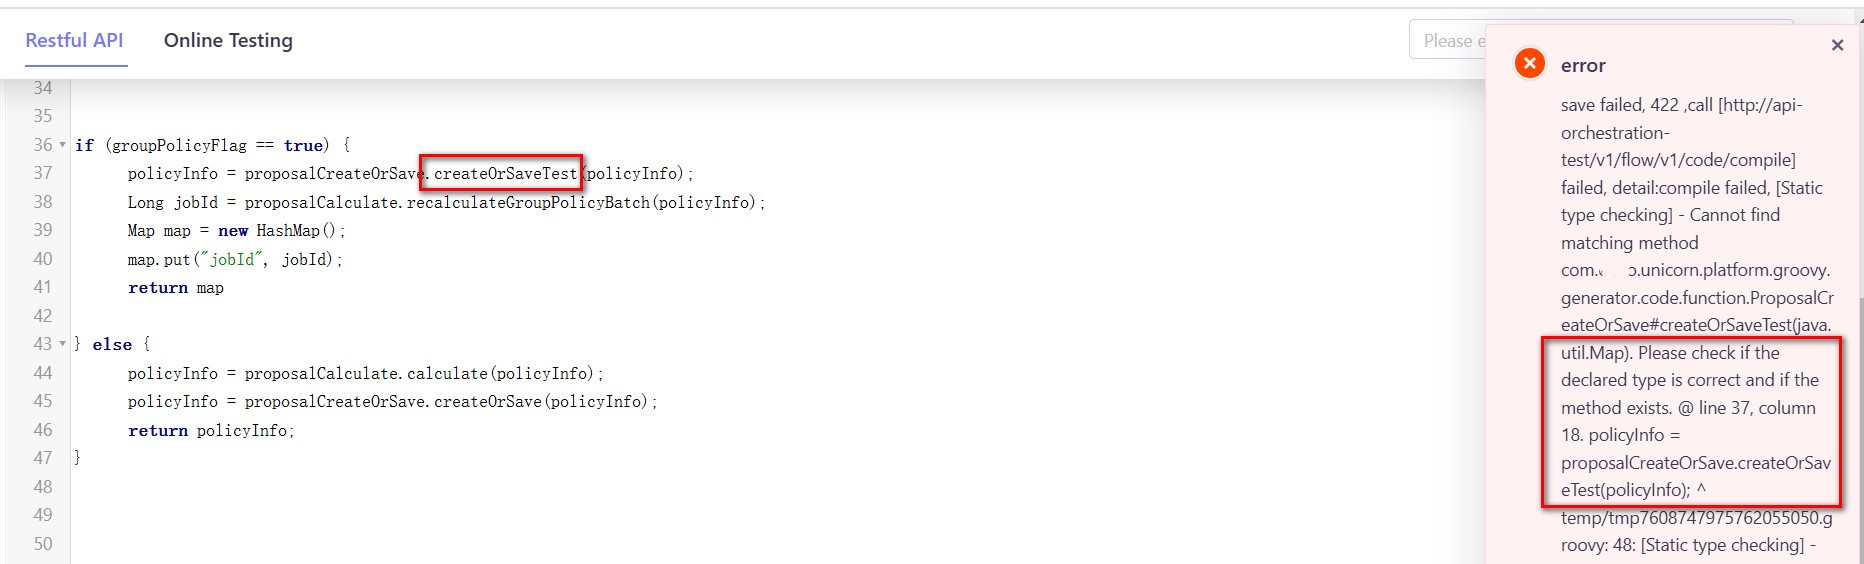
- Undeclared Variable
IComposerJsonUtils
The error message indicates that the variable IComposerJsonUtils, used on line 9, has not been imported. Therefore, to address this issue, simply import the required module or class.
import com.insuremo.icomposer.utils.IComposerJsonUtils;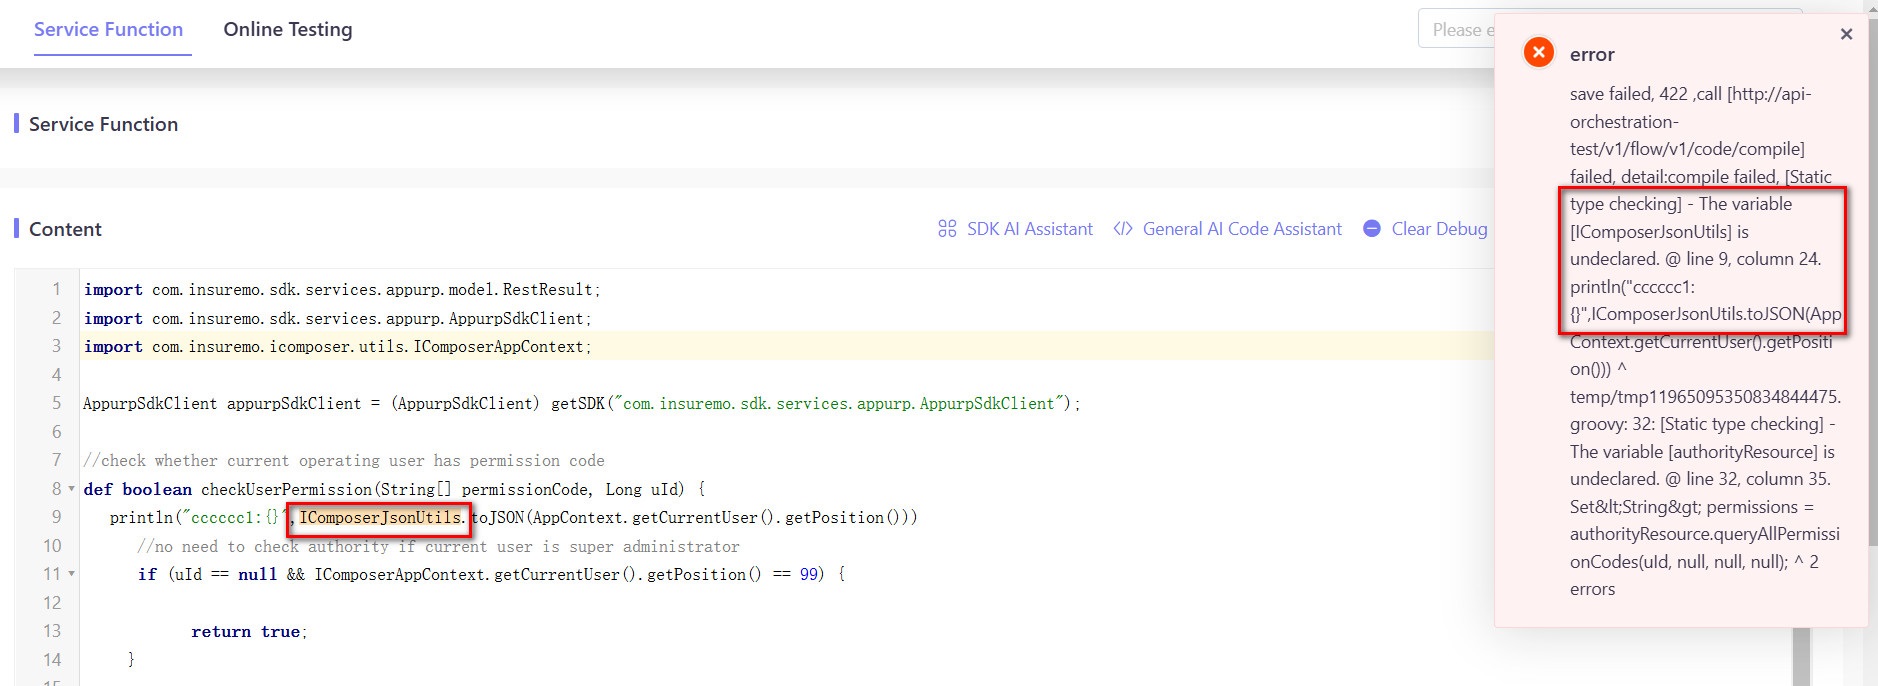
- Unable To Resolve Class
The error message indicates that the class BcpSdkClient, used in line 2, has not been imported. Therefore, to address this problem, simply import the required classes.
import com.insuremo.sdk.services.bcp.BcpSdkClient;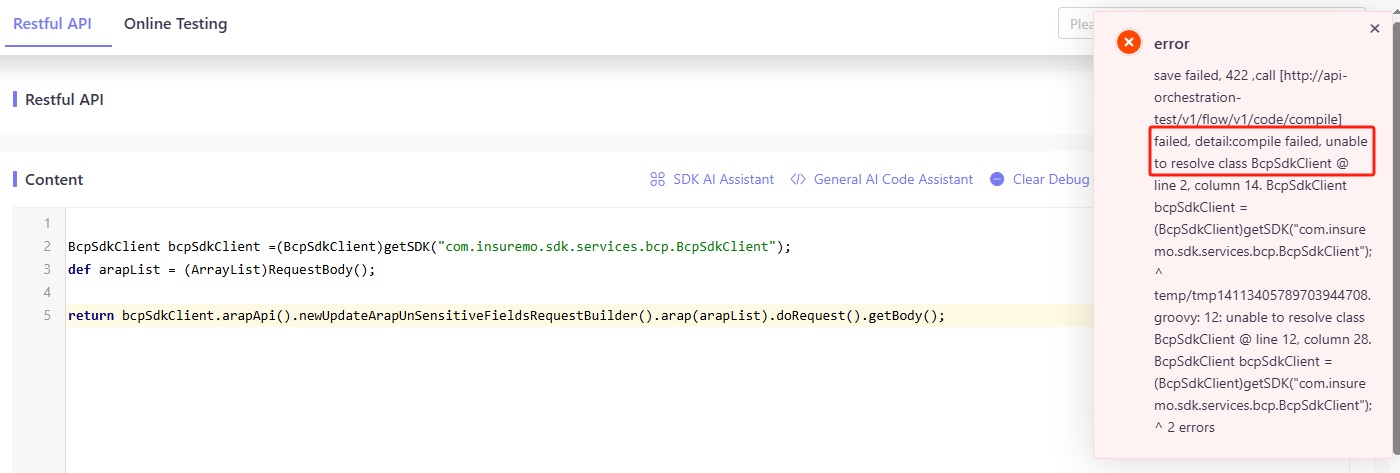
Quick Test & Debug
The Quick Debug tool is designed to rapidly generate println debug statements, assisting developers in outputting debug information during the testing phase to quickly identify and locate code issues, ensuring that the debugging process is efficient and comprehensible.
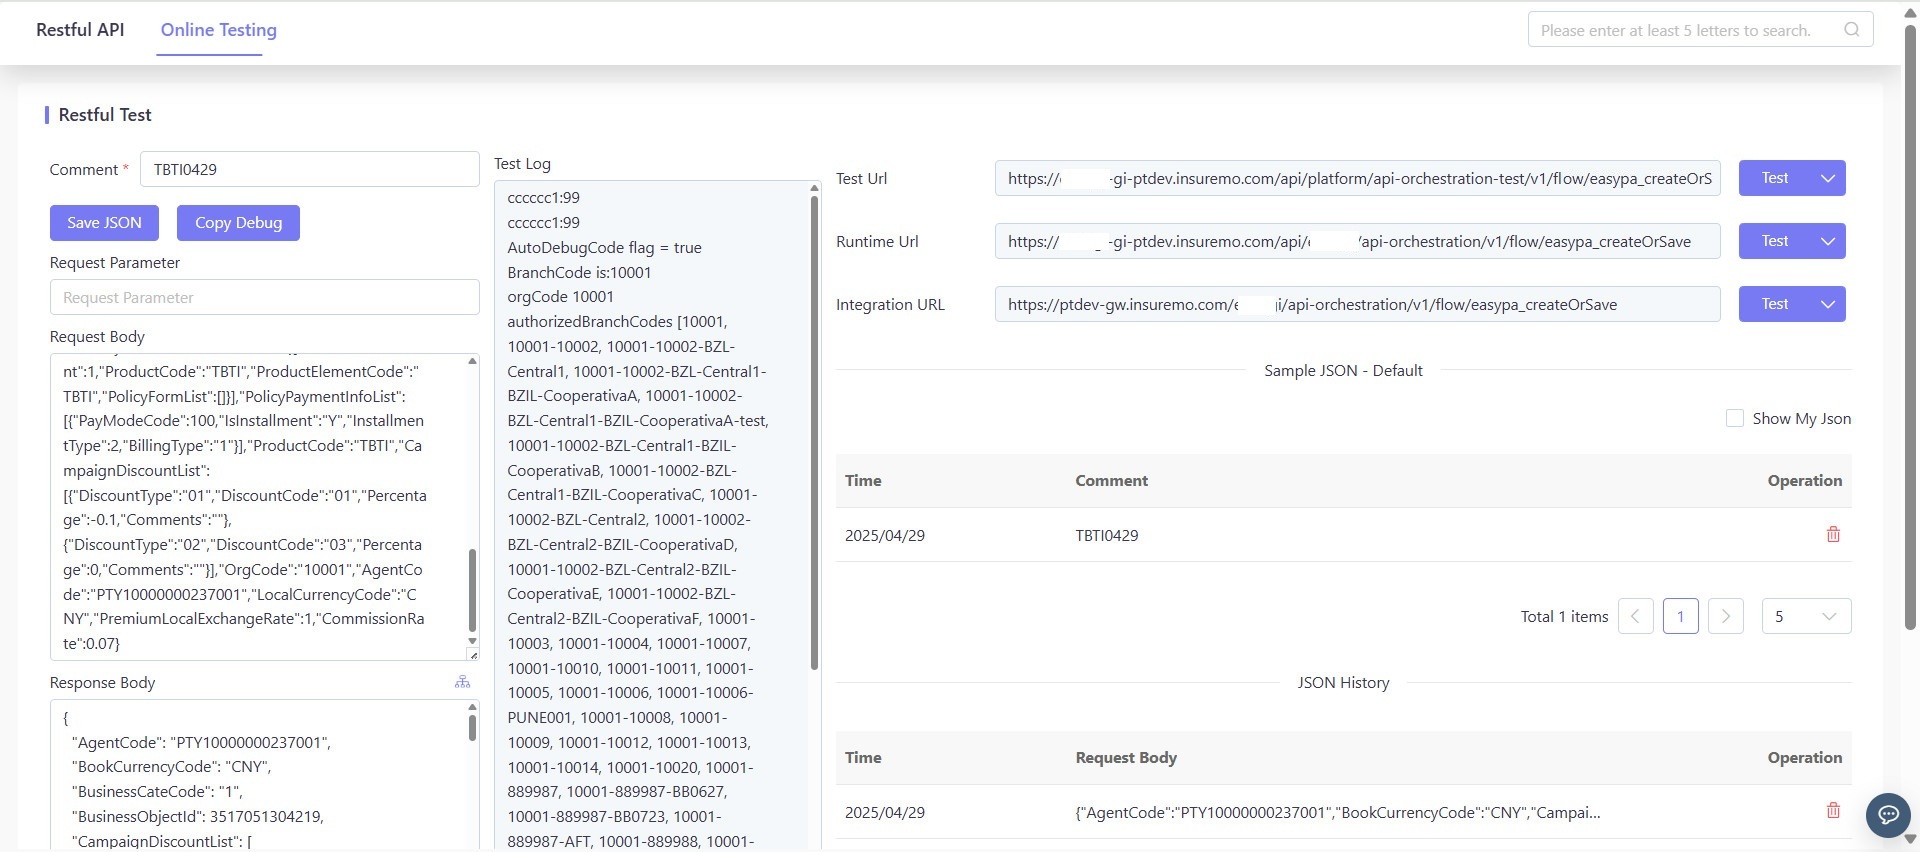
Testing URL
During testing, println statements will output debug information, which is instrumental in tracking variable values and the execution process.
Use the debug information output to analyze code behavior and quickly locate and solve code issues.
| Environment Type | URL | Primary Usage | Performance Considerations |
|---|---|---|---|
| Test Environment | https://tenantCode-gi-ptdev.insuremo.com/api/platform/api-orchestration-test/v1/flow/xxx | - Used for code debugging during development - Records detailed request and response information for quick issue localization | Extensive log recording consumes resources, lower performance, focuses on debugging details |
| Runtime Environment | https://tenantCode-gi-ptdev.insuremo.com/api/tenantCode/api-orchestration/v1/flow/xxx | - Used for actual application operation - Same behavior as the integration environment but with a different URL for easier distinction and management | Higher performance, suitable for actual application operation |
| Integration Environment | https://ptdev-gw.insuremo.com/tenantCode/api-orchestration/v1/flow/xxx | - Used for integration testing with other systems or services - Ensures overall system compatibility and stability | Higher performance, suitable for integration testing |
Note: In the Test Environment, whether logs are recorded is distinguished by the x-mo-log-payload header.
| Header Value | Description |
|---|---|
x-mo-log-payload: true | The request and response values will be fully recorded in the JSON History of iComposer. |
x-mo-log-payload: false | The data mentioned above will not be recorded. |
| Do not pass this parameter | Same as false |
Logging Level & Operators
We offer a succinct comparison of println, info, and debug logging approaches across functionality, application, log level management, performance effects, configurability, and ease of substitution.
For most of the logs, please use println as it will slow down the application if info or debug is widely used.
| Feature | println | info | debug |
|---|---|---|---|
| Function and Purpose | Basic output function, used for printing information to standard output | Log level, used for recording general program runtime information | Log level, used for recording detailed debug information |
| Log Level Control | Not supported | Supported | Supported |
| Performance Impact | Usually minimal, as it simply outputs information | May impact performance, especially when logging large volumes of logs | May significantly impact performance, often disabled in production environments |
| Configurability and Flexibility | No configuration support, just a simple output function | Can be configured and adjusted through logging frameworks | Can be configured and adjusted through logging frameworks |
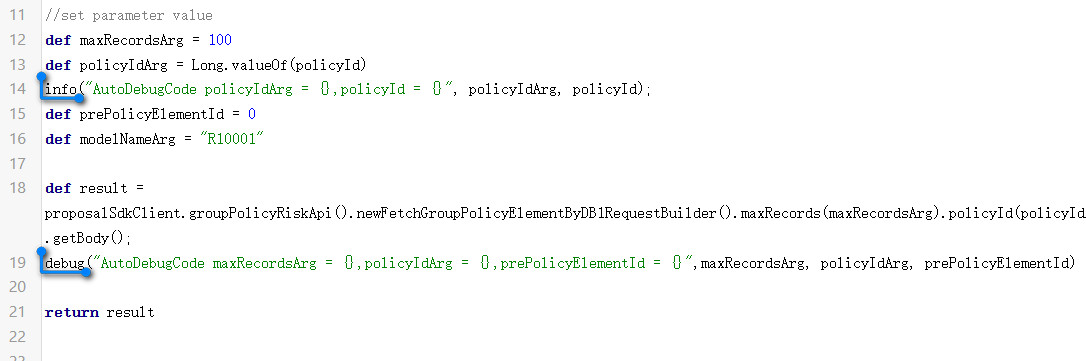
| Quick Substitutability | Can serve as a quick substitute for info or debug, especially when no logging framework is configured | Simply replace println with info in the automatically generated statements | Simply replace println with debug in the automatically generated statements |
We have adopted println as our default output statement for its simplicity, lack of additional configuration requirements, and minimal performance impact. These characteristics facilitate the streamlining of rapid development and debugging processes.
Find the line of code that needs debugging, typically where variables are assigned or functions are called. Manually generate println debug statements to output the values of key variables. The generated println statements can be used directly or modified according to specific debugging requirements.
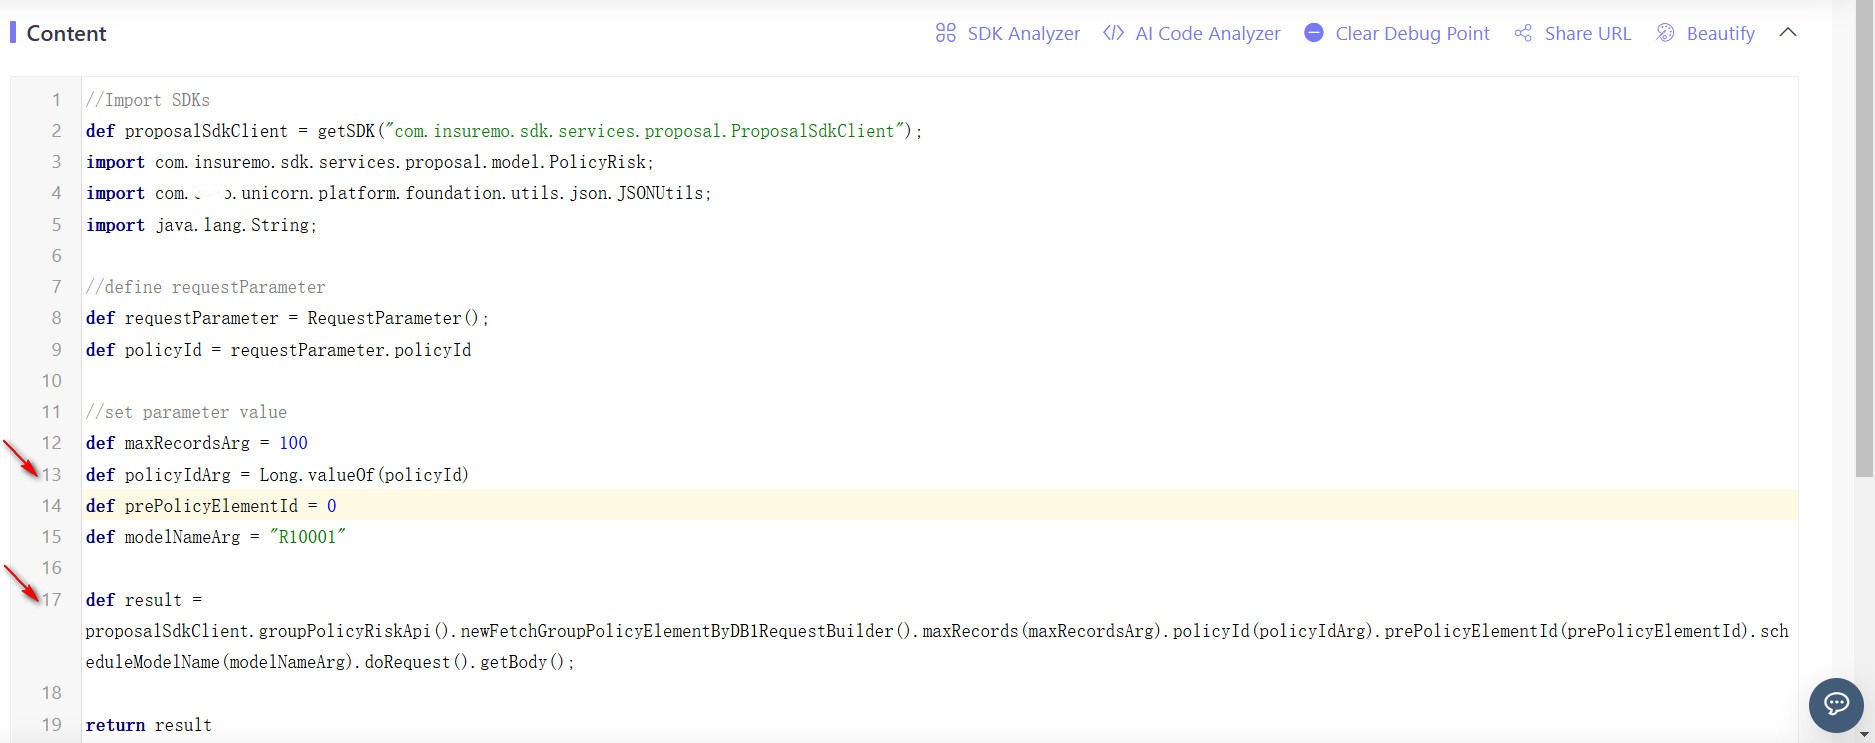

If println is not sufficient for more complex logging needs, you can replace println with info and debug levels as required, and then use monitoring tools to view the logs.
Regression Testing Before Deployment
Regression testing is used to verify whether the existing functions still work properly after the code has been updated. It ensures that new code changes have not negatively impacted the existing functions. During the development phase, regression testing is particularly important as it helps developers promptly identify and fix potential issues.
-
Attribute Introduction
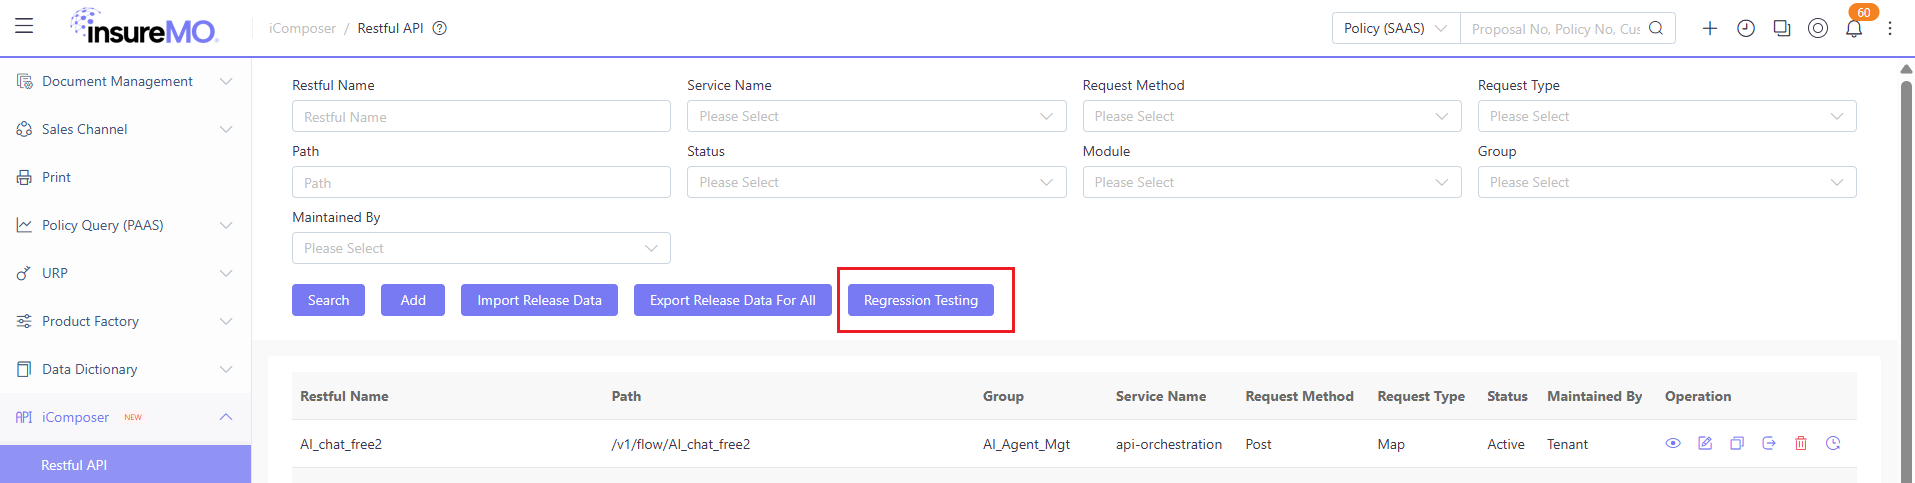
- Locate the “Regression Testing” Button: In the environment, click Regression Testing on the RESTful API or Function UI. This will bring up a dialog box named Multi Testing. Alternatively, when exporting business data, there will also be a prompt asking whether to perform regression testing first. If you select Yes, you will be directed to the Multi Testing dialog.
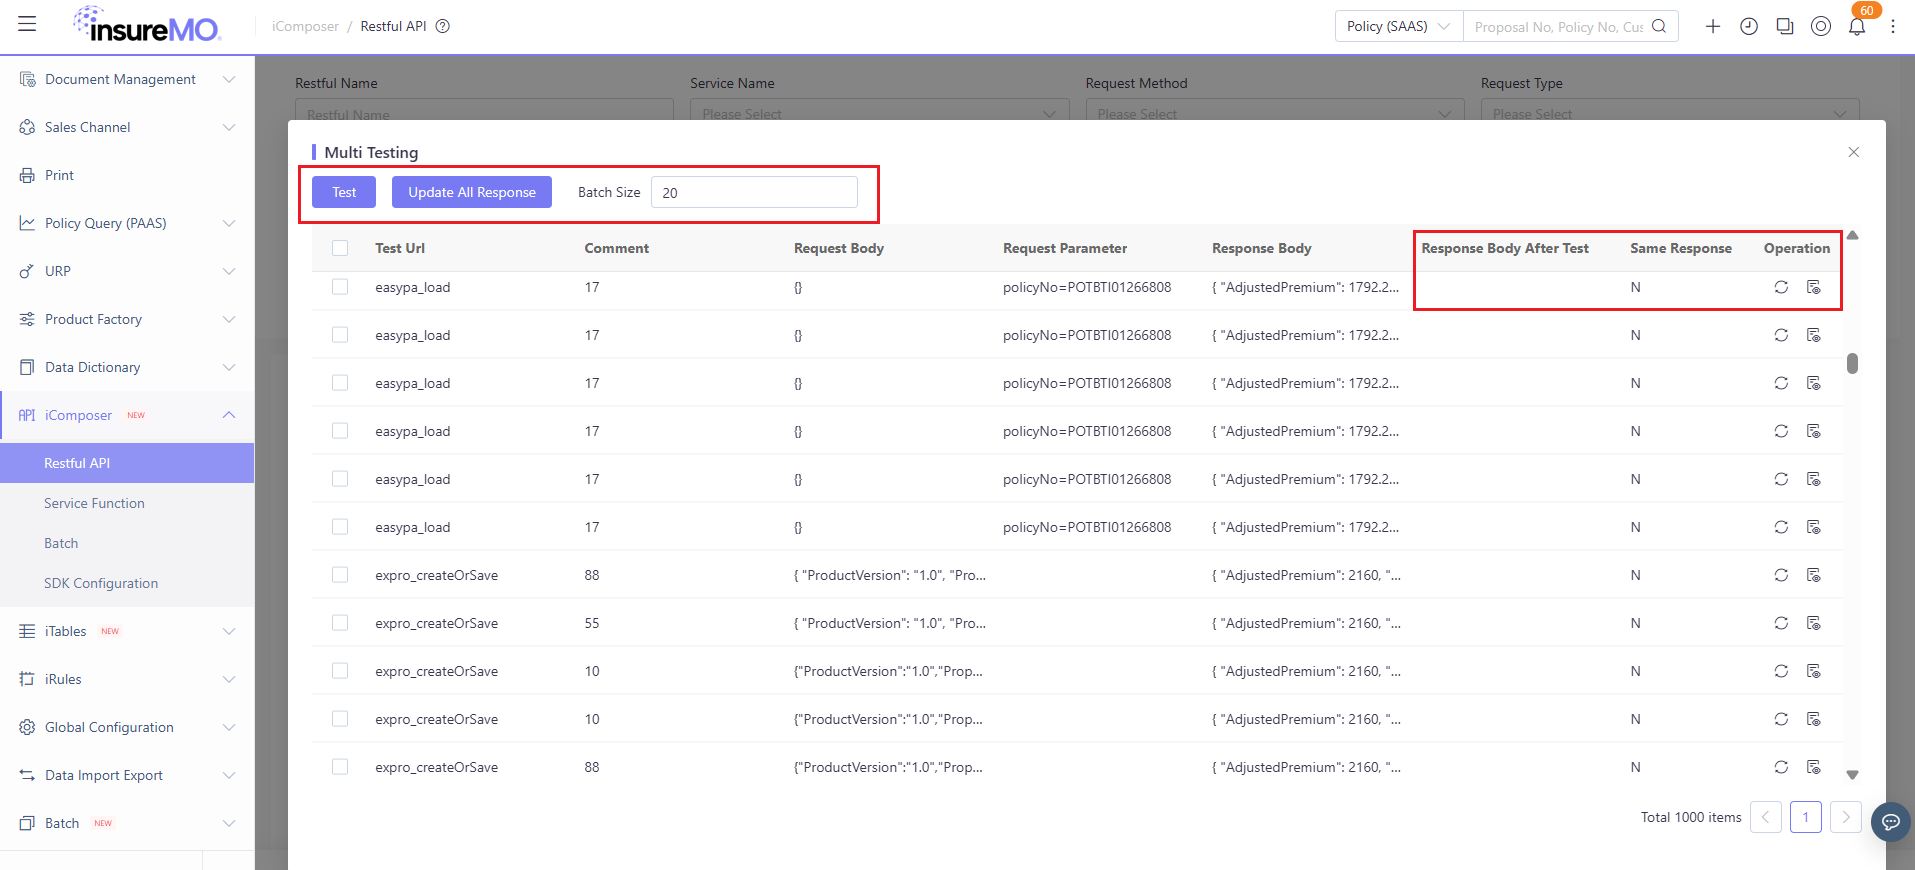
- Batch Size: Enter a suitable number for the number of items executed in parallel within the pool. This will not burden the system and can be completed quickly.
- Table Information: The online testing UI can save test case data. Displayed here are the most recent 1,000 entries of saved test case data from the RESTful API or Function.
-
Execute Tests
- Selection of Test Cases: Even with hundreds of test cases, you can select multiple cases at once.
- Run Test: After selecting the test cases, you can click Test to run them together.
- Result Refresh: The page will automatically refresh during the test to ensure you can view the latest test results in real-time.
- Response Body After Test Column: Update the test response, shown in a flat layout for quick analysis.
- Same Response Column: Mark whether the Response Body After Test and the previously stored case response have changed.
- Update Response Icon: Clicking it allows you to update this test case response, making it convenient for updating test cases.
- View Log Icon: Clicking it allows you to view the test logs for that path, aiding in the analysis of test results.
- Update Response Button: Select partially or entirely, and update the test case response together.
Runtime Environment Issue Troubleshooting
In the software development lifecycle, testing and UAT environments are critical for ensuring code quality. By effectively utilizing Test URL for functional testing and leveraging the History feature of iComposer, the efficiency of issue troubleshooting can be significantly improved.
Test URL Online Testing
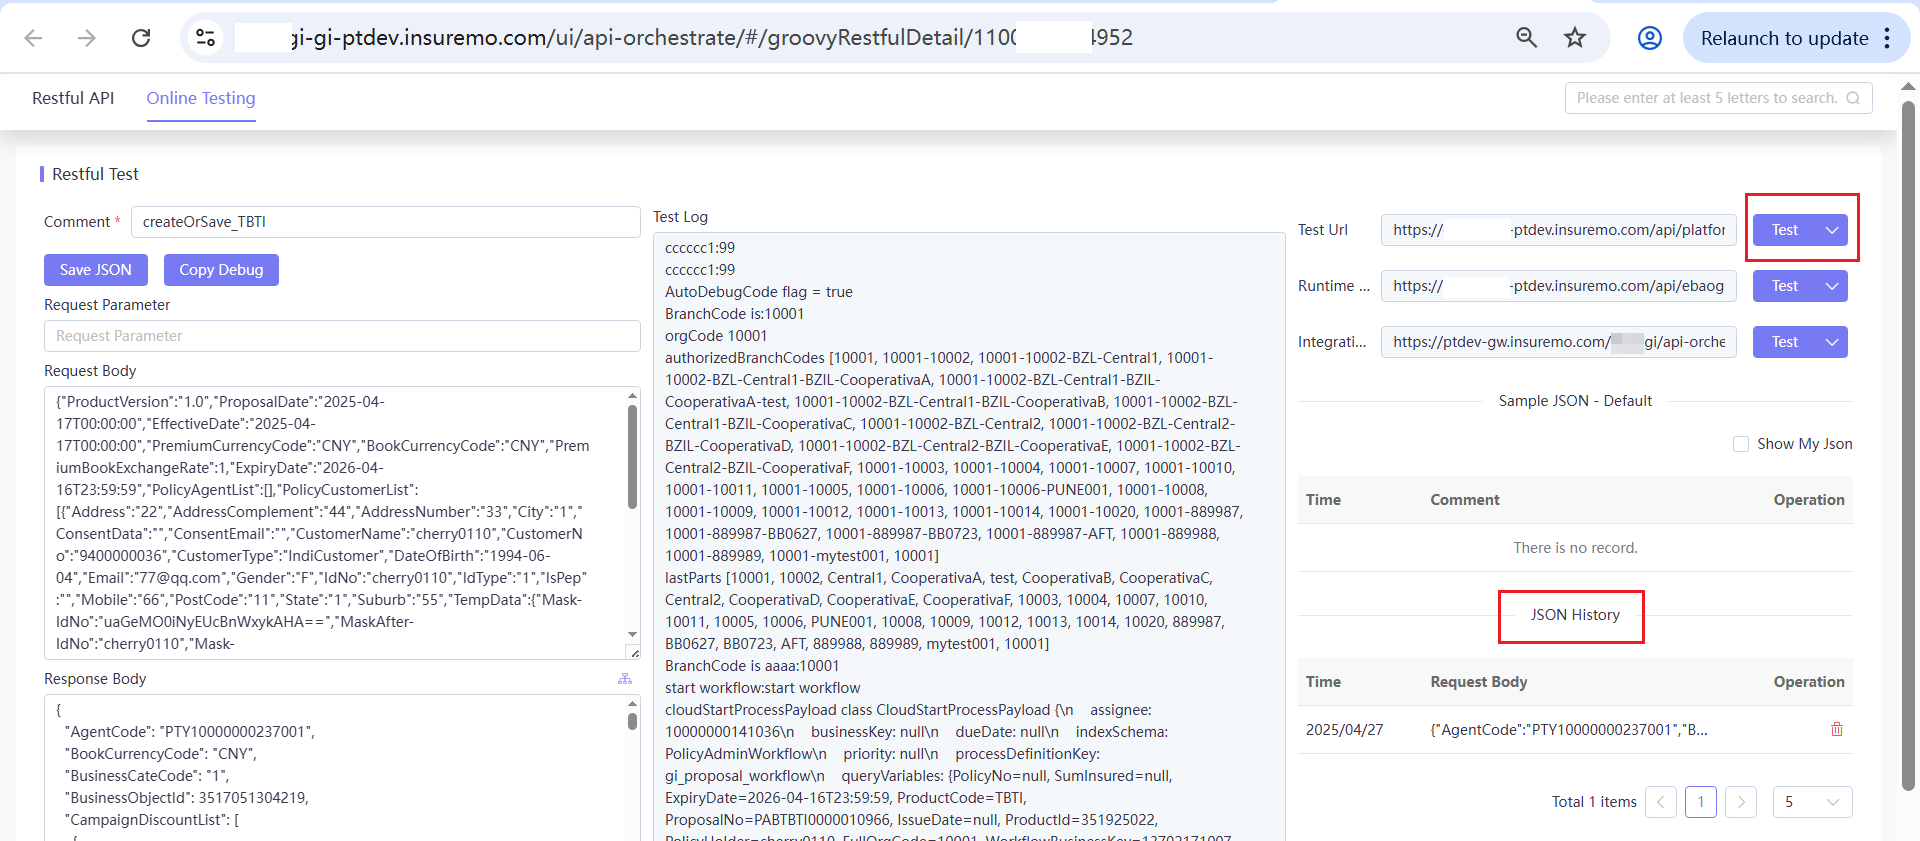
- Test URL: In testing or UAT environments, you can initiate a test request by clicking Test for Test URL. When manipulating data from the UI side, we pass the header x-mo-log-payload: true by default.
- Record Requests and Responses: The request and response values of the Test URL will be fully recorded in the JSON History of iComposer.
- Reproduce Issues Online: Through the History records, you can clearly see the inputs and outputs, which helps to pinpoint the exact point where the issue occurs.
Non-Critical Error Handling
The permission settings in different environments (such as testing and UAT) may vary, which can affect the behavior of the iComposer service. If you find some non-critical errors during iComposer runtime UI usage and these errors do not impact core functionality or user experience, they can be temporarily ignored.
iComposer Batch Implementation
You can view the batch search page by clicking the menu.
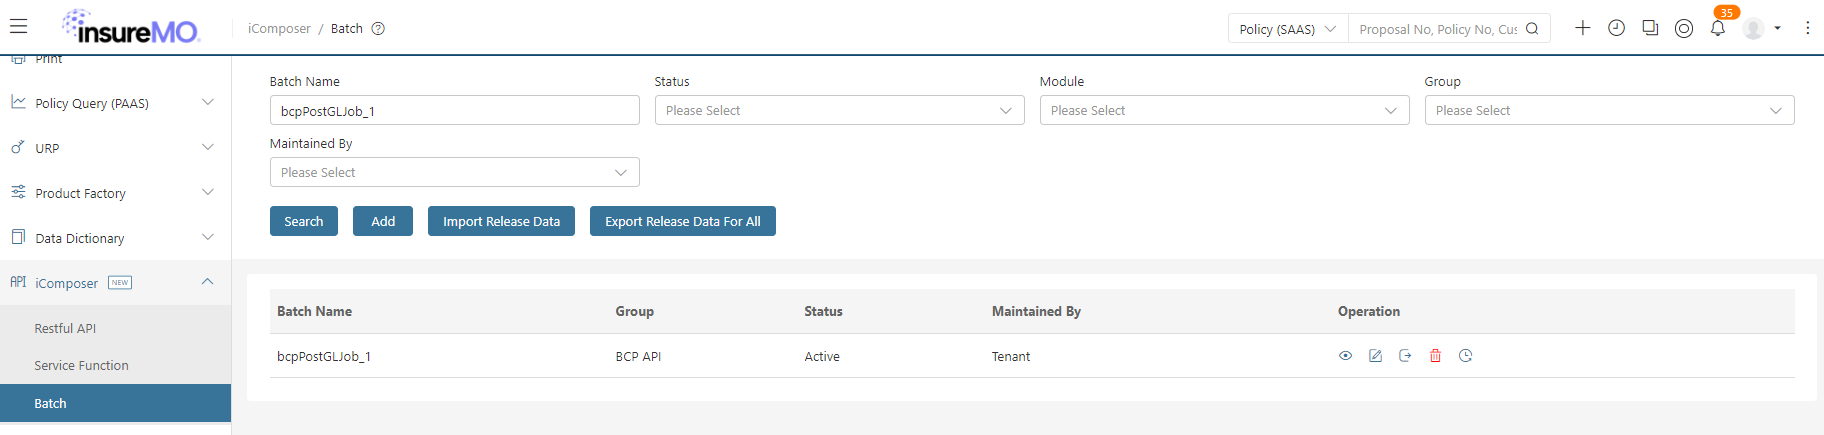
On the batch detail page, you can add or edit a batch. Basically, a batch consists of three elements:
- Batch Definition
- Batch Step
- Batch Step Item
The relationships between these components are one-to-many: a single batch definition can encompass multiple batch steps, and each batch step can have multiple batch step items.
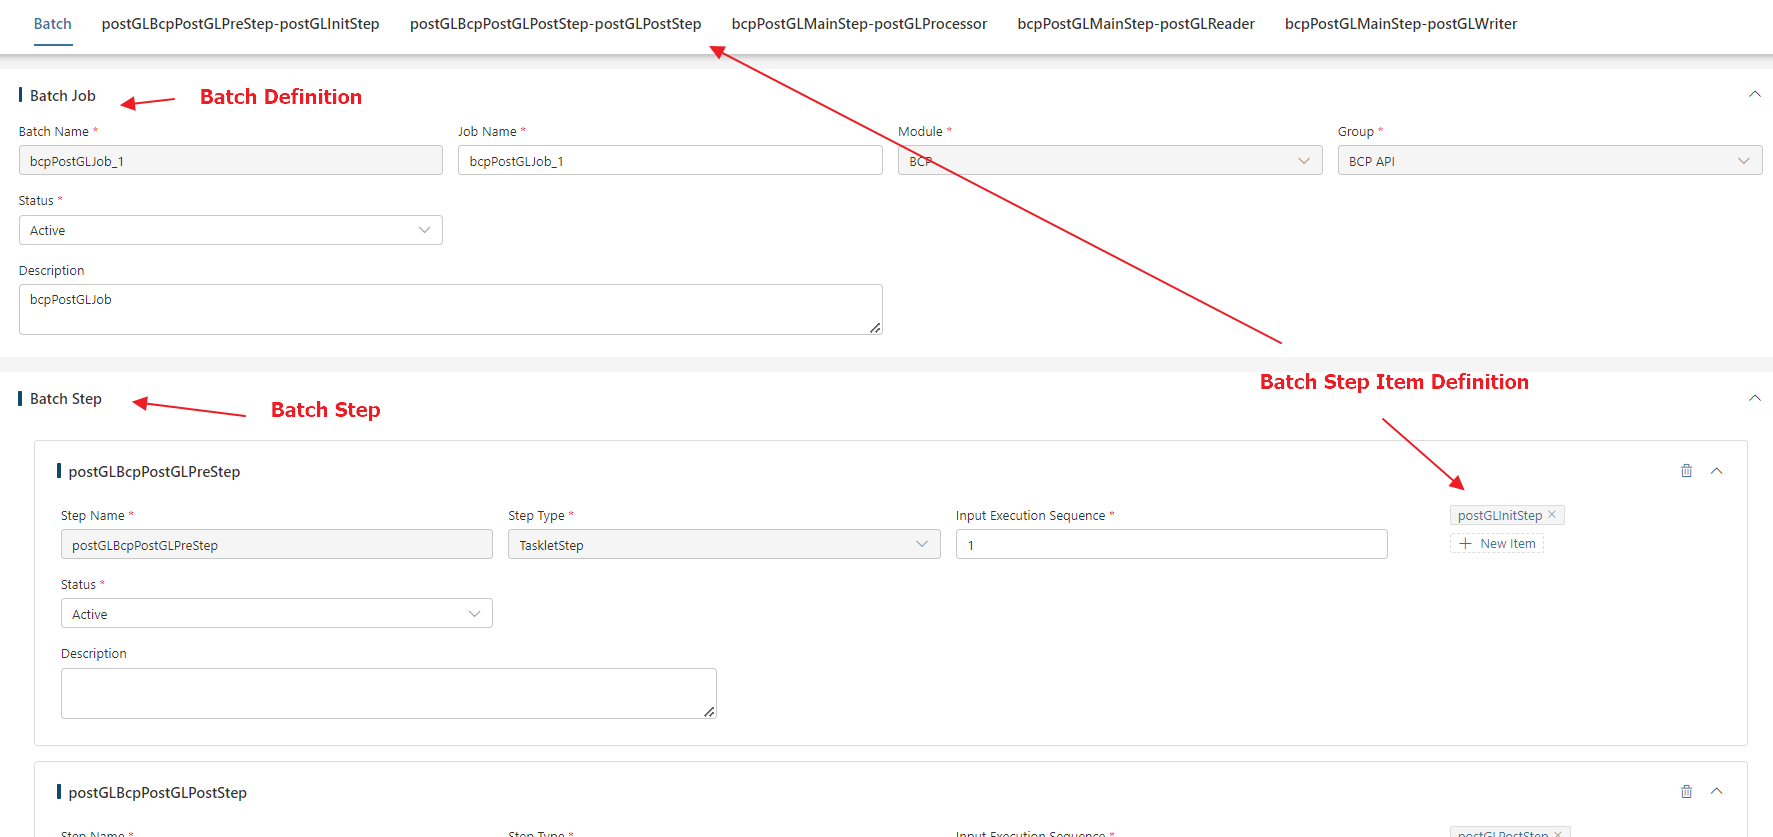
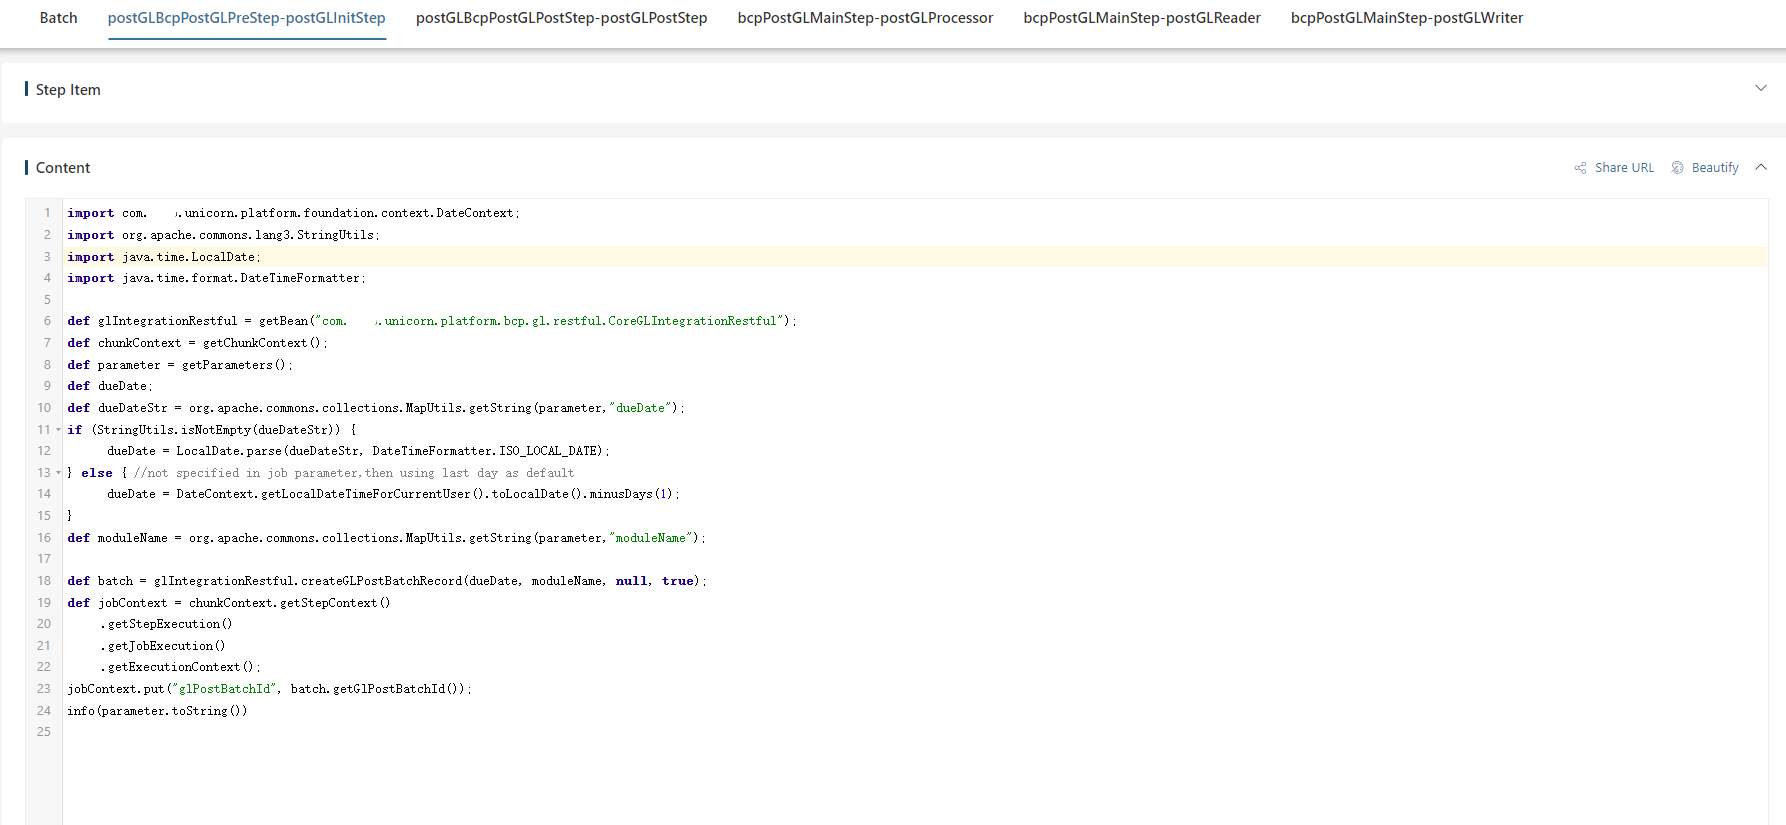
You can add, edit, and delete batch steps and batch step items, with all scripts being maintained at the batch step-item level.
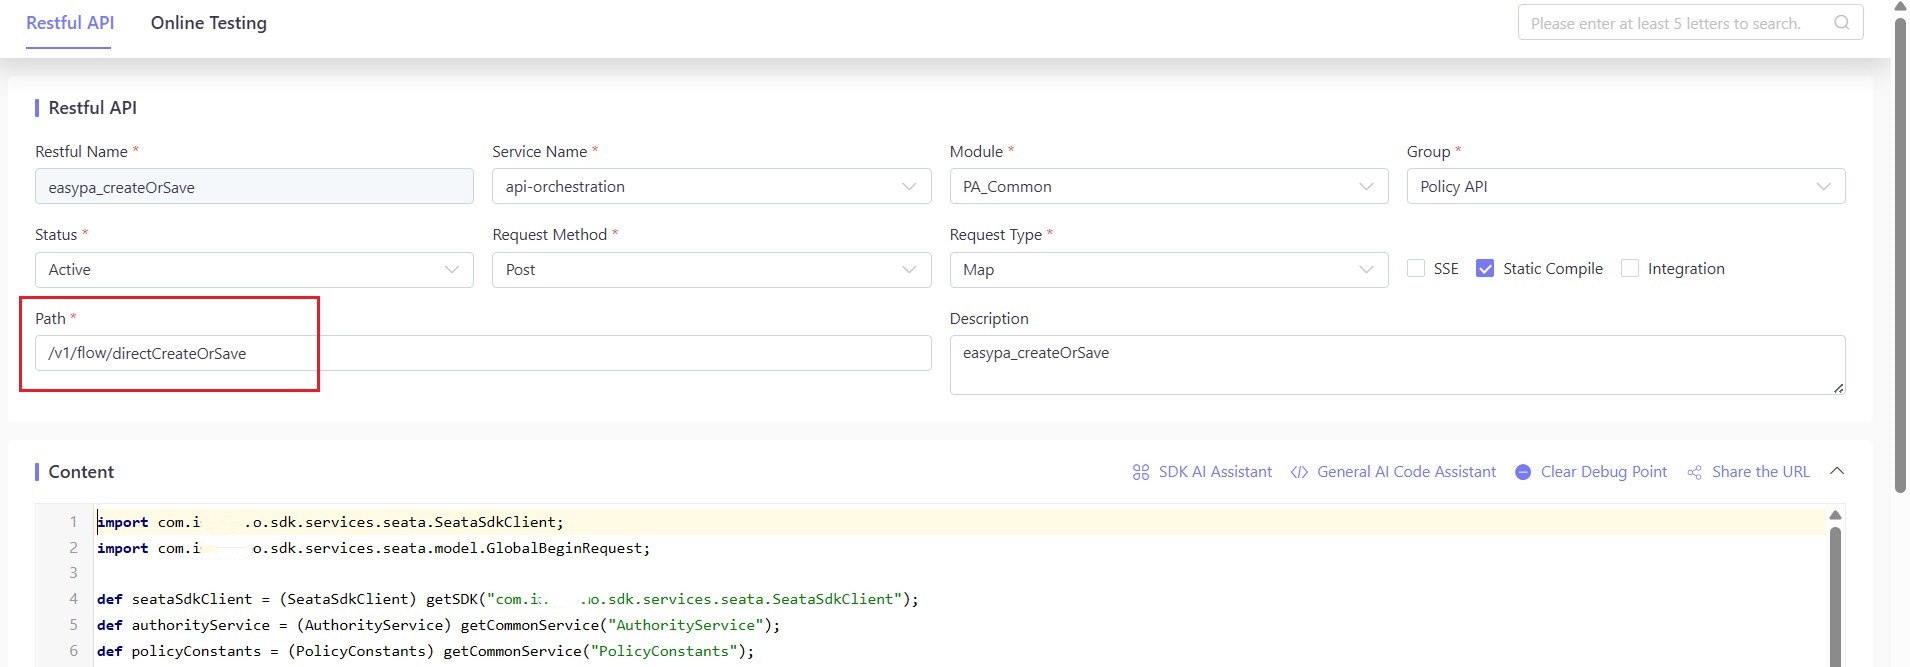
API Path Override
API Path Override is a useful feature. It gives tenants the flexibility to adjust API paths for external system integration and resource reuse. This optimization improves system interaction efficiency and ensures the secure use of platform services within rules.
For RESTful APIs, the path defaults to /v1/flow/Restful Name, but the API Path Override allows developers to customize the part after /v1/flow/. This customization makes the API more adaptable and scalable, meeting different business needs.
In the external integration scenario, tenants often need to adjust the API paths to adapt to the specific naming conventions of third-party systems, thus achieving seamless integration.
For example, when a tenant integrates with a third-party tool, according to the actual situation it can create new tenant-level APIs, subsequently, modify the path fields according to the special requirements of the third-party tool for API endpoints. It should be noted that when setting new paths, it is necessary to avoid duplicate API paths, ensure the uniqueness of API paths at the tenant level, maintain the order of the entire API system.
After the path modification is completed, both the system’s default path and the new path can be used simultaneously. During transition periods such as system upgrades and business process switches, this dual - path parallel mechanism can minimize the impact on existing businesses, enhance the user experience, and significantly improve flexibility and adaptability.
Un-dataMask & Un-entityIdSignature
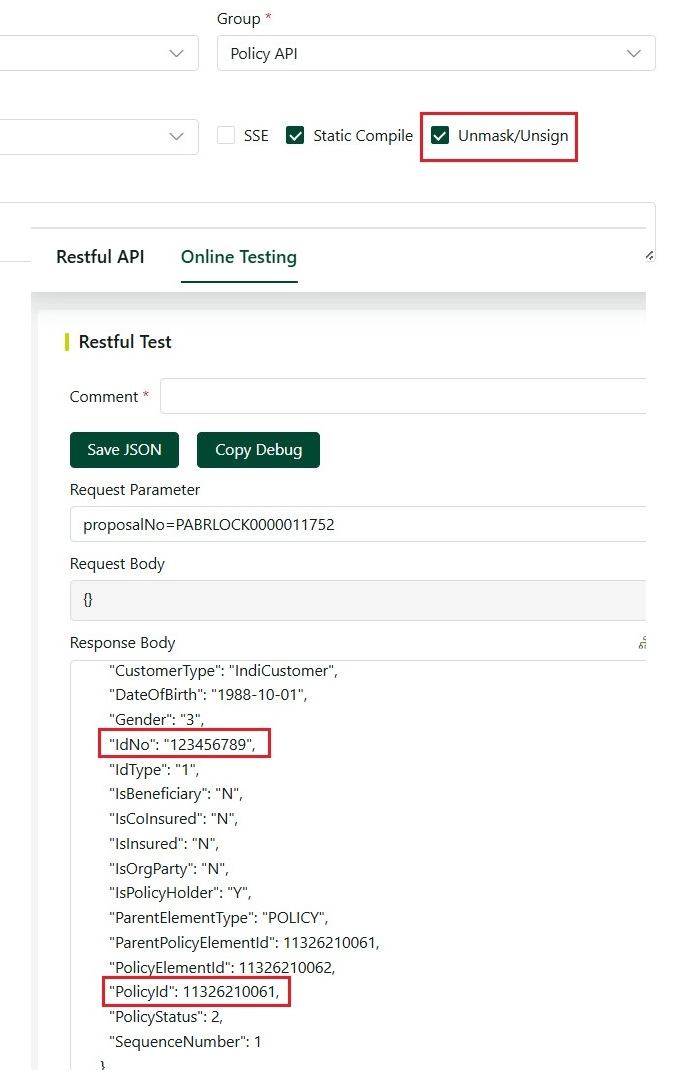
Generally, for security reasons, we enable data masking and signature verification. However, in some specific integration scenarios, based on actual needs and security assessments, we can opt to disable Mask and Entity Sign.
For more detailed information on Data Mask and Entity Sign, please refer to the Security.
Mask and Entity Sign
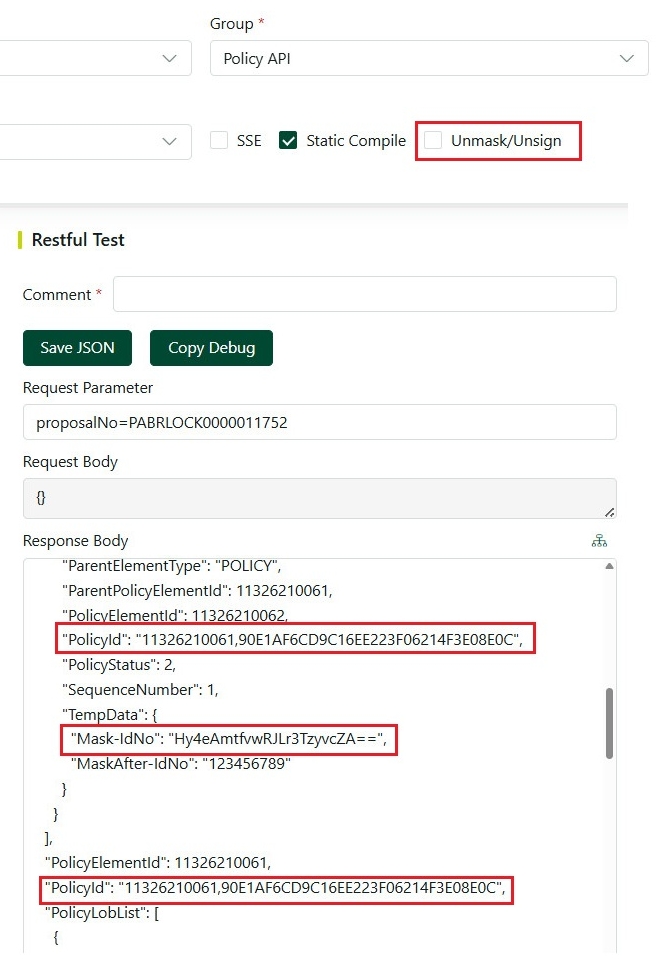
Disable Mask and Entity Sign
SSE (Server-Sent Events)
Server-Sent Events (SSE) is a technology that allows servers to push real-time updates to browsers. It is based on the HTTP protocol and sends data in the form of text streams, enabling browsers to receive updates from the server in real-time. SSE is a simple, efficient, and easy-to-implement technology, particularly suitable for unidirectional communication scenarios from server to client, such as real-time notifications and chat applications.
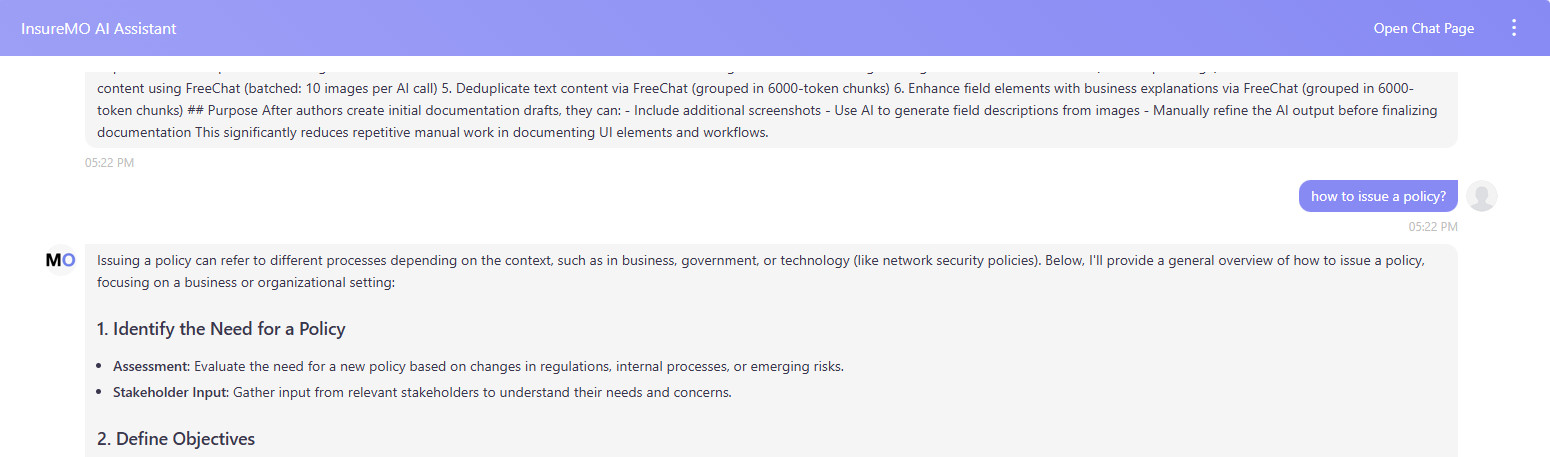
For example, when the SSE feature is enabled in API AI_Chat_Free, the server will transmit data in a streaming fashion, sending one character at a time. The client then displays each character in the chat box sequentially, thereby achieving the effect of messages being displayed character by character, which significantly enhances the interactivity and user experience.
API Example
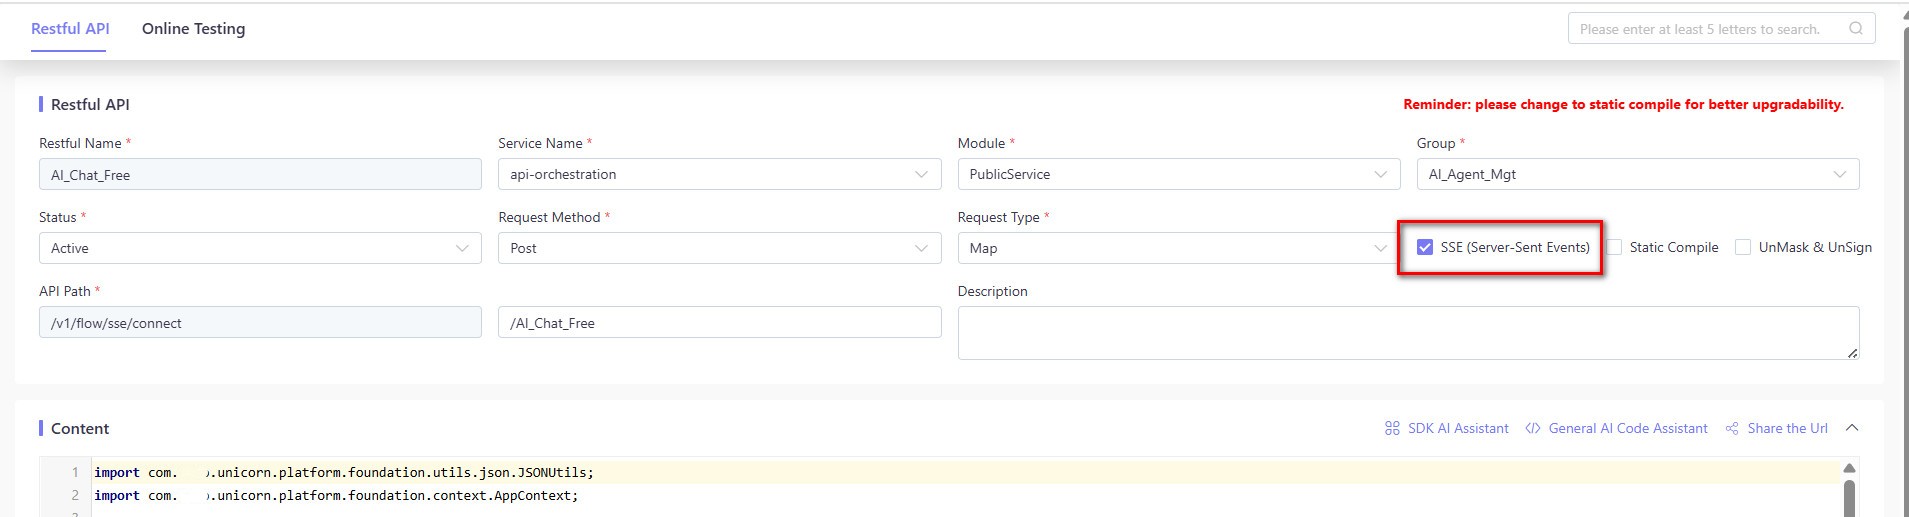
Free chat, character-by-character return.
SDK Configuration(Dynamically Loading SDKs)
Dynamic loading of SDKs allows different tenants’ SDK configurations to be loaded based on their specific needs. This ensures tenant-level isolation of SDKs, enhancing security and flexibility.
If the tenant has configured SDK Configuration, the api-orchestration service depends on it. The tenant must deploy the SDK Configuration data first, then deploy the api-orchestration service; reversing the order will cause the service to fail on startup.
Configuration Steps
-
Add SDK
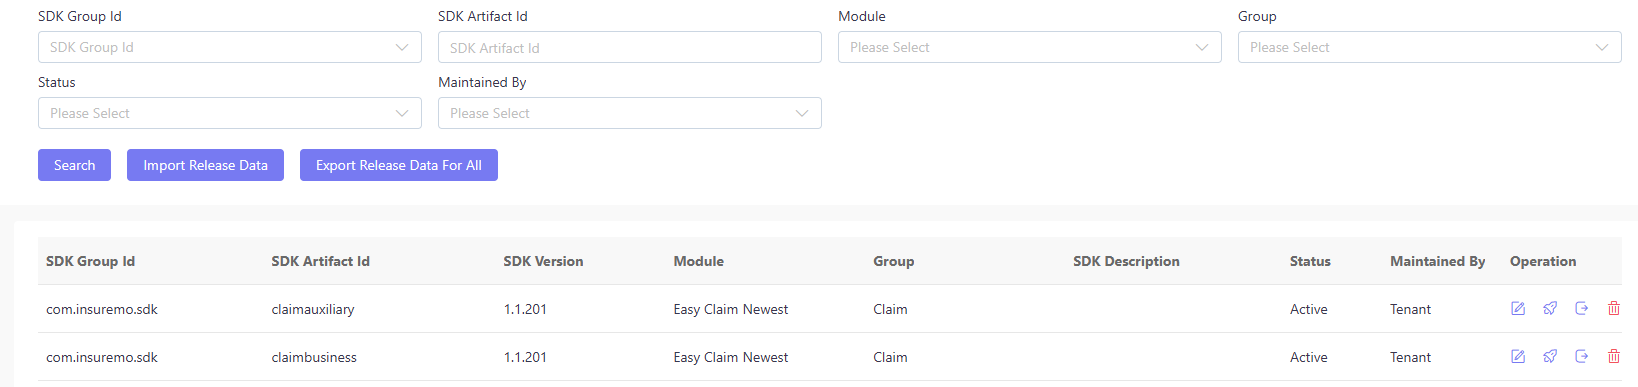
In the SDK configuration, the default SDK Group Id is set to
com.insuremo.sdk.- Scenario 1: Tenant Adds Own SDK
- The tenant selects the default SDK Group Id, which is
com.insuremo.sdk. - Add the required SDK Artifact Id after
com.insuremo.sdk.
- The tenant selects the default SDK Group Id, which is
- Scenario 2: Tenant Adds a New Dependency Jar Package
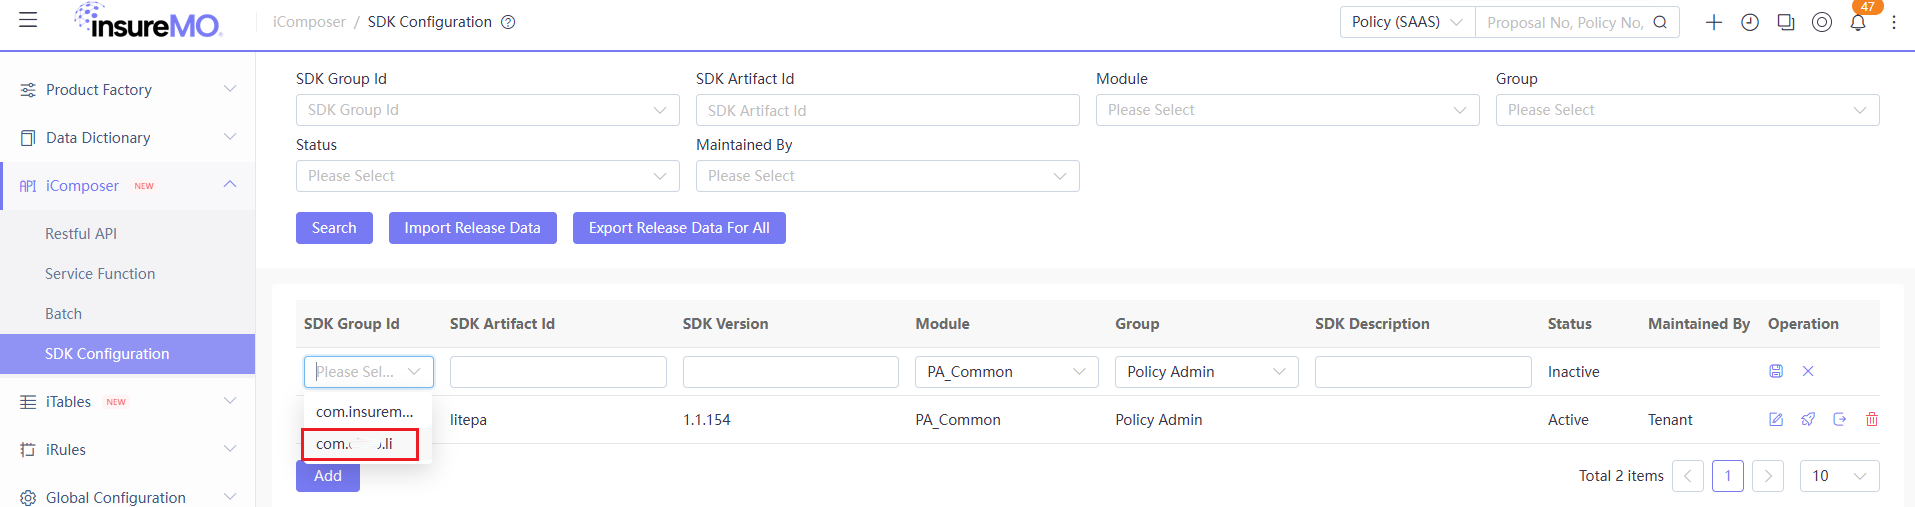
- Submit Application: When a new SDK Group Id (e.g.,
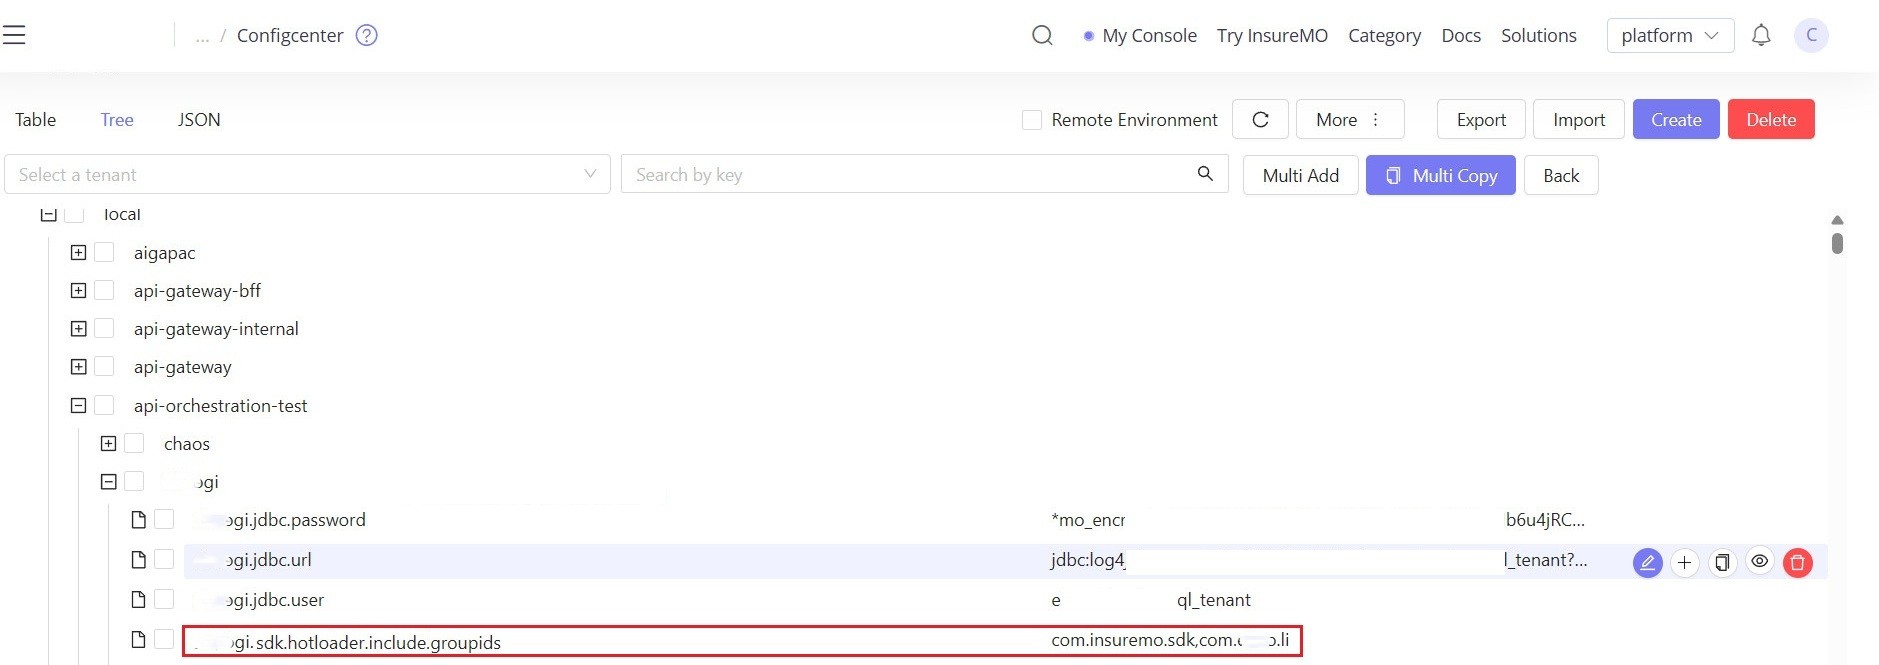
com.xxx.li) needs to be added, the tenant should submit an application through offline communication. - Platform Review: After the platform reviews and approves the application, it will add the parameters (e.g.,
tenantCode.sdk.hotloader.include.groupids=com.insuremo.sdk,com.xxx.li). - Parameter Deployment: Once the configuration parameters are deployed to the tenant’s MC environment, the newly added SDK Group Id
com.xxx.liwill appear in the dropdown list of the tenant’s MC, allowing the tenant to add SDK in SDK Configuration.
- Submit Application: When a new SDK Group Id (e.g.,
- Scenario 1: Tenant Adds Own SDK
-
SDK Configuration
-
Add the SDK configuration information in SDK Configuration Menu.
-
The Status is Inactive.

-
-
Install New SDK
-
Once a new SDK is added, click the install icon, the cache is automatically cleared upon successful installation.
-
The Status change to Active.

-
-
Export Business Data
-
Export and check-in business data.
-
When publishing, prioritize the release of the SDK’s business data before releasing iComposer’s DSL business data.

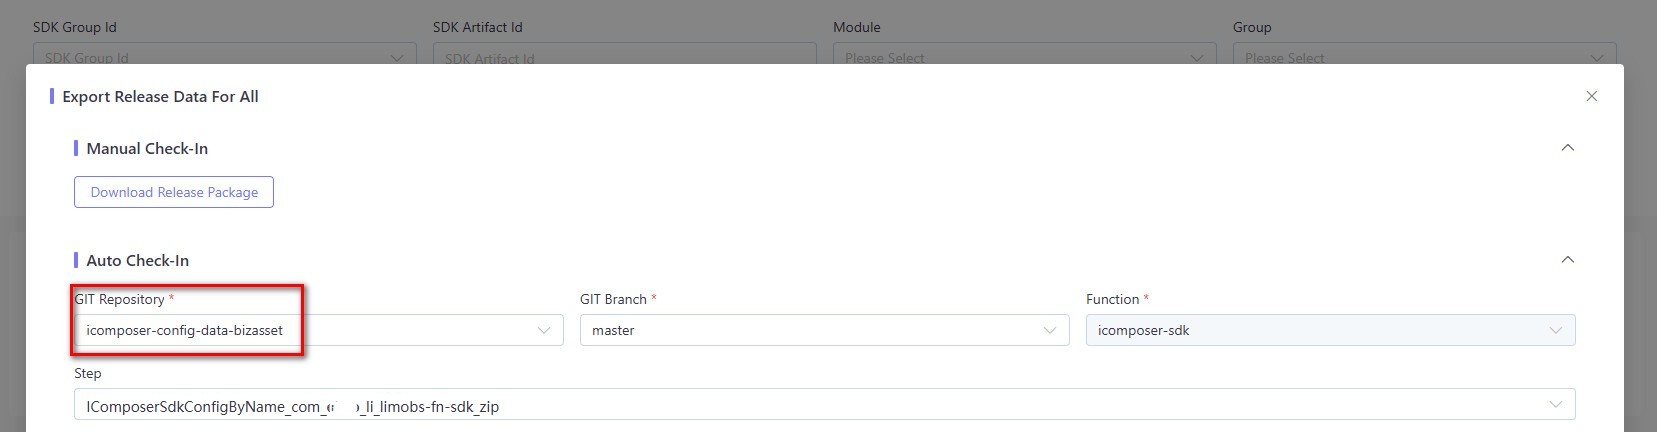
-
Using the Configured SDK with RESTful APIs
After successfully configuring the new SDK, you can use its functionalities through RESTful API or Function. Before configuration, com.xxx.li.framework.dto.ExtendableDTO cannot be used. After configuration, it becomes available for use.
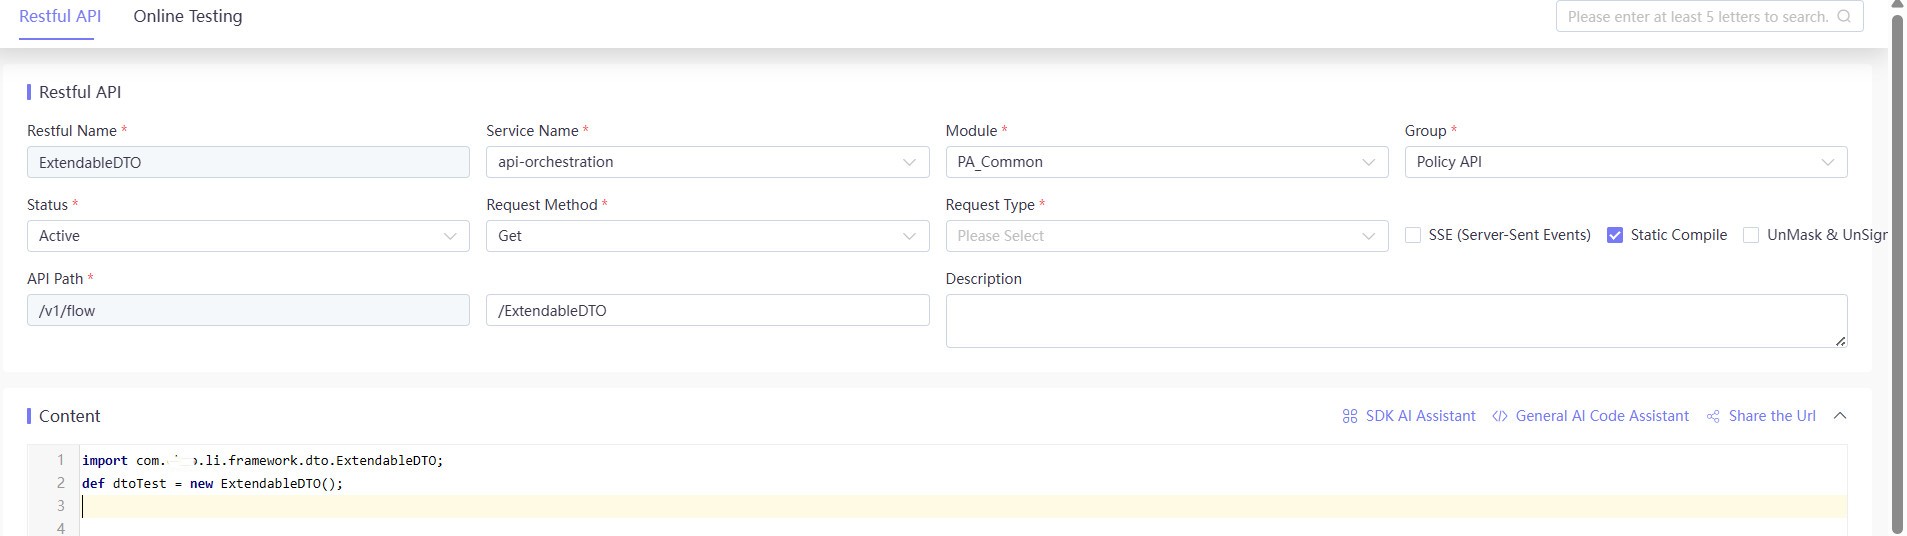
Data Model
When calling an API in the iComposer, a parameter declared only as Map forces consumers to read source code or contact the provider to learn the exact fields. The Data Model feature captures the interface schema visually, giving both front-end and back-end a single source of truth and removing the need for word-of-mouth alignment. It also shortens the learning curve for new team members and eliminates duplicate VO definitions for core developers.
Key capabilities
-
Zero-code modelling Create data models quickly through a visual editor.
-
Smart import Paste a JSON sample to generate the model structure automatically.
-
API Spec APIs that reference the model expose up-to-date documentation instantly.
-
Instant effect Changes made in the same environment can be tested immediately, with no SDK release required.
-
Config distribution Supports exporting the configuration from the MC environment as a business-data package and deploying it to other environments.
Data Model Search Pages
On the search pages, you will see all configured Data Model. Also, there are several operations you can perform.
| Operations | Description |
|---|---|
| Search | The system provides search criteria for you to choose from. After inputting or selecting the criteria, click Search. |
| Create | If you want to create a Data Model, click Add. |
| View | After searching and locating the existing Data Model, you can click View for details. In the view mode, all the information will be read-only. |
| Edit | After searching and locating the Data Model, you can click Edit to edit related information. |
| Copy | After searching and locating the Data Model, you can click Copy. A window will pop out with all the details of the selected Data Model, excluding the name. You need to name this new Data Model before saving. |
| View History | After searching and locating the Data Model, you can click View History for the edit history on the configuration audit page. |
| Sample JSON | Generate a sample JSON for the Data Model you configured. |
Data Model Detail Pages
-
After you add or edit a Data Model, a window will pop out for you to maintain the detailed information.
-
You can enter the basic attributes of the Data Model—Name, Module, Group, Status, and Description. Note that the Name must be unique, otherwise you will receive the error “Save failed: Duplicate DataModel name.”
-
If you are adding a new record, after filling in the attributes and clicking the Save button, an empty JSON Schema that conforms to the Swagger specification will be automatically generated. And an icon labeled Maintain Model Structure appears in the upper-right corner of the Content section.
-
The Content section is not entered manually; it is configured through the page. Clicking
Maintain Model Structureopens a new window where you can configure the model structure. -
On the model structure page, the left panel shows the model tree; the right panel displays details for the selected node.
- Initialize the model tree: you must select either “Add Node” or “Import JSON” at the top. “Add Node” lets you manually create the root node. “Import JSON” lets you upload a standard message sample; the system parses it and auto-generates the complete model tree, which becomes the baseline for further editing.
- Visual adjustment: every right-hand property panel has its own Add button, allowing you precisely insert a Field, a nested Class, or a sibling Element in the current context. Each record can be viewed, edited, or deleted.
- One-click freeze: when the configuration is complete, click Save at the bottom right. The front-end serializes the current model tree into a Swagger-compliant JSON Schema, sends it to the back-end, which compiles it into the corresponding Groovy class and stores it in the model repository.
- Iterative cycle: inside the iComposer IDE plugin run “LoadAllModels” to download the Groovy classes into your local project and reference them immediately.
Click Save in the bottom-right corner of this page to apply your additions or changes; otherwise, all changes will be lost.
Data Model Usage Sample
- Create a Data Model named
LiPaCancellationRequestand generate its schema.
{
  "components" : {
    "schemas" : {
      "AlteredCoverage" : {
        "type" : "object",
        "title" : "AlteredCoverage",
        "description" : "",
        "properties" : {
          "@type" : {
            "type" : "string"
          },
          "CoverageId" : {
            "type" : "integer",
            "format" : "int64"
          }
        }
      },
      "CancellationInput" : {
        "type" : "object",
        "title" : "CancellationInput",
        "properties" : {
          "@type" : {
            "type" : "string"
          },
          "AlteredCoverages" : {
            "type" : "array",
            "items" : {
              "$ref" : "#/components/schemas/AlteredCoverage"
            }
          },
          "CancellationReason" : {
            "type" : "integer",
            "format" : "int32"
          }
        }
      },
      "LiPaCancellationRequest" : {
        "type" : "object",
        "title" : "LiPaCancellationRequest",
        "properties" : {
          "AlterationEffectiveType" : {
            "type" : "string"
          },
          "ApplyTime" : {
            "type" : "string",
            "format" : "date-time"
          },
          "CancellationInput" : {
            "$ref" : "#/components/schemas/CancellationInput"
          },
          "EffectiveDate" : {
            "type" : "string",
            "format" : "date-time"
          },
          "PolicyNumber" : {
            "type" : "string"
          }
        }
      }
    }
  }
}- On the Restful API edit page,Request Type choose Custom
LiPaCancellationRequest.
import com.insuremo.icomposer.platform.groovy.generator.code.model.LiPaCancellationRequest
import com.insuremo.icomposer.platform.groovy.generator.code.model.LiPaCancellationRequest.AlteredCoverage
import com.insuremo.icomposer.platform.groovy.generator.code.model.LiPaCancellationRequest.CancellationInput

// get service input
Map serviceInput = (Map) RequestBody()
LiPaCancellationRequest req = IComposerJsonUtils.mapToObject(serviceInput, LiPaCancellationRequest.class)

CancellationInput cancellationInput = req.cancellationInput
List<AlteredCoverage> coverageInputs = cancellationInput.alteredCoverages
Integer cancellationReason = cancellationInput.cancellationReason- Click the APISpec button of the API to open a popup that displays the complete Swagger documentation, including the URL, request/response schemas, and field descriptions.
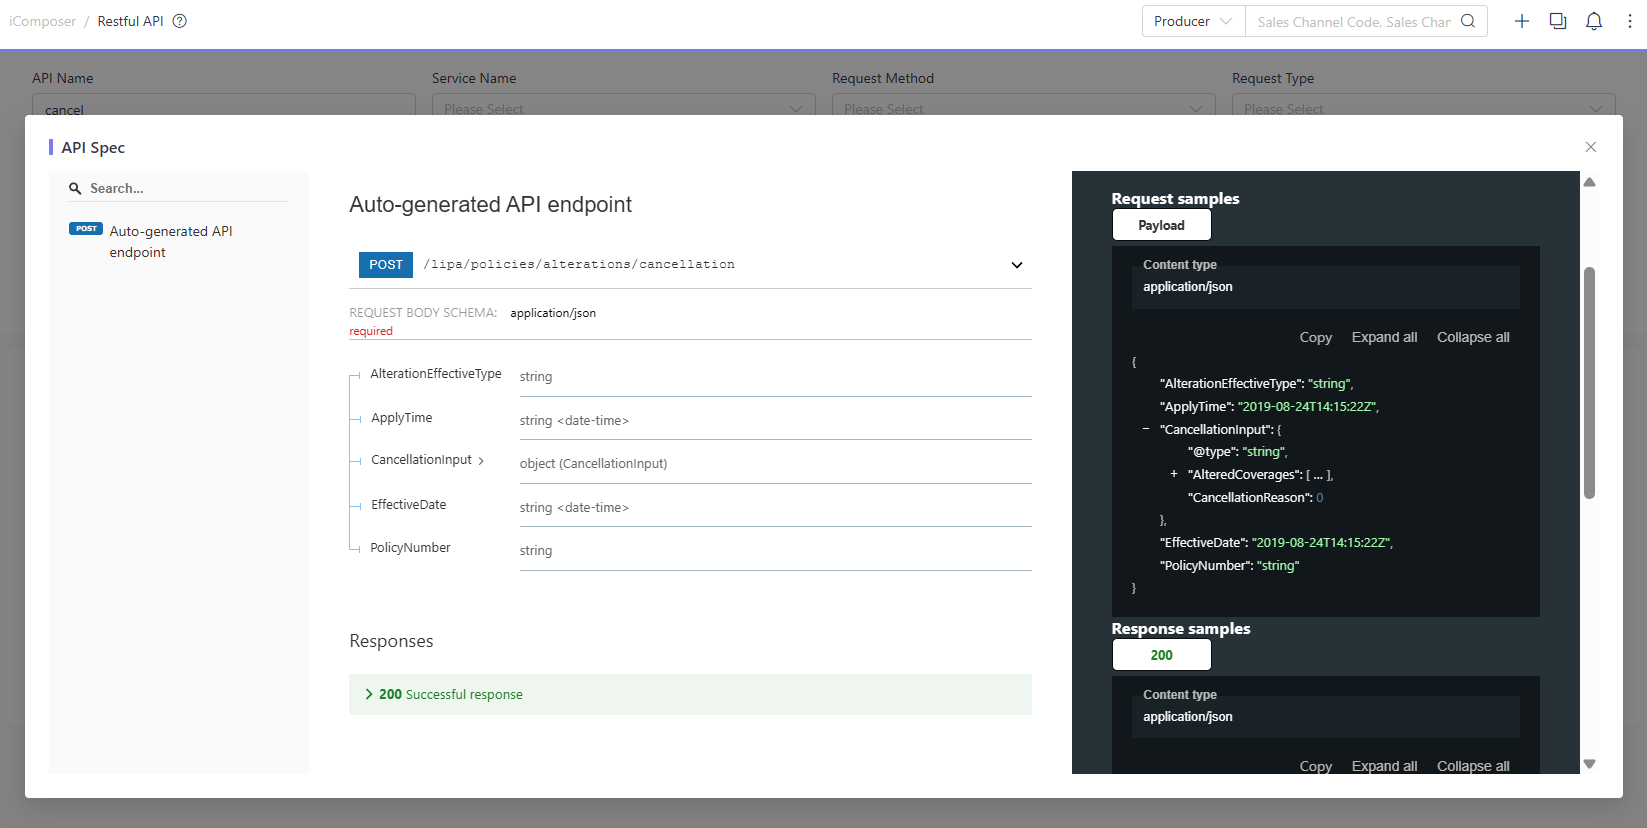
Dynamic Entity
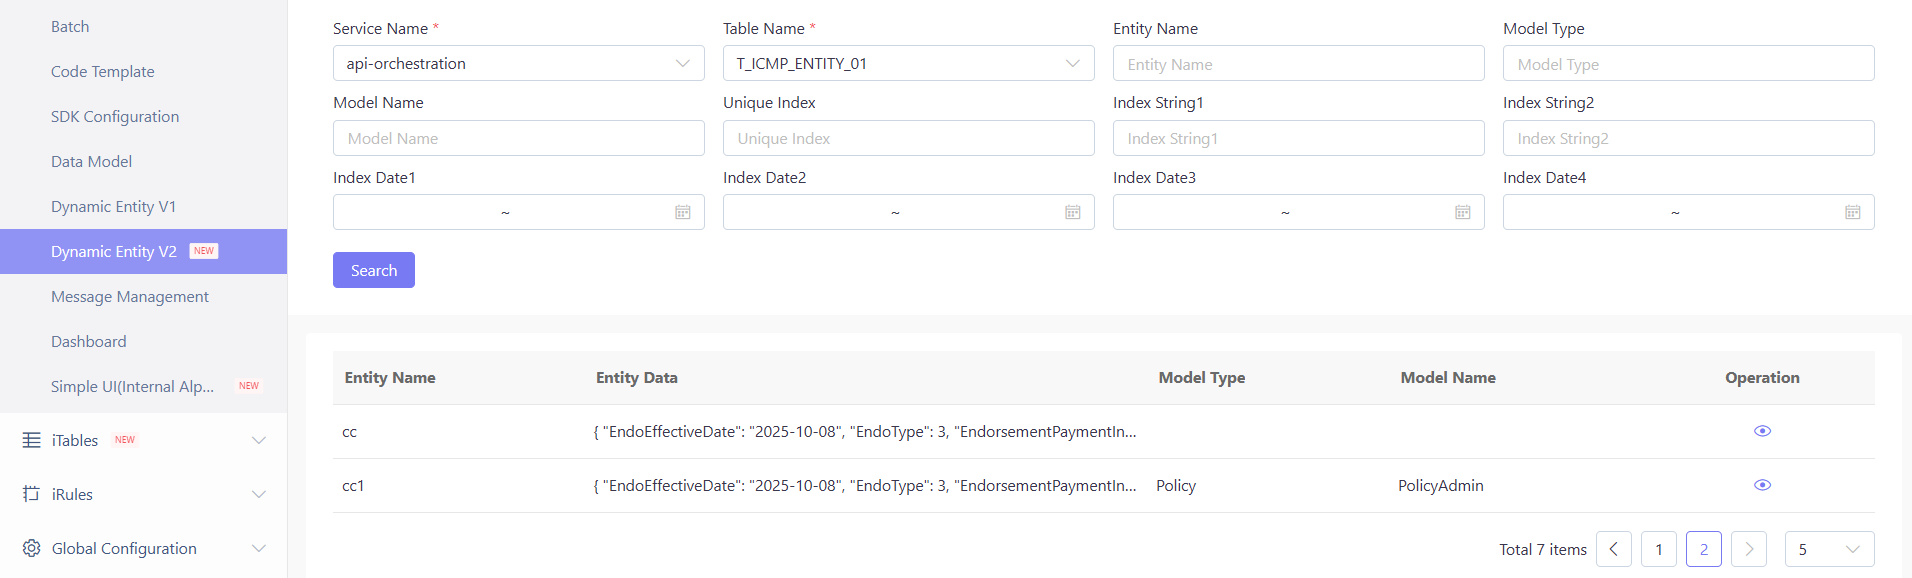
Dynamic Entity gives IComposer a document-database feel: no need to create or alter tables, and no direct database access is required. Any structure can be written instantly and automatically indexed. A built-in visual query page lets you search and filter with a few clicks—simple as flipping through a document—while staying as secure and index-efficient as a relational database.
Dynamic Entity V1(IComposerDbDataUtils)
For tenants who are already using IComposerDataService or IComposerDbDataUtils, please refer to IComposerDbDataUtils.
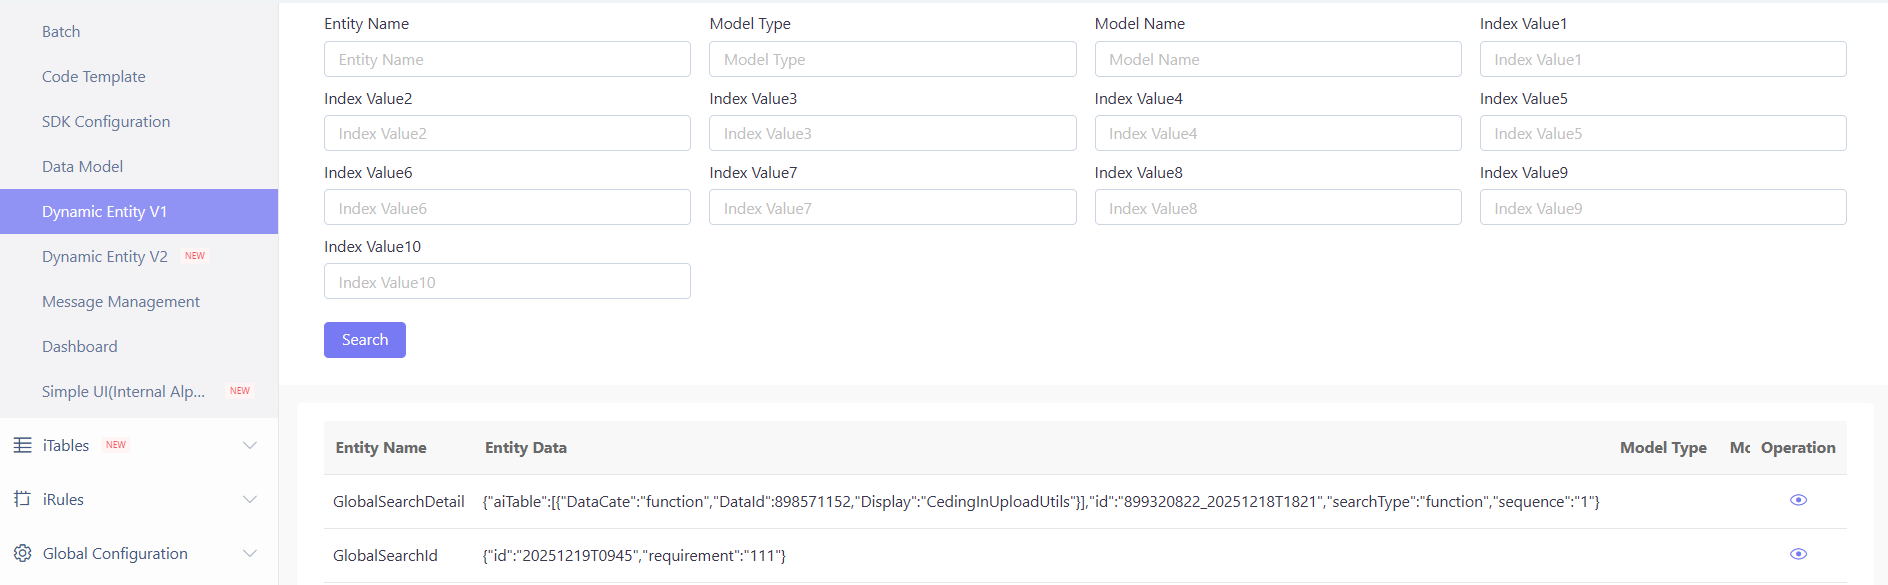
Dynamic Entity V2(IComposerDataAccessorUtils)
- For tenants implementing this functionality for the first time, we recommend using IComposerDataAccessorUtils.
Message Management
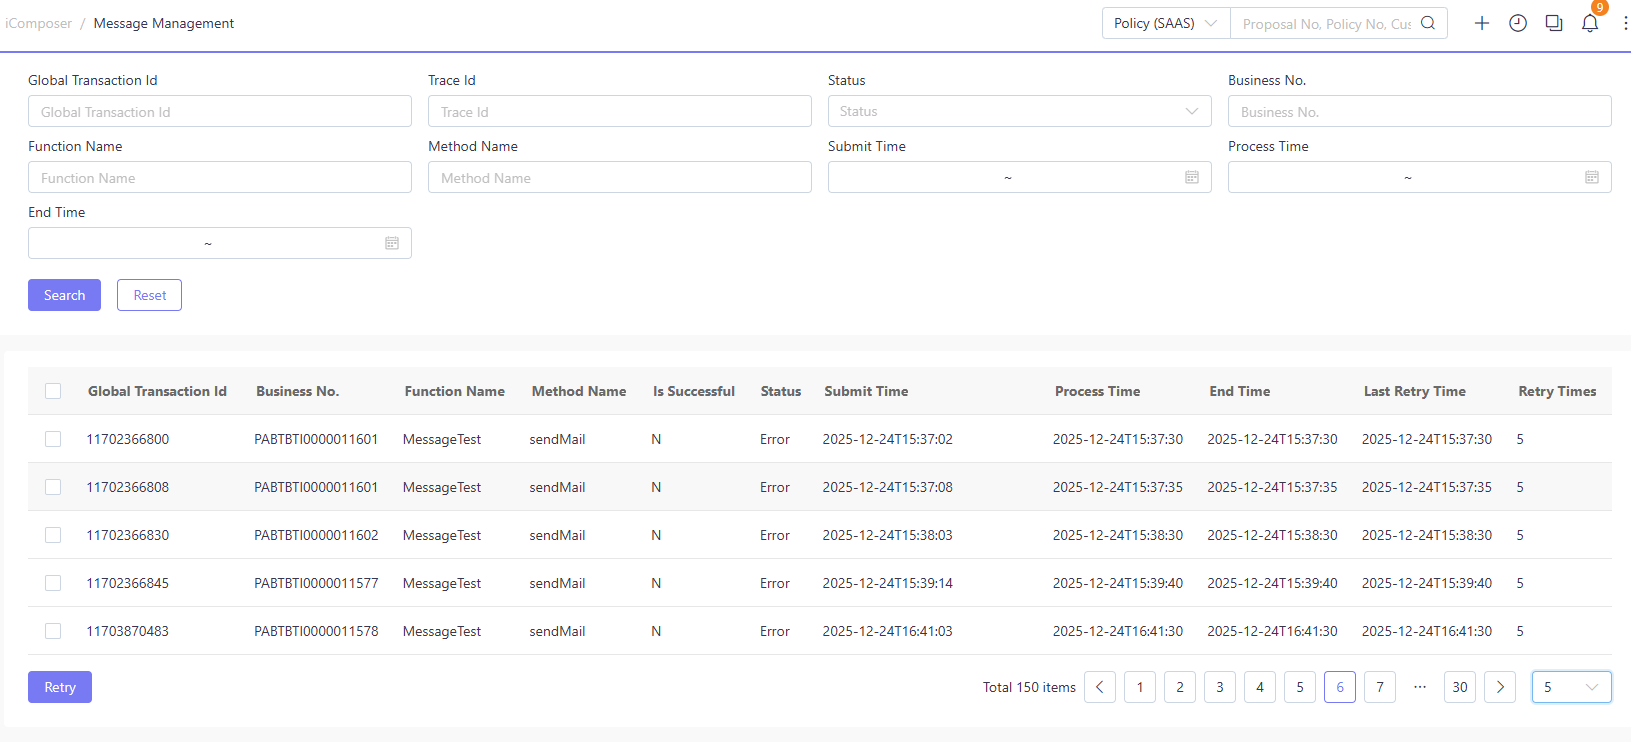
The Message Management Module in iComposer is designed to centrally collect and process all system-generated messages. Its core value lies in providing a unified message entry point, allowing quick location of key information, facilitating task tracking.
For detailed usage examples, please refer to IComposerExecutorUtils.
Message Search UI Any message that has failed more than 5 times can be retried directly on the page: simply tick the checkbox next to it and click Retry.
InsureMO Asset Reusage
Reuse Platform or Region Implementation
There can be platform or business core or business region (record usage = 2,3,4) three layers tenant can potentially reuse. They are different than your tenant layer (record usage = 5). After deployment, you will not be able to change implementation and only be able to reuse or override implementation. So such implementation is always subject to upgrade.
Basically, after onboarding, you can already find some design-time AI capability implementation achieved by iComposer and reuse.
Reuse platform assets-Restful API
To enhance the conciseness and readability of this document, “platform” will be used to refer to “platform/business region/business core” hereinafter.
When tenants expect to use platform API without path change, but want to change the internal logic script, they can achieve this by copying the API and retaining the default Path. On the Restful API page, tenants can conveniently perform the operation of copying the platform API. The path of the newly generated API will be exactly the same as the path of the platform.
Subsequently, tenants can modify the code scripts according to the unique needs of their own businesses. After the code scripts are adjusted, when the system executes an API call, according to the established rules, if the platform and the tenant has the same API path, the tenant’s customized logic will be called preferentially.
This mode of operation has significant advantages:
- In terms of compatibility, subsequent operations such as platform upgrades and maintenance will not interfere with the tenants’ use of the API, ensuring the continuous adaptation of the tenants’ businesses to the platform’s ecosystem.
- From the perspective of meeting personalized needs, tenants are able to flexibly shape the internal logic according to their own business processes and rules, achieving differentiated business operations.
- Most importantly, this greatly saves development time. Without having to build a brand-new API from scratch, tenants can quickly integrate customized logic into existing business processes, significantly improving the efficiency of business iteration.
Reuse platform assets-Function
To enhance the conciseness and readability of this document, “platform” will be used to refer to “platform/business region/business core” hereinafter.
Tenants can use Platform Functions under two conditions:
- Service Must Be Public
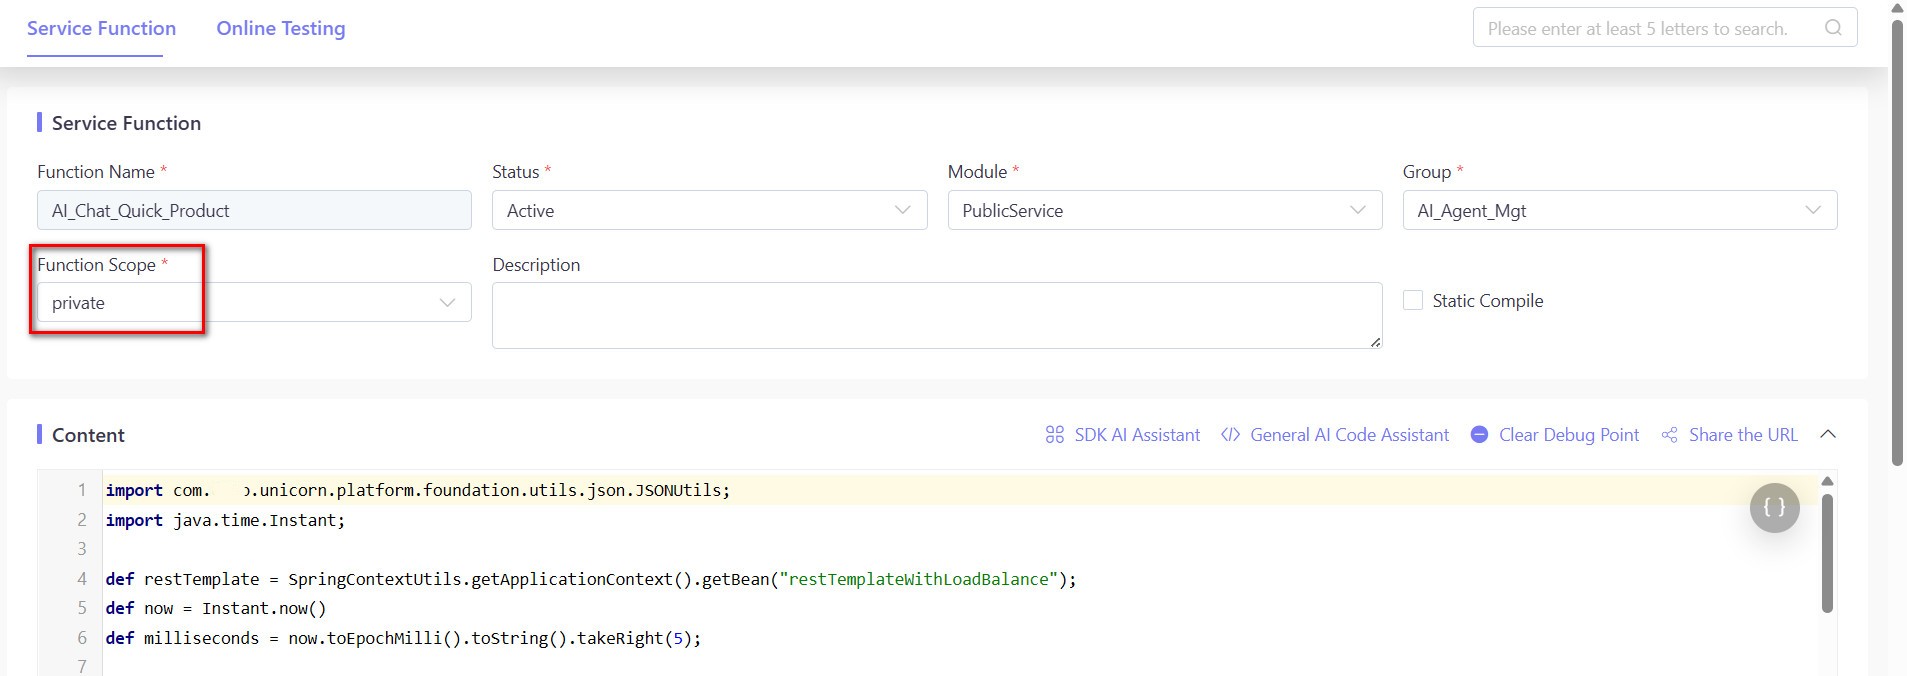
When calling a function of the platform, the function scope is a crucial factor to be confirmed. When the function scope is public, users can smoothly call it. However, if the function scope is set to private, the call cannot be completed. Taking the Alt tool(auto-suggestion script) as an example, when the function is private, Alt will not provide hints for this method. Even if users are aware of the method and enter it manually, the system will still report an error when performing the save operation, indicating that the corresponding method cannot be found.
The platform functions serve as important building blocks for the platform’s core business logic. When the platform optimizes the performance of basic functions or changes their implementation logic, to avoid interfering with tenants’ business operations, the platform currently defaults to setting existing functions as private to prevent tenants from directly accessing them. With this setting, the platform can achieve seamless upgrades without affecting tenants’ normal use.
For tenants, if there is a need to use the logic of specific platform functions, a feasible approach is to copy the function and make flexible adjustments according to their own business requirements. This approach ensures the relative independence between the platform function logic and the tenant function logic, satisfying the personalized needs of tenants while also guaranteeing the stability and maintainability of the platform.
- Method Must Not Be Private
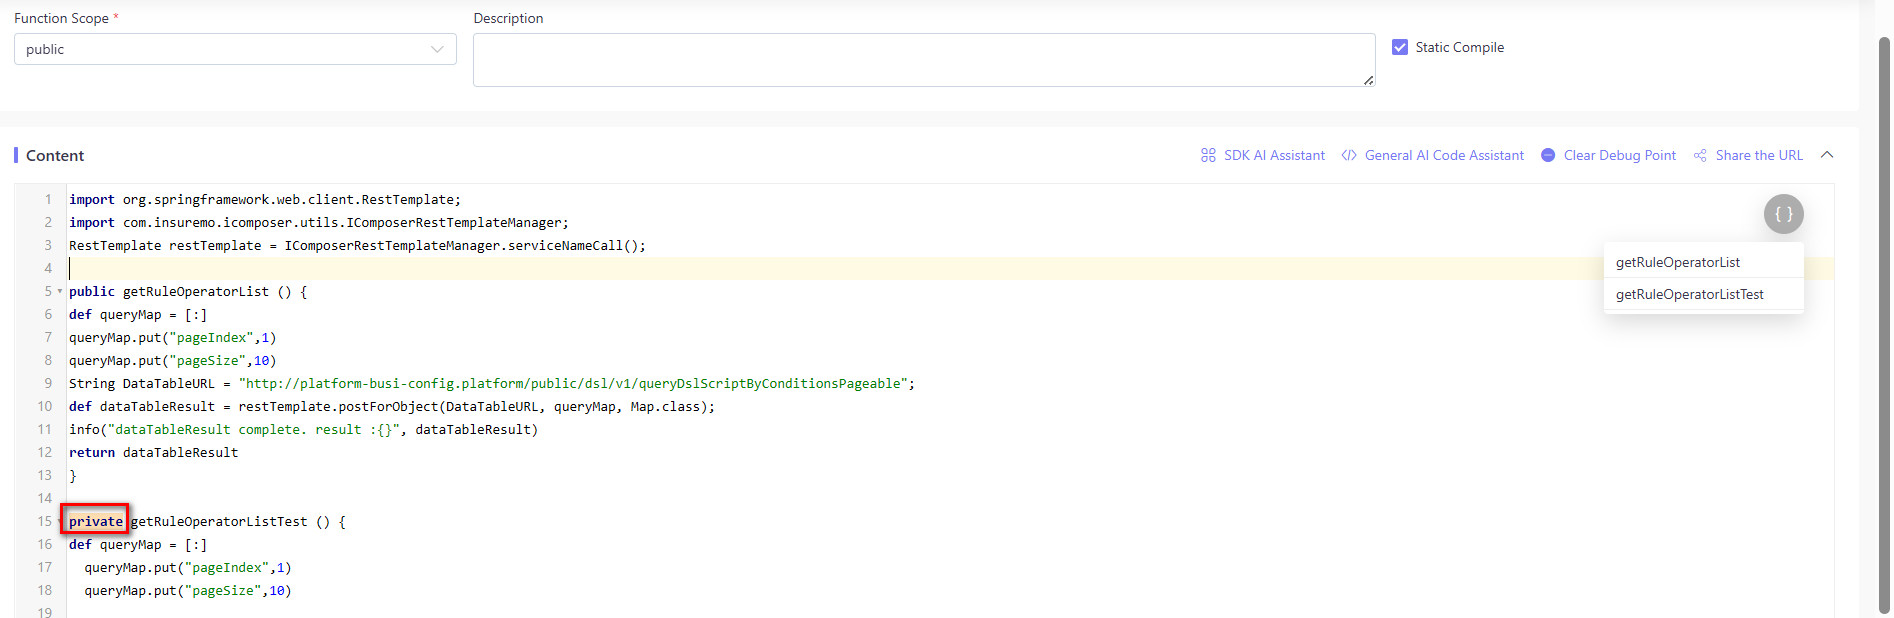
When the platform API function scope is set to public, tenants can call it. But if the methods under this function are set to private, they remain inaccessible. Additionally, these private methods will not be shown in the Alt tool(auto-suggestion script). If you forcefully type them manually and try to save, the system will report an error.
Reuse Tenant Implementation from Other Tenant
There can be tenant level iComposer implementation given by other Apps which is same as tenant layer (record usage = 5). After deployment, you will be able to directly work on such implementation. Such implementation will not be subject to upgrade because they will ever know whether you have changed it or not.
This is mostly one time copy approach and suitable for all our App onboarding like Easy App or Gemini App.